
Google Maps Static APIを使ってFlutterで地図画像を表示する
Google Maps Static API を使って Flutter で地図画像を表示する方法です。
Maps Static API は以下のエンドポイントに API キーと緯度経度を指定してマーカー付きの地図画像を取得することができます。
https://maps.googleapis.com/maps/api/staticmap?center=Brooklyn+Bridge,New+York,NY&zoom=13&size=600x300&maptype=roadmap
&markers=color:blue%7Clabel:S%7C40.702147,-74.015794&markers=color:green%7Clabel:G%7C40.711614,-74.012318
&markers=color:red%7Clabel:C%7C40.718217,-73.998284
&key=YOUR_API_KEY
今回は地図画像を取得して Flutter のアプリ内に表示したいと思います。

環境
- macOS Big Sur 11.2.3
- Android Studio 4.1.3
- Flutter 2.0.3
- Dart 2.12.2
Maps Static API を有効にする
Google Cloud Platform (以後 GCP)の Google Maps Platform にアクセスします。
URL は https://cloud.google.com/maps-platform/ になります。
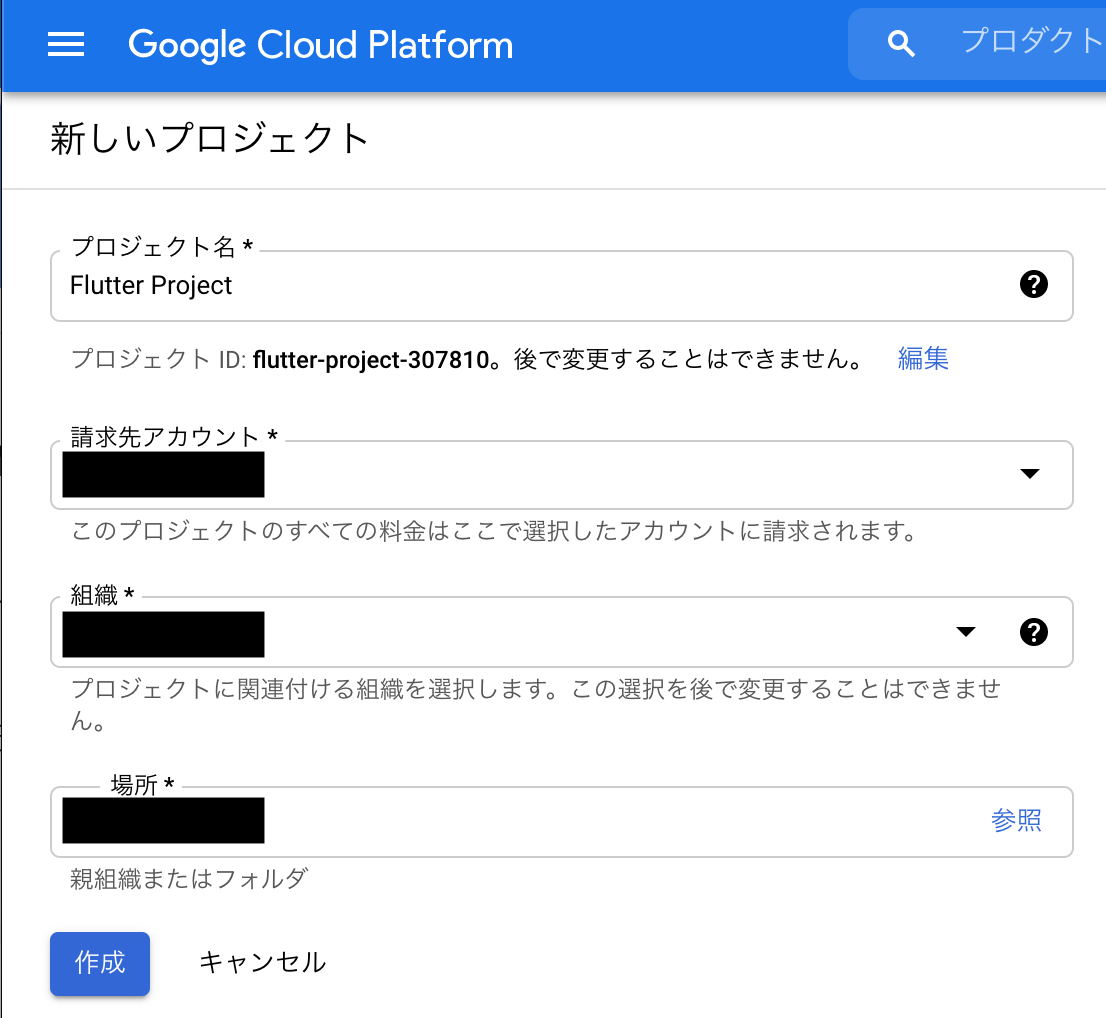
プロジェクトが無ければ新規プロジェクトを作成を行います。
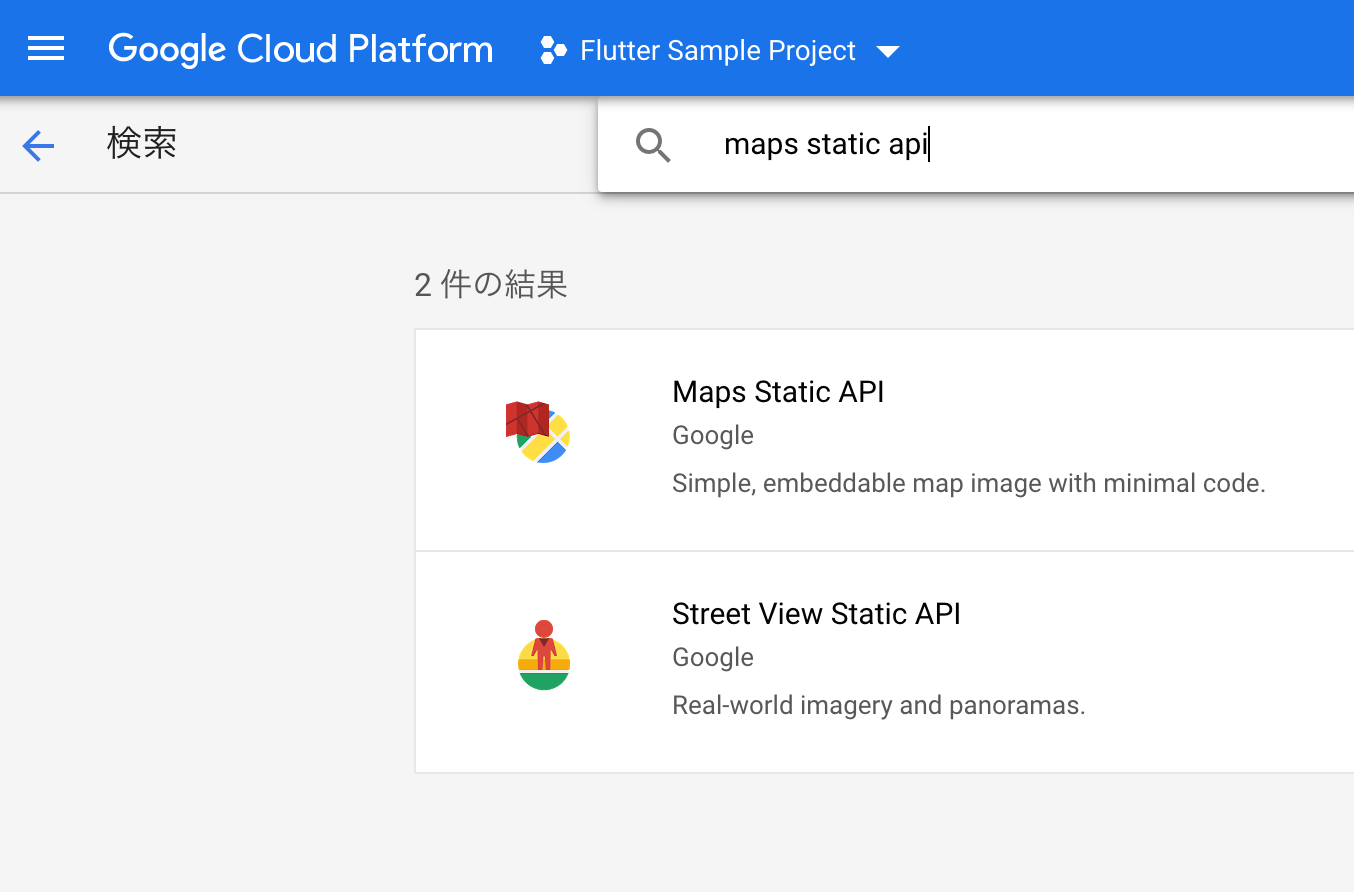
GCP の左上メニューから API とサービス > ライブラリから API ライブラリ画面を開き、キーワード検索で maps static api を入力します。
Maps Static API が検索結果に表示されます。
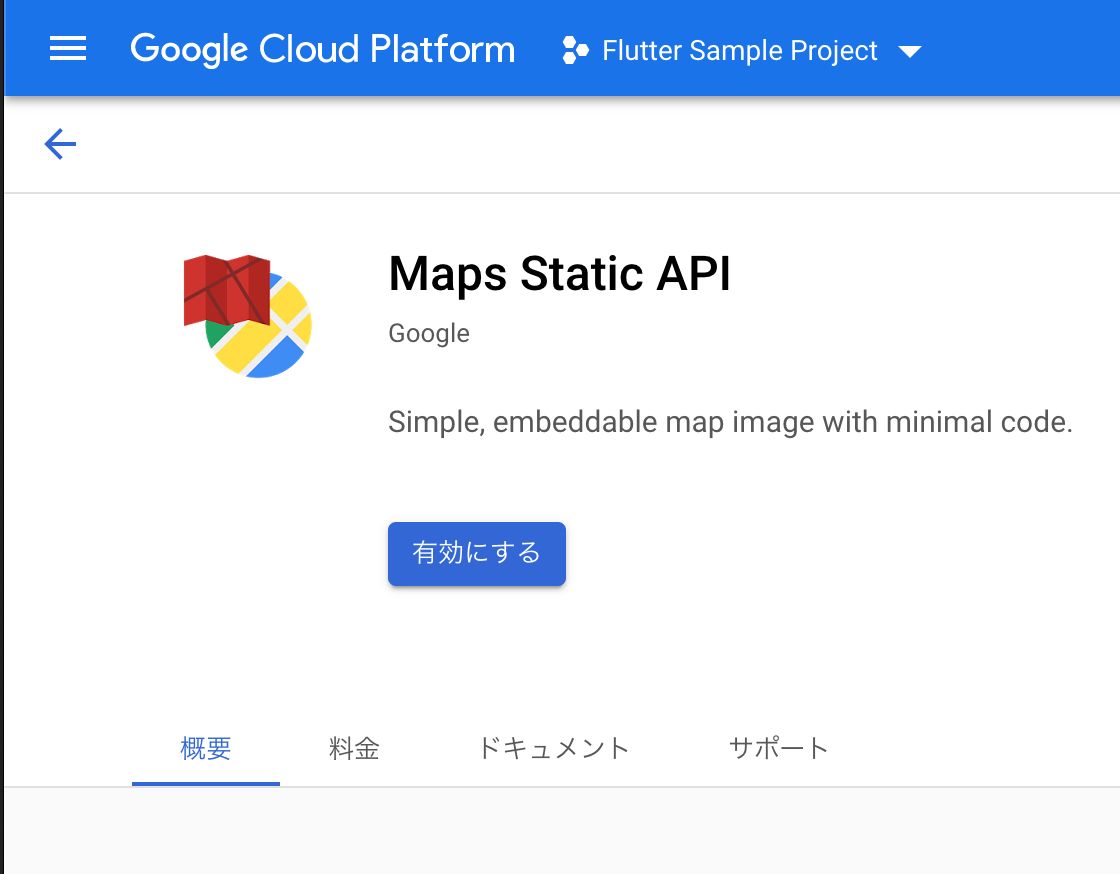
Maps Static API を有効にします。
API Key を発行する
次に API キーを発行します。
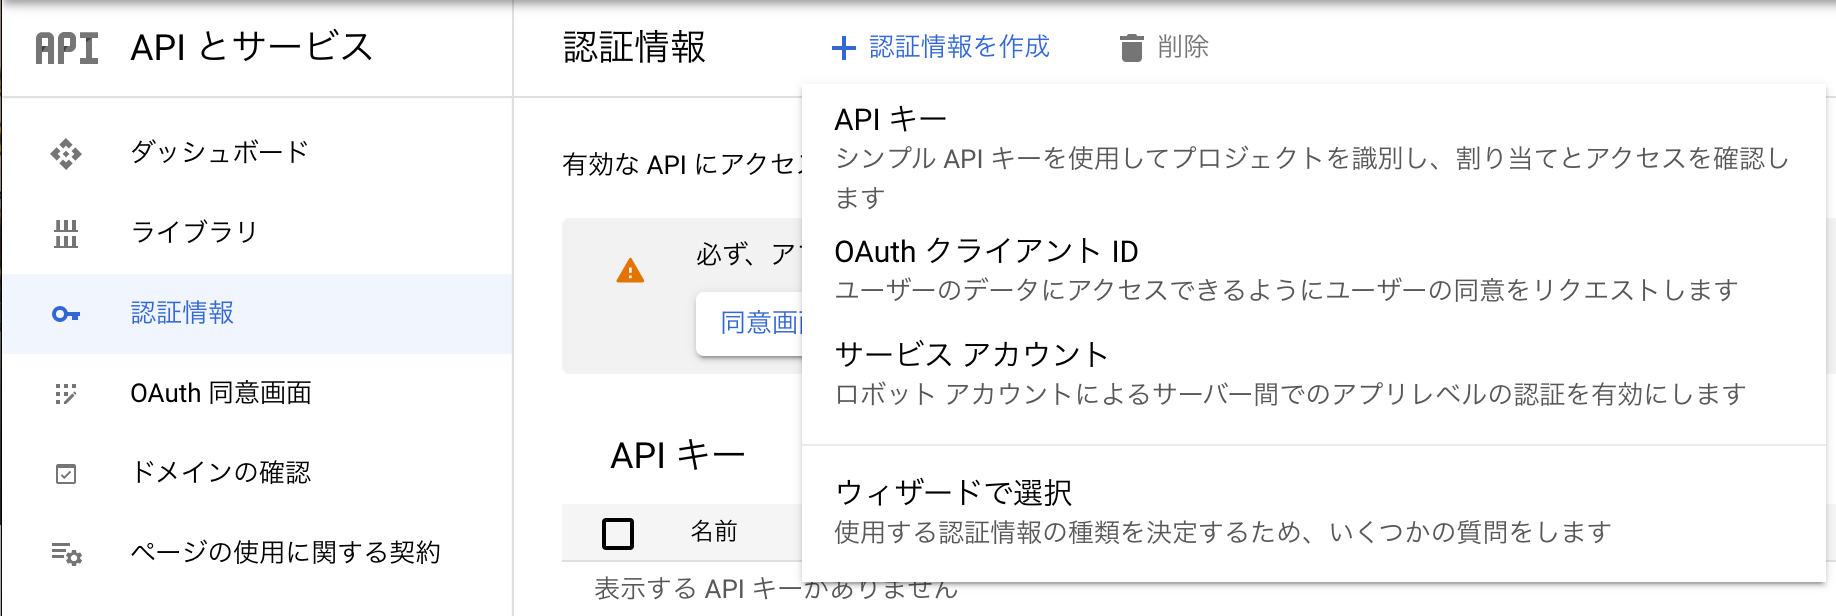
先程の GCP コンソールの左上メニューの API とサービス > 認証情報から認証情報画面を開きます。
認証情報を作成ボタンのプルダウンから API キーを選択します。
API キーを作成したら API キーに分かりやすい名前をつけます。今回は API key debug と名前をつけました。
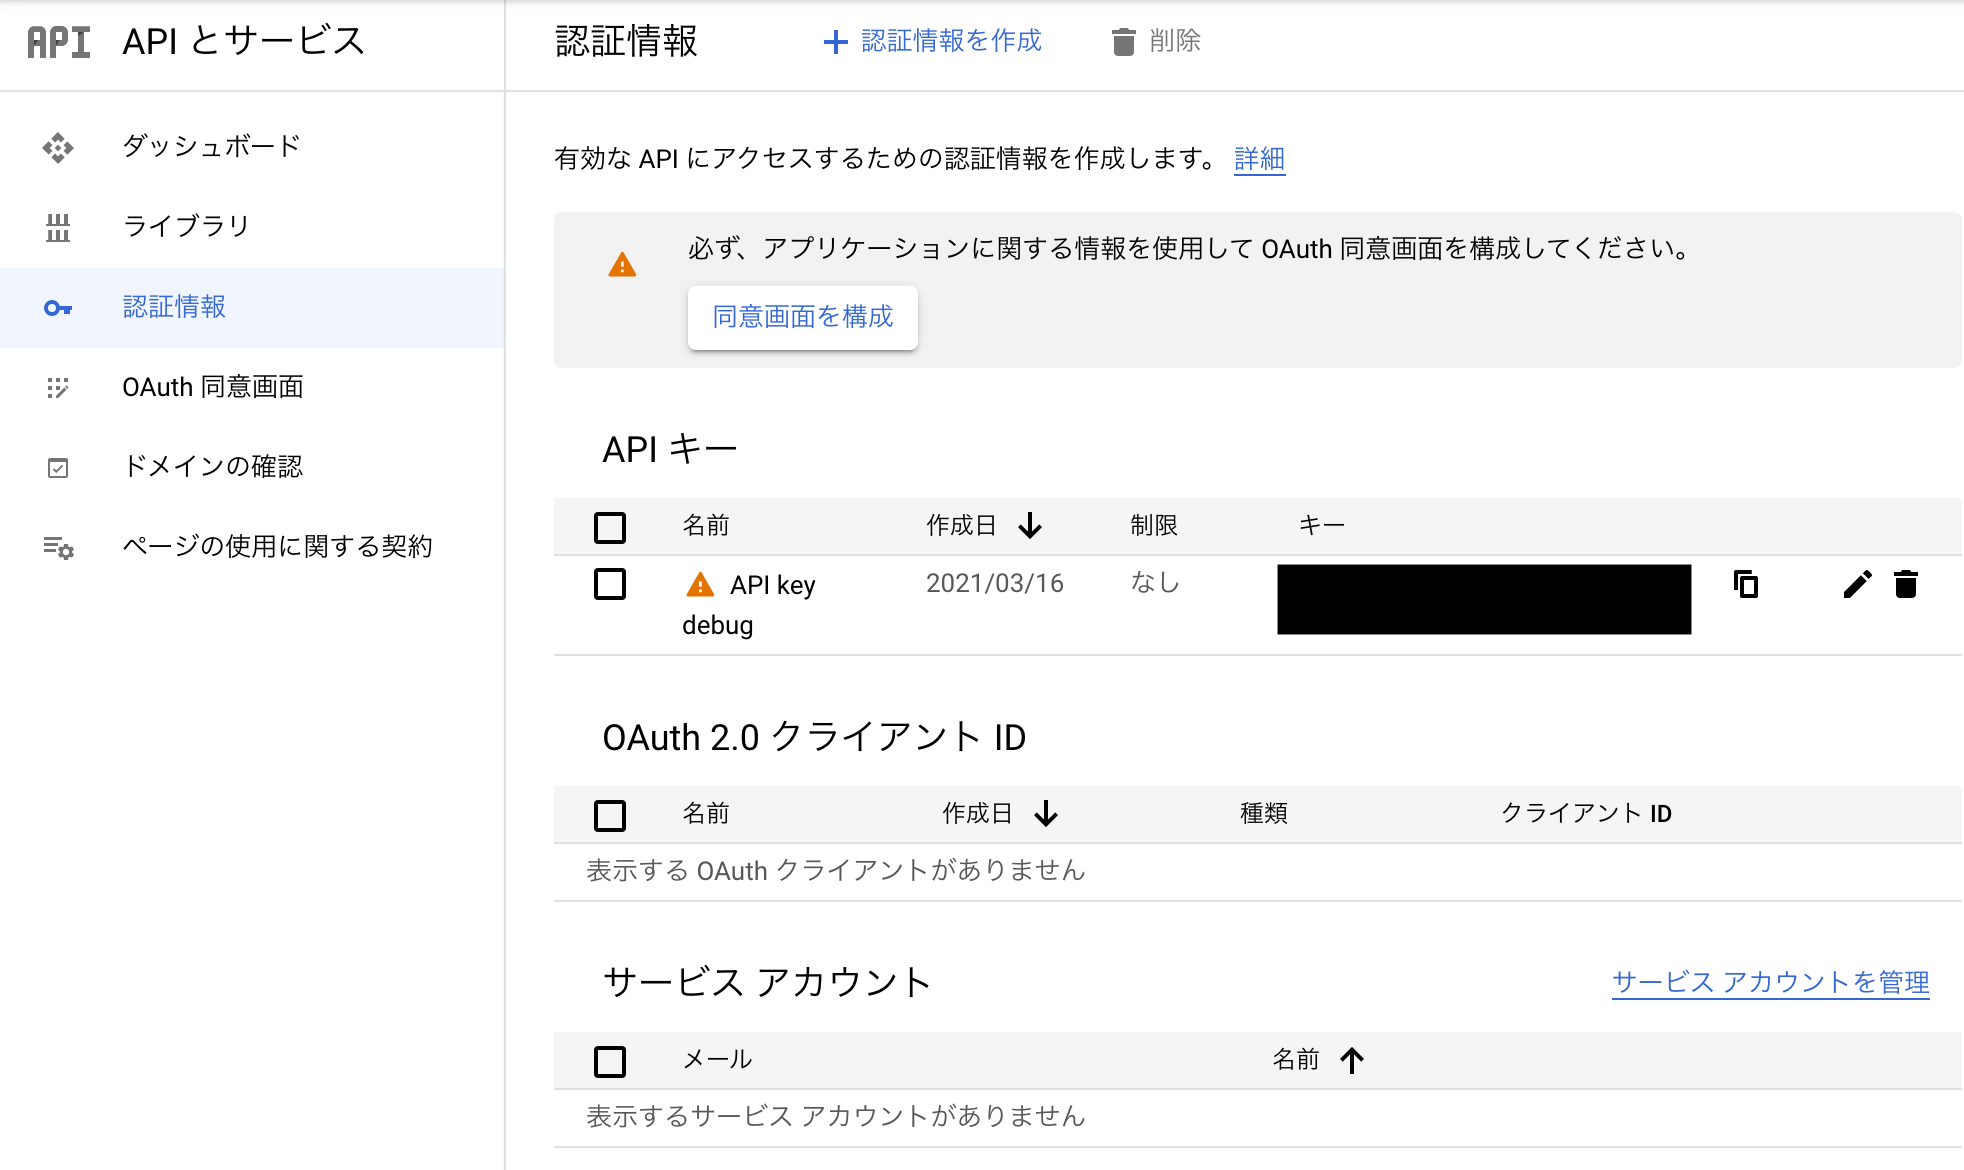
通常本番環境で API キーを運用する場合はキー制限をつけますが、今回は検証用なのでこのまま進めます。
dart-define を使って API キーを隠蔽する
前提として Google の API キーは dart-define で隠蔽をします。
Google の API キーなどを秘匿情報をソースコードにハードコーディングして Github などに上げてしまうと、その API キーが悪用される恐れがあります。
本人が気づかないうちに API キーを悪用され膨大な利用料金が請求される可能性がある訳です。
API キーなどの秘匿情報は環境変数で設定してソースコードから値を取得するようにしましょう。
環境変数を設定する方法は過去の記事で紹介していますので参照ください。
Maps Static API のパラーメータを確認する
Maps Static API のエンドポイントはこちらです。
https://maps.googleapis.com/maps/api/staticmapMaps Static API の主なパラメータはこちらです。
- key
- 必須項目。先程取得した API Key
- center
- 地図の中心座標。緯度/経度または住所、建物名で指定可能。住所、建物名を指定する場合は URL エンコード必須。
- zoom
- 地図のズーム値を 1〜22 の間で指定。公式では倍率の見え方は以下のように定義されている
- 1: World
- 5: Landmass/continent
- 10: City
- 15: Streets
- 20: Buildings
- 地図のズーム値を 1〜22 の間で指定。公式では倍率の見え方は以下のように定義されている
- size
- 画像のサイズ。{width}x{height}で値を指定
- scale
- 2 を指定すると、画像が 2 倍のサイズになる。例えば iPhone の Retina Display で、画像がボヤけて表示されるケースは scale で調整する
- format
- 画像の形式。png8(or png)/png32/gif/jpg/jpg-baseline が指定可能。デフォルトは png
- markers
- 座標を指定して地図上にマーカーを設置。複数指定可能
- language
- マップに表示するラベル(地点名など)の言語を定義する。e.g.) &language=ja
- maptype
- roadmap
- 通常の GoogleMap。デフォルトはこちら
- satellite
- 航空写真
- terrain
- 地形と植生を示す物理的なレリーフマップ画像
- hybrid
- 衛星画像とロードマップ画像のハイブリッド画像。衛星画像上に主要な通りと地名の透明なレイヤーを表示
- roadmap
これらのパラメータは全体の一部なので詳細はこちらを参照ください。
Maps Static API の利用料金
Maps Static API はリクエスト 1,000 件あたりの$2 の料金が課金されます。
ただし毎月$200 分は無料なので、20 万件/月は無料枠になります。
ただし他の ルートやプレイスの Maps API を利用している場合は全ての利用 API の総利用回数分となります。
同一のアカウントで Maps Static API の他、 Geocoding API、Maps JavaScript API、Directions API などを利用している場合は注意が必要です。
プロダクトでアプリへのアクセスが余りに多い場合は、API のアカウントを分けたり日割りのリミットをかけるなど検討した方が良さそうです。
料金体系についてはこちらを参照ください。
地図画像を Flutter で表示する
本題の地図画像の表示実装は以下になります。
lib/main.dart
import 'package:flutter/material.dart';

class EnvironmentVariables {
  static const googleApiKey = String.fromEnvironment('GOOGLE_API_KEY');
}

void main() {
  runApp(MyApp());
}

class MyApp extends StatelessWidget {
  // This widget is the root of your application.
  @override
  Widget build(BuildContext context) {
    return MaterialApp(
      theme: ThemeData.dark(),
      home: Scaffold(
        appBar: AppBar(
          title: const Text('Static Maps View'),
        ),
        body: StaticMapView(),
      ),
    );
  }
}

class StaticMapView extends StatelessWidget {
  static const _baseMapURL = 'https://maps.googleapis.com/maps/api/staticmap';
  static const _latitude = 35.667097;
  static const _longitude = 139.740178;
  static const _mapZoom = 'zoom=18';
  static const _mapSize = 'size=720x640';
  static const _scale = 'scale=2';
  static const _language = 'language=ja';
  static const _mapCenter = 'center=$_latitude,$_longitude';
  static const _mapMarkers = 'markers=$_latitude,$_longitude';
  static const _apiKey = 'key=${EnvironmentVariables.googleApiKey}';
  static const _imageUrl =
      '$_baseMapURL?$_mapCenter&$_mapZoom&$_mapMarkers&$_mapSize&$_scale&$_language&$_apiKey';

  @override
  Widget build(BuildContext context) {
    return SingleChildScrollView(
      physics: const BouncingScrollPhysics(),
      child: Center(
        child: Column(
          children: <Widget>[
            const SizedBox(
              height: 240,
            ),
            Image.network(
              _imageUrl,
              fit: BoxFit.cover,
            ),
            const SizedBox(
              height: 240,
            ),
          ],
        ),
      ),
    );
  }
}
簡単に解説ですが、まず String.fromEnvironment で dart-define で指定した環境変数の値を取得しています。
class EnvironmentVariables {
  static const googleApiKey = String.fromEnvironment('GOOGLE_API_KEY');
}
次にエンドポイントとパラメータを定義します。
今回座標である latitude と longitude は六本木ヒルズの座標を指定しています。
各パラメータを定義して最終的には _imageUrl プロパティで URL を構成しています。
  static const _baseMapURL = 'https://maps.googleapis.com/maps/api/staticmap';
  static const _latitude = 35.667097;
  static const _longitude = 139.740178;
  static const _mapZoom = 'zoom=18';
  static const _mapSize = 'size=720x640';
  static const _scale = 'scale=2';
  static const _language = 'language=ja';
  static const _mapCenter = 'center=$_latitude,$_longitude';
  static const _mapMarkers = 'markers=$_latitude,$_longitude';
  static const _apiKey = 'key=${EnvironmentVariables.googleApiKey}';
  static const _imageUrl =
      '$_baseMapURL?$_mapCenter&$_mapZoom&$_mapMarkers&$_mapSize&$_scale&$_language&$_apiKey';
最後に Image.network Widget で画像を取得して表示します。
Image.network(
  _imageUrl,
  fit: BoxFit.cover,
)
以上で簡単ですが Google Maps Static API を使って Flutter で地図画像を表示する方法でした。
全てのソースコードは Github にありますので参照ください。