
Flutter初心者がFCMを使ってプッシュ通知を受け取る〜アプリ実装編〜(2021/3/22版)
FCM (Firebase Cloud Messaging) のプッシュ通知設定とプッシュ通知を受信する Flutter アプリを実装します。
前回 Firebase のプロジェクト設定から iOS/Android の FCM 設定を解説しました。
初学者にとって最初の壁の iOS の証明書周りも詳しく解説しているので、まだ設定が終わっていない方は是非こちらの記事をご覧ください。
筆者は Flutter 初学者の為もし内容の誤りや、もっとこういうやり方があるよ、という方は Twitter で DM していただくか Contact で連絡して頂けると大変助かります。
それではアプリの実装をみていきましょう。
環境
- macOS Big Sur 11.2.1
- Android Studio 4.1.2
- Flutter 2.0.0
- Dart 2.12.0
前提
今回はこちらの Firebase Messaging 公式の examples にあるサンプルアプリを解説する形で進めます。
今回部分的に掲載するので、全てのソースを参照したい場合は上記の公式 examples か、筆者の Github を参照くださいませ。
筆者のソースはクライアントアプリからプッシュ通知を送信する機能は不要だったので省いていたり、examples で実装している通知設定をよりモバイルプッシュ通知向けに修正しています。
Flutter に firebase_messaging を install する
pubspec.yaml に firebase_core と firebase_messaging を追記します。
また flutter_local_notifications も追記します。
- pubspec.yaml
environment:
  sdk: '>=2.12.0 <3.0.0'

dependencies:
  flutter:
    sdk: flutter
  firebase_core:
  firebase_messaging:
  flutter_local_notifications:
追記したら忘れずに flutter pub get を実行しましょう。
パーミッション部分を実装する
まず、プッシュ通知パーミッションの許可ダイアログを表示して、パーミッション状態を表示する Widget を実装します。
lib/permissions.dart
// @dart=2.9

import 'package:firebase_messaging/firebase_messaging.dart';
import 'package:flutter/foundation.dart';
import 'package:flutter/material.dart';

/// Requests & displays the current user permissions for this device.
class Permissions extends StatefulWidget {
  @override
  State<StatefulWidget> createState() => _Permissions();
}

class _Permissions extends State<Permissions> {
  bool _requested = false;
  bool _fetching = false;
  NotificationSettings _settings;

  Future<void> requestPermissions() async {
    setState(() {
      _fetching = true;
    });

    final settings = await FirebaseMessaging.instance.requestPermission(
      announcement: true,
      carPlay: true,
      criticalAlert: true,
    );

    setState(() {
      _requested = true;
      _fetching = false;
      _settings = settings;
    });
  }

  Widget row(String title, String value) {
    return Container(
      margin: const EdgeInsets.only(bottom: 8),
      child: Row(
        mainAxisAlignment: MainAxisAlignment.spaceBetween,
        children: [
          Text('$title:', style: const TextStyle(fontWeight: FontWeight.bold)),
          Text(value),
        ],
      ),
    );
  }

  @override
  Widget build(BuildContext context) {
    if (_fetching) {
      return const CircularProgressIndicator();
    }

    if (!_requested) {
      return ElevatedButton(
          onPressed: requestPermissions,
          child: const Text('Request Permissions'));
    }

    return Column(children: [
      row('Authorization Status', statusMap[_settings.authorizationStatus]),
      if (defaultTargetPlatform == TargetPlatform.iOS) ...[
        row('Alert', settingsMap[_settings.alert]),
        row('Announcement', settingsMap[_settings.announcement]),
        row('Badge', settingsMap[_settings.badge]),
        row('Car Play', settingsMap[_settings.carPlay]),
        row('Lock Screen', settingsMap[_settings.lockScreen]),
        row('Notification Center', settingsMap[_settings.notificationCenter]),
        row('Show Previews', previewMap[_settings.showPreviews]),
        row('Sound', settingsMap[_settings.sound]),
      ],
      ElevatedButton(
        onPressed: () {},
        child: const Text('Reload Permissions'),
      ),
    ]);
  }
}

/// Maps a [AuthorizationStatus] to a string value.
const statusMap = {
  AuthorizationStatus.authorized: 'Authorized',
  AuthorizationStatus.denied: 'Denied',
  AuthorizationStatus.notDetermined: 'Not Determined',
  AuthorizationStatus.provisional: 'Provisional',
};

/// Maps a [AppleNotificationSetting] to a string value.
const settingsMap = {
  AppleNotificationSetting.disabled: 'Disabled',
  AppleNotificationSetting.enabled: 'Enabled',
  AppleNotificationSetting.notSupported: 'Not Supported',
};

/// Maps a [AppleShowPreviewSetting] to a string value.
const previewMap = {
  AppleShowPreviewSetting.always: 'Always',
  AppleShowPreviewSetting.never: 'Never',
  AppleShowPreviewSetting.notSupported: 'Not Supported',
  AppleShowPreviewSetting.whenAuthenticated: 'Only When Authenticated',
};
プッシュ通知のパーミッション許可ダイアログは以下のメソッドで表示しています。
final settings = await FirebaseMessaging.instance.requestPermission();requestPermission メソッドの引数は以下指定できます。
指定できる引数は全て iOS 用のプロパティです。
    return _delegate.requestPermission(
      alert: alert,
      announcement: announcement,
      badge: badge,
      carPlay: carPlay,
      criticalAlert: criticalAlert,
      provisional: provisional,
      sound: sound,
    );
アプリのみのプッシュ通知で使用するであろう、画面にプッシュ通知を表示する alert、アプリケーション Icon にバッチを表示する badge、通知受信時に音を鳴らす sound プロパティはデフォルト true となっています。
戻り値には通知パーミッション状態のオブジェクト NotificationSettings が返却されます。
/// Represents the devices notification settings.
class NotificationSettings {
  // ignore: public_member_api_docs
  const NotificationSettings(
      {required this.alert,
      required this.announcement,
      required this.authorizationStatus,
      required this.badge,
      required this.carPlay,
      required this.lockScreen,
      required this.notificationCenter,
      required this.showPreviews,
      required this.sound});
プッシュ通知の許可/不許可状態を保持する settings.authorizationStatus は iOS/Android 共通ですが、その他のプロパティは iOS のみ使用されるプロパティです。
FCM Token 部分を実装する
次に FCM Token を取得して画面に表示する Widget を実装します。
// @dart=2.9

import 'package:firebase_messaging/firebase_messaging.dart';
import 'package:flutter/material.dart';

/// Manages & returns the users FCM token.
///
/// Also monitors token refreshes and updates state.
class TokenMonitor extends StatefulWidget {
  const TokenMonitor(this._builder);

  final Widget Function(String token) _builder;

  @override
  State<StatefulWidget> createState() => _TokenMonitor();
}

class _TokenMonitor extends State<TokenMonitor> {
  String _token;
  Stream<String> _tokenStream;

  void setToken(String token) {
    print('FCM Token: $token');
    setState(() {
      _token = token;
    });
  }

  @override
  void initState() {
    super.initState();
    FirebaseMessaging.instance.getToken().then(setToken);
    _tokenStream = FirebaseMessaging.instance.onTokenRefresh;
    _tokenStream.listen(setToken);
  }

  @override
  Widget build(BuildContext context) {
    return widget._builder(_token);
  }
}
Widget の initState で FCM Token を取得して state にセットしています。
  @override
  void initState() {
    super.initState();
    FirebaseMessaging.instance.getToken().then(setToken);
    _tokenStream = FirebaseMessaging.instance.onTokenRefresh;
    _tokenStream.listen(setToken);
  }
getToken メソッドで FCM トークンを取得して state にセットしています。
アプリをインストールするとトークンはすぐに生成されます。
onTokenRefresh メソッドは、新しい FCM トークンが生成されるたびに呼び出されます。
アプリのインストール時の他、トークンが変更されたときにも呼び出される為、listen してトークンの変更を監視しています。
FCM トークンが変更になるトリガーは こちらの記事 にまとめられているので参照ください。
蛇足ですがプロダクトで FCM トークンを利用する場合は、listen でトークンの変更を検知したらサーバにトークンを送信して常に最新の FCM トークンを使う必要がありそうです。
プッシュ通知受信履歴一覧を実装する
次にプッシュ通知受信履歴一覧の Widget を実装します。
lib/message_list.dart
// @dart=2.9

import 'package:firebase_messaging/firebase_messaging.dart';
import 'package:flutter/material.dart';

import 'message.dart';

/// Listens for incoming foreground messages and displays them in a list.
class MessageList extends StatefulWidget {
  @override
  State<StatefulWidget> createState() => _MessageList();
}

class _MessageList extends State<MessageList> {
  List<RemoteMessage> _messages = [];

  @override
  void initState() {
    super.initState();
    FirebaseMessaging.onMessage.listen((RemoteMessage message) {
      setState(() {
        _messages = [..._messages, message];
      });
    });
  }

  @override
  Widget build(BuildContext context) {
    if (_messages.isEmpty) {
      return const Text('No messages received');
    }

    return ListView.builder(
        shrinkWrap: true,
        itemCount: _messages.length,
        itemBuilder: (context, index) {
          final message = _messages[index];

          return ListTile(
            title: Text(message.messageId),
            subtitle: Text(message.sentTime?.toString() ?? 'N/A'),
            onTap: () => Navigator.pushNamed(context, '/message',
                arguments: MessageArguments(message, openedApplication: false)),
          );
        });
  }
}
Widget の initState で FirebaseMessaging.onMessage.listen しています。
プッシュ通知を受信したら RemoteMessage オブジェクトが取得できるので配列の state に追加しています。
  @override
  void initState() {
    super.initState();
    FirebaseMessaging.onMessage.listen((RemoteMessage message) {
      setState(() {
        _messages = [..._messages, message];
      });
    });
  }
RemoteMessage オブジェクトは以下のプロパティの値を保持しています。
プッシュ通知受信一覧ではユニークな値である messageId を表示しています。
/// A class representing a message sent from Firebase Cloud Messaging.
class RemoteMessage {
  // ignore: public_member_api_docs
  const RemoteMessage(
      {this.senderId,
      this.category,
      this.collapseKey,
      this.contentAvailable = false,
      this.data = const <String, dynamic>{},
      this.from,
      this.messageId,
      this.messageType,
      this.mutableContent = false,
      this.notification,
      this.sentTime,
      this.threadId,
      this.ttl})
プッシュ通知受信一覧をタップするとメッセージ詳細画面へ遷移します。
          return ListTile(
            title: Text(message.messageId),
            subtitle: Text(message.sentTime?.toString() ?? 'N/A'),
            onTap: () => Navigator.pushNamed(context, '/message',
                arguments: MessageArguments(message, openedApplication: false)),
          );
プッシュ通知メッセージ詳細画面を実装する
次にプッシュ通知受信一覧 Widget からの遷移先である、メッセージ詳細画面を実装します。
この画面はホーム画面や、タスクトレイに格納されたプッシュ通知をタップからも遷移します。
lib/message.dart
// @dart=2.9

import 'package:firebase_messaging/firebase_messaging.dart';
import 'package:flutter/material.dart';

/// Message route arguments.
class MessageArguments {
  MessageArguments(this.message, {this.openedApplication})
      : assert(message != null);

  /// The RemoteMessage
  final RemoteMessage message;

  /// Whether this message caused the application to open.
  final bool openedApplication;
}

/// Displays information about a [RemoteMessage].
class MessageView extends StatelessWidget {
  /// A single data row.
  Widget row(String title, String value) {
    return Padding(
      padding: const EdgeInsets.only(left: 8, right: 8, top: 8),
      child: Row(children: [
        Text('$title: '),
        Text(value ?? 'N/A'),
      ]),
    );
  }

  @override
  Widget build(BuildContext context) {
    final args = ModalRoute.of(context).settings.arguments as MessageArguments;
    final message = args.message;
    final notification = message.notification;

    return Scaffold(
      appBar: AppBar(
        title: Text(message.messageId),
      ),
      body: SingleChildScrollView(
          child: Padding(
        padding: const EdgeInsets.all(8),
        child: Column(children: [
          row('Triggered application open', args.openedApplication.toString()),
          row('Message ID', message.messageId),
          row('Sender ID', message.senderId),
          row('Category', message.category),
          row('Collapse Key', message.collapseKey),
          row('Content Available', message.contentAvailable.toString()),
          row('Data', message.data.toString()),
          row('From', message.from),
          row('Message ID', message.messageId),
          row('Sent Time', message.sentTime?.toString()),
          row('Thread ID', message.threadId),
          row('Time to Live (TTL)', message.ttl?.toString()),
          if (notification != null) ...[
            Padding(
              padding: const EdgeInsets.only(top: 16),
              child: Column(children: [
                const Text(
                  'Remote Notification',
                  style: TextStyle(fontSize: 18),
                ),
                row(
                  'Title',
                  notification.title,
                ),
                row(
                  'Body',
                  notification.body,
                ),
                if (notification.android != null) ...[
                  const Text(
                    'Android Properties',
                    style: TextStyle(fontSize: 18),
                  ),
                  row(
                    'Channel ID',
                    notification.android.channelId,
                  ),
                  row(
                    'Click Action',
                    notification.android.clickAction,
                  ),
                  row(
                    'Color',
                    notification.android.color,
                  ),
                  row(
                    'Count',
                    notification.android.count?.toString(),
                  ),
                  row(
                    'Image URL',
                    notification.android.imageUrl,
                  ),
                  row(
                    'Link',
                    notification.android.link,
                  ),
                  row(
                    'Priority',
                    notification.android.priority?.toString(),
                  ),
                  row(
                    'Small Icon',
                    notification.android.smallIcon,
                  ),
                  row(
                    'Sound',
                    notification.android.sound,
                  ),
                  row(
                    'Ticker',
                    notification.android.ticker,
                  ),
                  row(
                    'Visibility',
                    notification.android.visibility?.toString(),
                  ),
                ],
                if (notification.apple != null) ...[
                  const Text(
                    'Apple Properties',
                    style: TextStyle(fontSize: 18),
                  ),
                  row(
                    'Subtitle',
                    notification.apple.subtitle,
                  ),
                  row(
                    'Badge',
                    notification.apple.badge,
                  ),
                  row(
                    'Sound',
                    notification.apple.sound?.name,
                  ),
                ]
              ]),
            )
          ]
        ]),
      )),
    );
  }
}
この画面ではシンプルに前の画面から Args で受け取った RemoteMessage オブジェクトの内容を表示しています。
改めて RemoteMessage オブジェクトでは以下プロパティの値を保持します。
class RemoteMessage {
  // ignore: public_member_api_docs
  const RemoteMessage(
      {this.senderId,
      this.category,
      this.collapseKey,
      this.contentAvailable = false,
      this.data = const <String, dynamic>{},
      this.from,
      this.messageId,
      this.messageType,
      this.mutableContent = false,
      this.notification,
      this.sentTime,
      this.threadId,
      this.ttl});
プッシュ通知のタイトル、テキストのプロパティが notification です。
notification は RemoteNotification クラスで以下のプロパティを保持しています。
/// This class can be accessed via a [RemoteMessage.notification].
class RemoteNotification {
  // ignore: public_member_api_docs
  const RemoteNotification(
      {this.android,
      this.apple,
      this.title,
      this.titleLocArgs = const <String>[],
      this.titleLocKey,
      this.body,
      this.bodyLocArgs = const <String>[],
this.bodyLocKey});プッシュ通知のタイトル、テキストプロパティの他、AndroidNotification AppleNotification と Android/iOS 固有のプロパティが用意されています。
/// Android specific properties of a [RemoteNotification].
///
/// This will only be populated if the current device is Android.
class AndroidNotification {
  // ignore: public_member_api_docs
  const AndroidNotification(
      {this.channelId,
      this.clickAction,
      this.color,
      this.count,
      this.imageUrl,
      this.link,
      this.priority = AndroidNotificationPriority.defaultPriority,
      this.smallIcon,
      this.sound,
      this.ticker,
      this.visibility = AndroidNotificationVisibility.private});
/// Apple specific properties of a [RemoteNotification].
///
/// This will only be populated if the current device is Apple based (iOS/MacOS).
class AppleNotification {
// ignore: public_member_api_docs
const AppleNotification(
{this.badge,
this.sound,
this.imageUrl,
this.subtitle,
this.subtitleLocArgs = const <String>[],
this.subtitleLocKey});iOS でプッシュ通知の payload で送信された badge 数(Android は count 数)をアプリケーション Icon に表示、アプリ内で表示したい時に使えそうです。
サンプルアプリでは、notification を取得して、null じゃなかったら iOS/Android それぞれ固有のプロパティを表示しています。
          if (notification != null) ...[
            Padding(
              padding: const EdgeInsets.only(top: 16),
              child: Column(children: [
                const Text(
                  'Remote Notification',
                  style: TextStyle(fontSize: 18),
                             :
                             :
                             :
                if (notification.android != null) ...[
                  const Text(
                    'Android Properties',
                    style: TextStyle(fontSize: 18),
                  ),
                  row(
                             :
                             :
                             :
                if (notification.apple != null) ...[
                  const Text(
                    'Apple Properties',
                    style: TextStyle(fontSize: 18),
                  ),
                  row(
各 Widget を表示する main.dart を実装する
最後に各 Widget を表示する main.dart を実装します。
Widget の表示以外にプッシュ通知設定を初期化、バックグラウンド通知をハンドリングしています。
lib/main.dart
// @dart=2.9

import 'dart:async';
import 'dart:convert';

import 'package:firebase_core/firebase_core.dart';
import 'package:firebase_messaging/firebase_messaging.dart';
import 'package:flutter/foundation.dart';
import 'package:flutter/material.dart';
import 'package:flutter_local_notifications/flutter_local_notifications.dart';

import 'message.dart';
import 'message_list.dart';
import 'permissions.dart';
import 'token_monitor.dart';

/// Define a top-level named handler which background/terminated messages will
/// call.
///
/// To verify things are working, check out the native platform logs.
Future<void> _firebaseMessagingBackgroundHandler(RemoteMessage message) async {
  // If you're going to use other Firebase services in the background, such as Firestore,
  // make sure you call `initializeApp` before using other Firebase services.
  await Firebase.initializeApp();
  print('Handling a background message ${message.messageId}');
}

/// Create a [AndroidNotificationChannel] for heads up notifications
const AndroidNotificationChannel channel = AndroidNotificationChannel(
  'high_importance_channel', // id
  'High Importance Notifications', // title
  'This channel is used for important notifications.', // description
  importance: Importance.high,
);

/// Initialize the [FlutterLocalNotificationsPlugin] package.
final FlutterLocalNotificationsPlugin flutterLocalNotificationsPlugin =
    FlutterLocalNotificationsPlugin();

Future<void> main() async {
  WidgetsFlutterBinding.ensureInitialized();
  await Firebase.initializeApp();

  // Set the background messaging handler early on,
  // as a named top-level function
  FirebaseMessaging.onBackgroundMessage(_firebaseMessagingBackgroundHandler);

  /// Create an Android Notification Channel.
  ///
  /// We use this channel in the `AndroidManifest.xml` file to override the
  /// default FCM channel to enable heads up notifications.
  await flutterLocalNotificationsPlugin
      .resolvePlatformSpecificImplementation<
          AndroidFlutterLocalNotificationsPlugin>()
      ?.createNotificationChannel(channel);

  /// Update the iOS foreground notification presentation options to allow
  /// heads up notifications.
  await FirebaseMessaging.instance.setForegroundNotificationPresentationOptions(
    alert: true,
    badge: true,
    sound: true,
  );

  runApp(MessagingExampleApp());
}

/// Entry point for the example application.
class MessagingExampleApp extends StatelessWidget {
  @override
  Widget build(BuildContext context) {
    return MaterialApp(
      title: 'Messaging Example App',
      theme: ThemeData.dark(),
      routes: {
        '/': (context) => Application(),
        '/message': (context) => MessageView(),
      },
    );
  }
}

// Crude counter to make messages unique
int _messageCount = 0;

/// The API endpoint here accepts a raw FCM payload for demonstration purposes.
String constructFCMPayload(String token) {
  _messageCount++;
  return jsonEncode({
    'token': token,
    'data': {
      'via': 'FlutterFire Cloud Messaging!!!',
      'count': _messageCount.toString(),
    },
    'notification': {
      'title': 'Hello FlutterFire!',
      'body': 'This notification (#$_messageCount) was created via FCM!',
    },
  });
}

/// Renders the example application.
class Application extends StatefulWidget {
  @override
  State<StatefulWidget> createState() => _Application();
}

class _Application extends State<Application> {
  @override
  void initState() {
    super.initState();
    FirebaseMessaging.instance
        .getInitialMessage()
        .then((RemoteMessage message) {
      if (message != null) {
        Navigator.pushNamed(context, '/message',
            arguments: MessageArguments(message, openedApplication: true));
      }
    });

    FirebaseMessaging.onMessage.listen((RemoteMessage message) {
      final notification = message.notification;
      final android = message.notification?.android;

      if (notification != null && android != null) {
        flutterLocalNotificationsPlugin.show(
            notification.hashCode,
            notification.title,
            notification.body,
            NotificationDetails(
              android: AndroidNotificationDetails(
                channel.id,
                channel.name,
                channel.description,
                // ignore: flutter_style_todos
                // TODO add a proper drawable resource to android, for now using
                //      one that already exists in example app.
                icon: 'launch_background',
              ),
            ));
      }
    });

    FirebaseMessaging.onMessageOpenedApp.listen((RemoteMessage message) {
      print('A new onMessageOpenedApp event was published!');
      Navigator.pushNamed(context, '/message',
          arguments: MessageArguments(message, openedApplication: true));
    });
  }

  Future<void> onActionSelected(String value) async {
    switch (value) {
      case 'subscribe':
        {
          print(
              'FlutterFire Messaging Example: Subscribing to topic "fcm_test".');
          await FirebaseMessaging.instance.subscribeToTopic('fcm_test');
          print(
              'FlutterFire Messaging Example: Subscribing to topic "fcm_test" successful.');
        }
        break;
      case 'unsubscribe':
        {
          print(
              'FlutterFire Messaging Example: Unsubscribing from topic "fcm_test".');
          await FirebaseMessaging.instance.unsubscribeFromTopic('fcm_test');
          print(
              'FlutterFire Messaging Example: Unsubscribing from topic "fcm_test" successful.');
        }
        break;
      case 'get_apns_token':
        {
          if (defaultTargetPlatform == TargetPlatform.iOS ||
              defaultTargetPlatform == TargetPlatform.macOS) {
            print('FlutterFire Messaging Example: Getting APNs token...');
            final token = await FirebaseMessaging.instance.getAPNSToken();
            print('FlutterFire Messaging Example: Got APNs token: $token');
          } else {
            print(
                'FlutterFire Messaging Example: Getting an APNs token is only supported on iOS and macOS platforms.');
          }
        }
        break;
      default:
        break;
    }
  }

  @override
  Widget build(BuildContext context) {
    return Scaffold(
      appBar: AppBar(
        title: const Text('Cloud Messaging'),
        actions: <Widget>[
          PopupMenuButton(
            onSelected: onActionSelected,
            itemBuilder: (BuildContext context) {
              return [
                const PopupMenuItem(
                  value: 'subscribe',
                  child: Text('Subscribe to topic'),
                ),
                const PopupMenuItem(
                  value: 'unsubscribe',
                  child: Text('Unsubscribe to topic'),
                ),
                const PopupMenuItem(
                  value: 'get_apns_token',
                  child: Text('Get APNs token (Apple only)'),
                ),
              ];
            },
          ),
        ],
      ),
      body: SingleChildScrollView(
        child: Column(children: [
          MetaCard('Permissions', Permissions()),
          MetaCard('FCM Token', TokenMonitor((token) {
            return token == null
                ? const CircularProgressIndicator()
                : Text(token, style: const TextStyle(fontSize: 12));
          })),
          MetaCard('Message Stream', MessageList()),
        ]),
      ),
    );
  }
}

/// UI Widget for displaying metadata.
class MetaCard extends StatelessWidget {
  const MetaCard(this._title, this._children);

  final String _title;
  final Widget _children;

  @override
  Widget build(BuildContext context) {
    return Container(
        width: double.infinity,
        margin: const EdgeInsets.only(left: 8, right: 8, top: 8),
        child: Card(
            child: Padding(
                padding: const EdgeInsets.all(16),
                child: Column(children: [
                  Container(
                      margin: const EdgeInsets.only(bottom: 16),
                      child:
                          Text(_title, style: const TextStyle(fontSize: 18))),
                  _children,
                ]))));
  }
}
Firebase を初期化する
main.dart ではまず、 WidgetsFlutterBinding.ensureInitialized() で Flutter Engine を使う準備をします。
正直この WidgetsFlutterBinding が良く分かっておらず、いまのところ呪文のように書いています・・
次に await Firebase.initializeApp() で Firebase を初期化します。
次にプッシュ通知をバックグラウンドやタスクを落としたターミネイト状態で受信した時の handler FirebaseMessaging.onBackgroundMessage を実装します。
Future<void> main() async {
  WidgetsFlutterBinding.ensureInitialized();
  await Firebase.initializeApp();

  // Set the background messaging handler early on,
  // as a named top-level function
  FirebaseMessaging.onBackgroundMessage(_firebaseMessagingBackgroundHandler);
アプリがフォアグラウンドの時以外にこの handler からアプリを起動された時の為にここでも await Firebase.initializeApp() しています。
/// Define a top-level named handler which background/terminated messages will
/// call.
///
/// To verify things are working, check out the native platform logs.
Future<void> _firebaseMessagingBackgroundHandler(RemoteMessage message) async {
  // If you're going to use other Firebase services in the background, such as Firestore,
  // make sure you call `initializeApp` before using other Firebase services.
  await Firebase.initializeApp();
  print('Handling a background message ${message.messageId}');
}
Android Notification Channel を設定する
次に Android 固有 の notification channel を実装しています。
この channel はカテゴリとも呼ばれていて一つのアプリで複数の通知カテゴリを持てたり、カテゴリごとにプッシュ通知を分けたりできます。
  /// Create an Android Notification Channel.
  ///
  /// We use this channel in the `AndroidManifest.xml` file to override the
  /// default FCM channel to enable heads up notifications.
  await flutterLocalNotificationsPlugin
      .resolvePlatformSpecificImplementation<
          AndroidFlutterLocalNotificationsPlugin>()
      ?.createNotificationChannel(channel);
createNotificationChannel に設定している channel は以下です。
サンプルアプリでは high_importance_channel という一つのカテゴリを設定しています。
/// Create a [AndroidNotificationChannel] for heads up notifications
const AndroidNotificationChannel channel = AndroidNotificationChannel(
'high_importance_channel', // id
'High Importance Notifications', // title
'This channel is used for important notifications.', // description
importance: Importance.high,
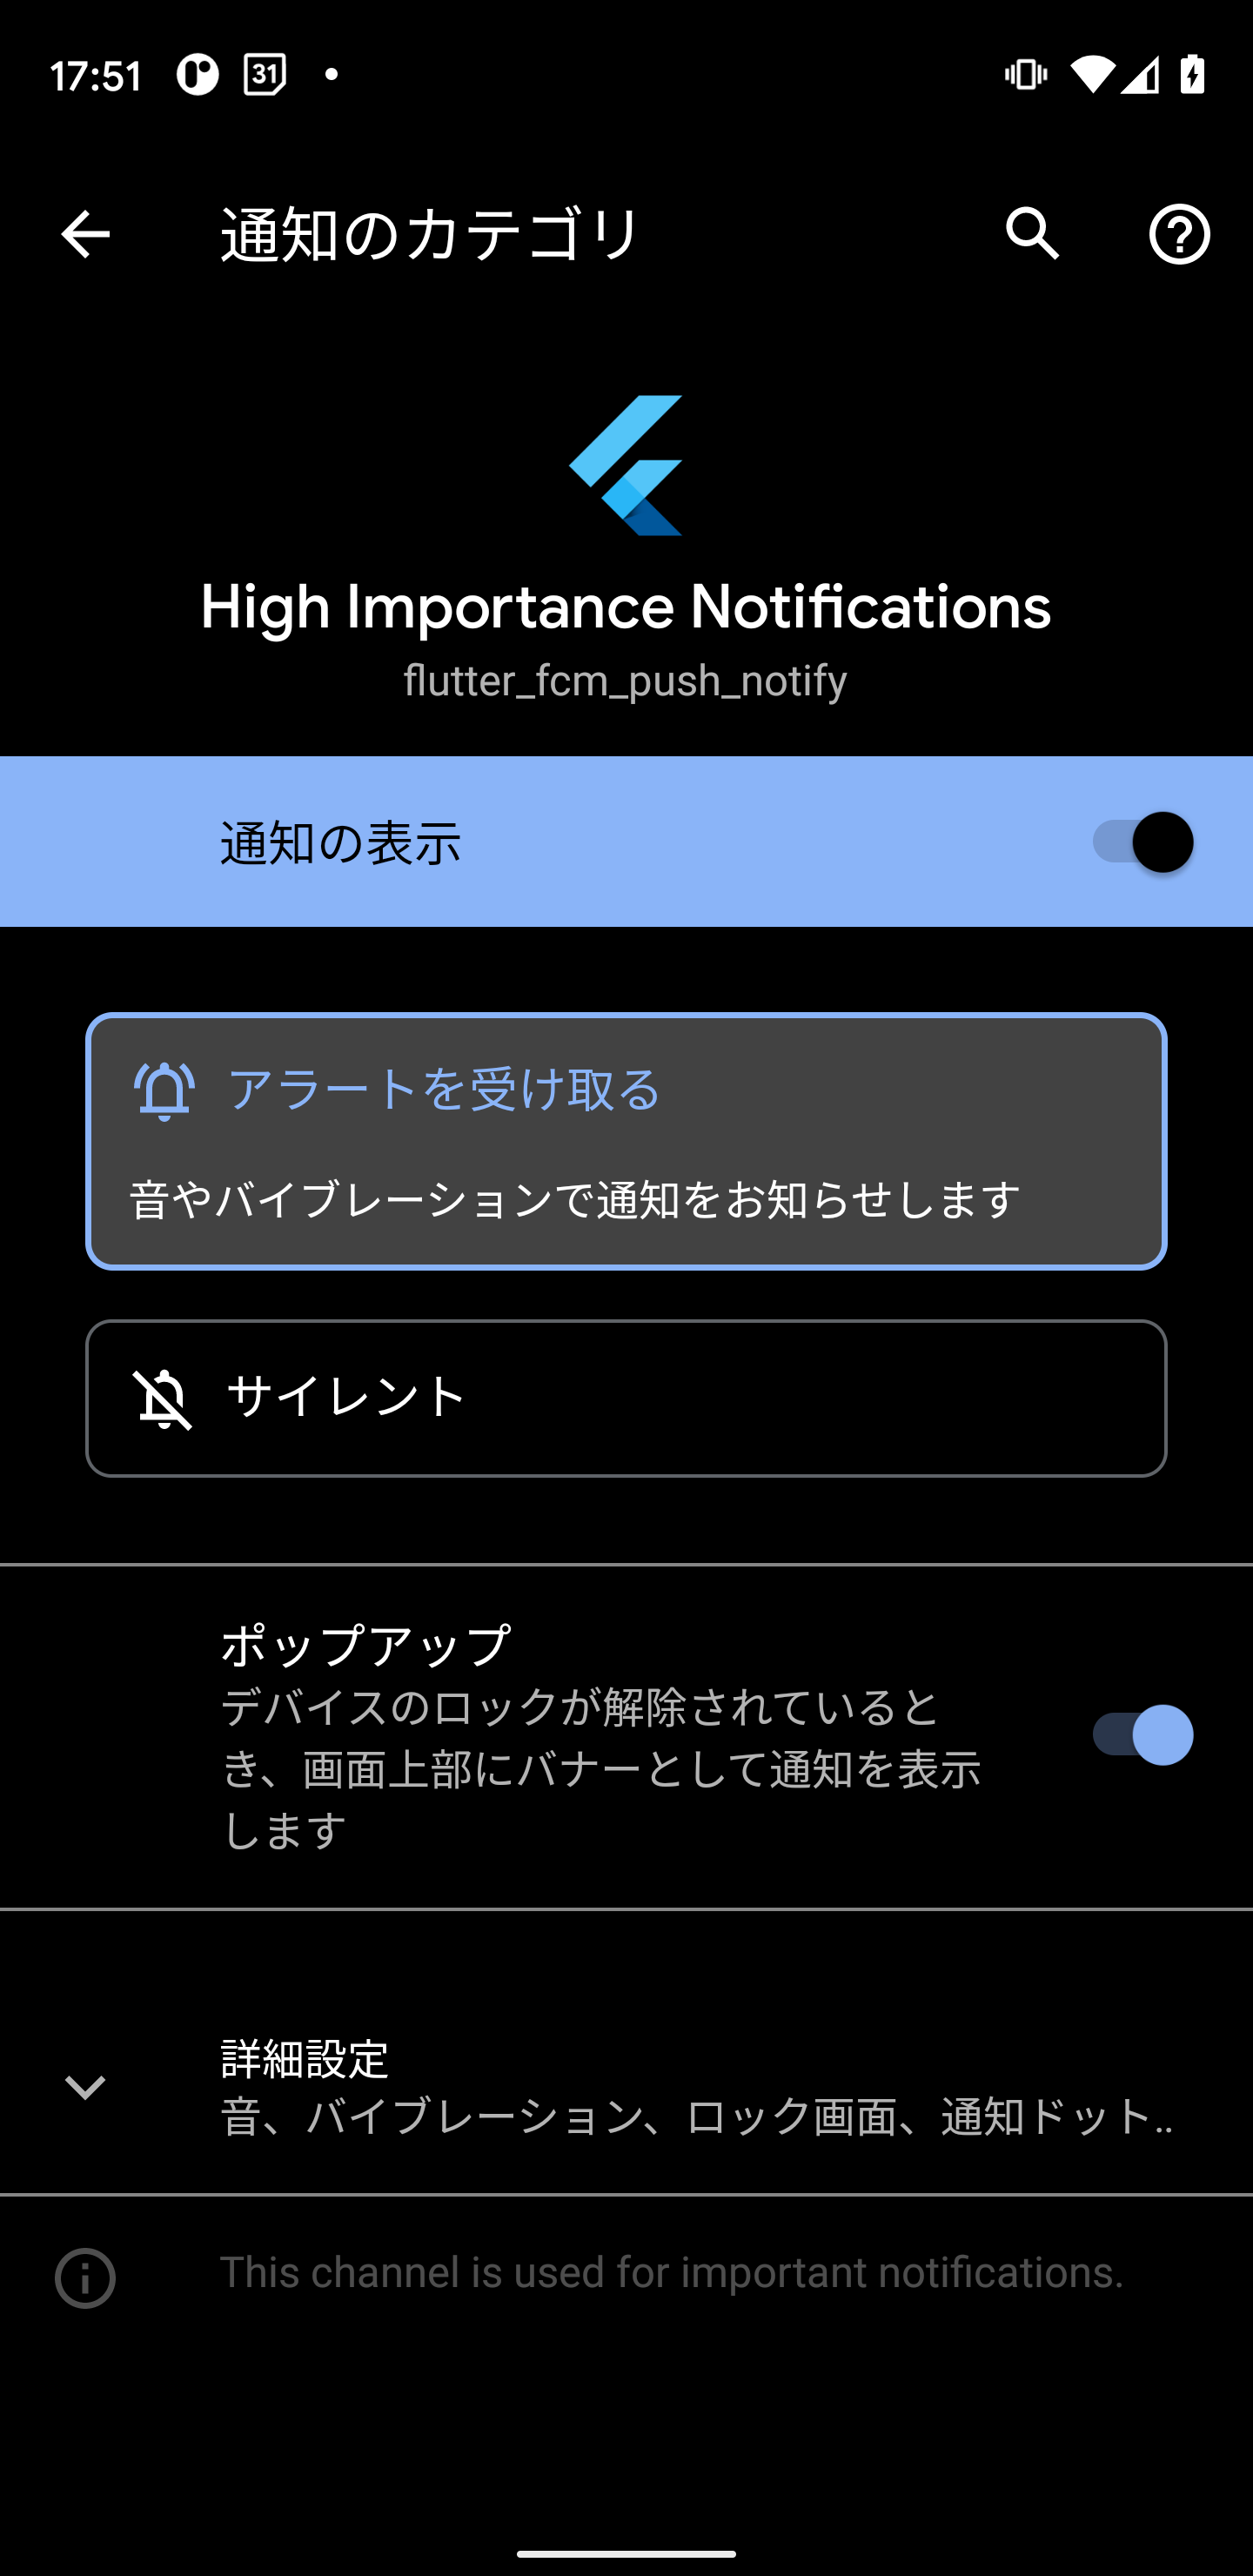
);この AndroidNotificationChannel の channel 設定は Android のアプリの設定画面から確認できます。
まずアプリをインストールしたら設定アプリの アプリと通知 から今回実装したアプリの情報画面を開きます。
通知 をタップした設定画面から今回実装した AndroidNotificationChannel の内容が反映されていることを確認できます。
iOS のフォアグラウンドプッシュ通知受信時アクションを設定する
次に iOS 固有のフォアグラウンドのプッシュ通知受信時アクションを設定します。
以下はサンプルアプリの setForegroundNotificationPresentationOptions 設定です。
  /// Update the iOS foreground notification presentation options to allow
  /// heads up notifications.
  await FirebaseMessaging.instance.setForegroundNotificationPresentationOptions(
    alert: true,
    badge: true,
    sound: true,
  );
アプリがフォアグラウンド時にプッシュ通知を受信した時に、画面上部に通知メッセージを表示、バッチ数を更新、通知音を鳴らす設定をしています。
詳しくは FlutterFire Foreground Notifications を参照ください。
ちなみに Android はアプリがフォアグラウンドにある場合、目に見える通知は表示されません。
次に実装する FlutterLocalNotificationsPlugin でフォアグラウンド状態で通知メッセージを表示します。
Android のフォアグラウンドプッシュ通知受信時アクションを設定する
iOS のアプリがフォアグラウンド状態で通知メッセージ表示を Android でも実装します。
Android ではアプリがフォアグラウンド状態で画面上部にプッシュ通知メッセージを表示することができない為、ローカル通知で擬似的に通知メッセージを表示します。
まずグローバルにローカル通知を表示する FlutterLocalNotificationsPlugin クラスを宣言してオブジェクトを生成します。
/// Initialize the [FlutterLocalNotificationsPlugin] package.
final FlutterLocalNotificationsPlugin flutterLocalNotificationsPlugin =
    FlutterLocalNotificationsPlugin();
次に _Application クラスの initState 内で flutterLocalNotificationsPlugin.show を実装します。
  @override
  void initState() {
                       :
                       :
                       :
    FirebaseMessaging.onMessage.listen((RemoteMessage message) {
      final notification = message.notification;
      final android = message.notification?.android;

      if (notification != null && android != null) {
        flutterLocalNotificationsPlugin.show(
            notification.hashCode,
            notification.title,
            notification.body,
            NotificationDetails(
              android: AndroidNotificationDetails(
                channel.id,
                channel.name,
                channel.description,
                // ignore: flutter_style_todos
                // TODO add a proper drawable resource to android, for now using
                //      one that already exists in example app.
                icon: 'launch_background',
              ),
            ));
      }
    });
FirebaseMessaging.onMessage.listen で取得したプッシュ通知のメッセージオブジェクト RemoteNotification とそのプロパティである AndroidNotification が null じゃなかったら flutterLocalNotificationsPlugin.show でローカル通知を表示しています。
ターミネイト状態でプッシュ通知からアプリを起動した時のアクションを実装する
ターミネイト状態とはアプリのタスクを落としている状態です。
_Application クラスの initState で FirebaseMessaging.instance.getInitialMessage を実装します。
内容としてターミネイト状態でプッシュ通知メッセージからアプリを起動した場合にメッセージ詳細画面へ遷移する実装をします。
  @override
  void initState() {
    super.initState();
    FirebaseMessaging.instance
        .getInitialMessage()
        .then((RemoteMessage message) {
      if (message != null) {
        Navigator.pushNamed(context, '/message',
            arguments: MessageArguments(message, openedApplication: true));
      }
    });
実装自体は簡単で、通知メッセージからアプリを起動したら Navigator.pushNamed で自動で画面遷移するようにしています。
バックグラウンド状態でプッシュ通知からアプリを起動した時のアクションを実装する
次に FirebaseMessaging.onMessageOpenedApp.listen でバックグラウンド状態でプッシュ通知メッセージからアプリを起動した場合にメッセージ詳細画面へ遷移する実装をします。
こちらも _Application クラスの initState 内で実装します。
    FirebaseMessaging.onMessageOpenedApp.listen((RemoteMessage message) {
      print('A new onMessageOpenedApp event was published!');
      Navigator.pushNamed(context, '/message',
          arguments: MessageArguments(message, openedApplication: true));
    });
こちらも実装自体は簡単で、listen して通知メッセージからアプリを起動したら Navigator.pushNamed で自動で画面遷移するようにしています。
以上でサンプルアプリ実装とその解説になります。
次にいよいよプッシュ通知を送信します。
アプリを起動する
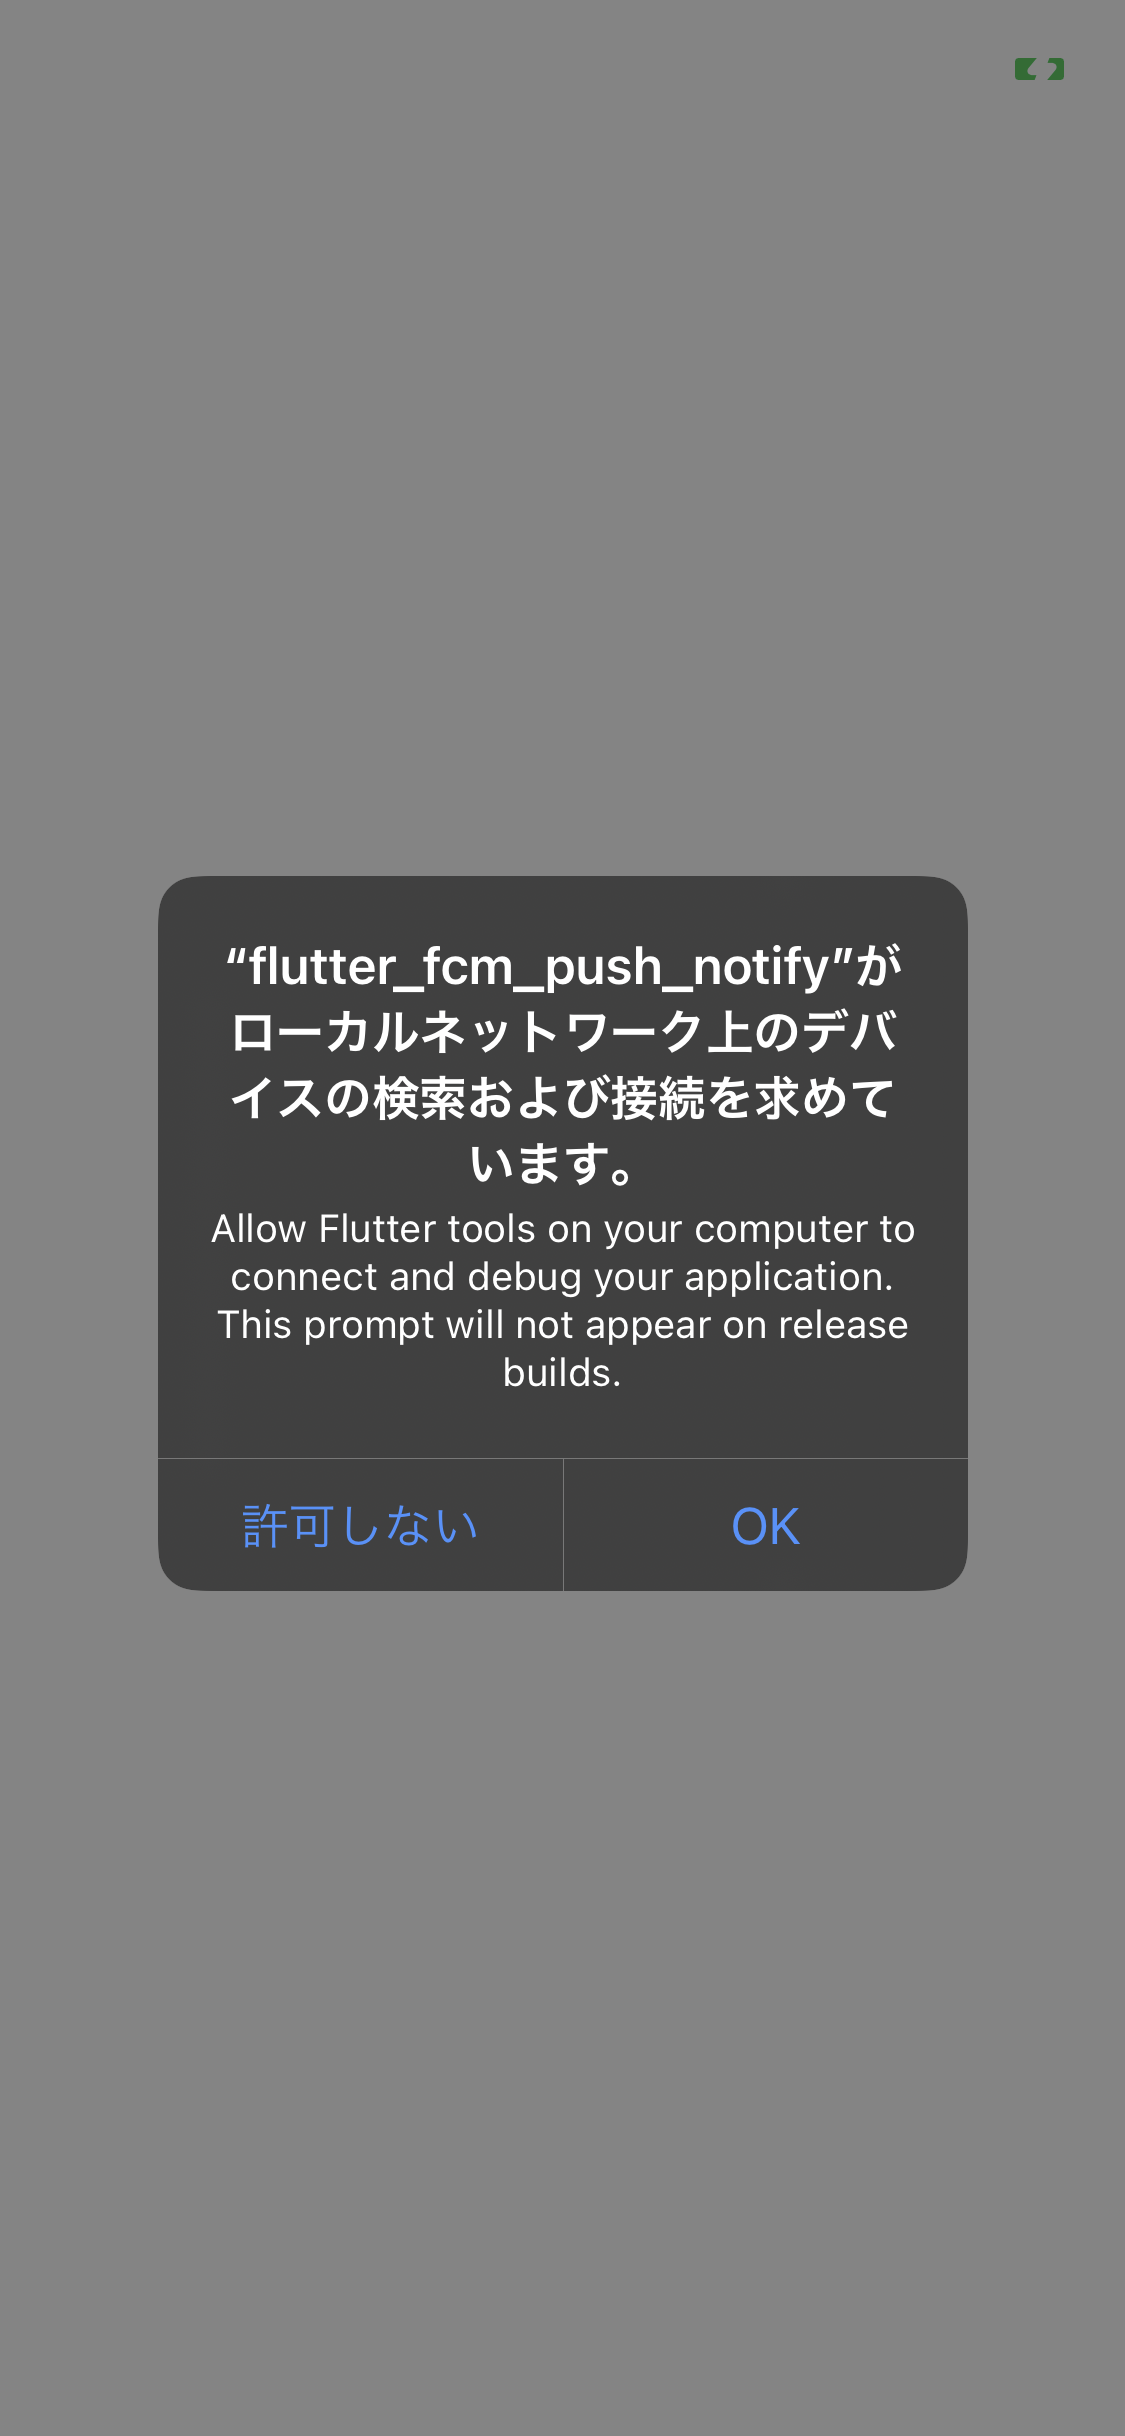
iOS でアプリを起動すると以下プロンプトが表示されますが OK をタップしてください。
公式の Debugging Flutter に以下の記述があります。
Due to added security around local network permissions in iOS 14, a permission dialog box must now be accepted for each application in order to enable Flutter debugging functionalities such as hot-reload and DevTools.
iOS 14 でローカルネットワークのアクセス許可に関するセキュリティが追加されたため、ホットリロードや DevTools などの Flutter デバッグ機能を有効にするには、アプリケーションごとにアクセス許可ダイアログボックスを受け入れる必要があります。
今回検証の為、DevTools やホットリロードを使いたいので許可します。
まだ未検証ですが、Release build 時はホットリロード等の機能はそもそも制限されるのでこのプロンプトは表示されないと推測します。
アプリを起動すると、FCM Token が取得されます。
アプリにも表示されるのと、debug print でも FCM Token が確認できます。
Launching lib/main.dart on iPhone11pro in debug mode...
Automatically signing iOS for device deployment using specified development team in Xcode project: 3UZ42L2F29
Running Xcode build...
Xcode build done. 24.8s
Installing and launching...
(lldb) 2021-03-22 11:39:45.392332+0900 Runner[46415:19573182] 7.3.0 - [Firebase/Core][I-COR000005] No app has been configured yet.
7.3.0 - [Firebase/Core][I-COR000008] The project's Bundle ID is inconsistent with either the Bundle ID in 'GoogleService-Info.plist', or the Bundle ID in the options if you are using a customized options. To ensure that everything can be configured correctly, you may need to make the Bundle IDs consistent. To continue with this plist file, you may change your app's bundle identifier to 'com.example.flutter-fcm-push-notify'. Or you can download a new configuration file that matches your bundle identifier from https://console.firebase.google.com/ and replace the current one.
7.3.0 - [Firebase/Messaging][I-FCM001000] FIRMessaging Remote Notifications proxy enabled, will swizzle remote notification receiver handlers. If you'd prefer to manually integrate Firebase Messaging, add "FirebaseAppDelegateProxyEnabled" to your Info.plist, and set it to NO. Follow the instructions at:
https://firebase.google.com/docs/cloud-messaging/ios/client#method_swizzling_in_firebase_messaging
to ensure proper integration.
Debug service listening on ws://127.0.0.1:50137/Sfk6Jn-ohYg=/ws
Syncing files to device iPhone11pro...
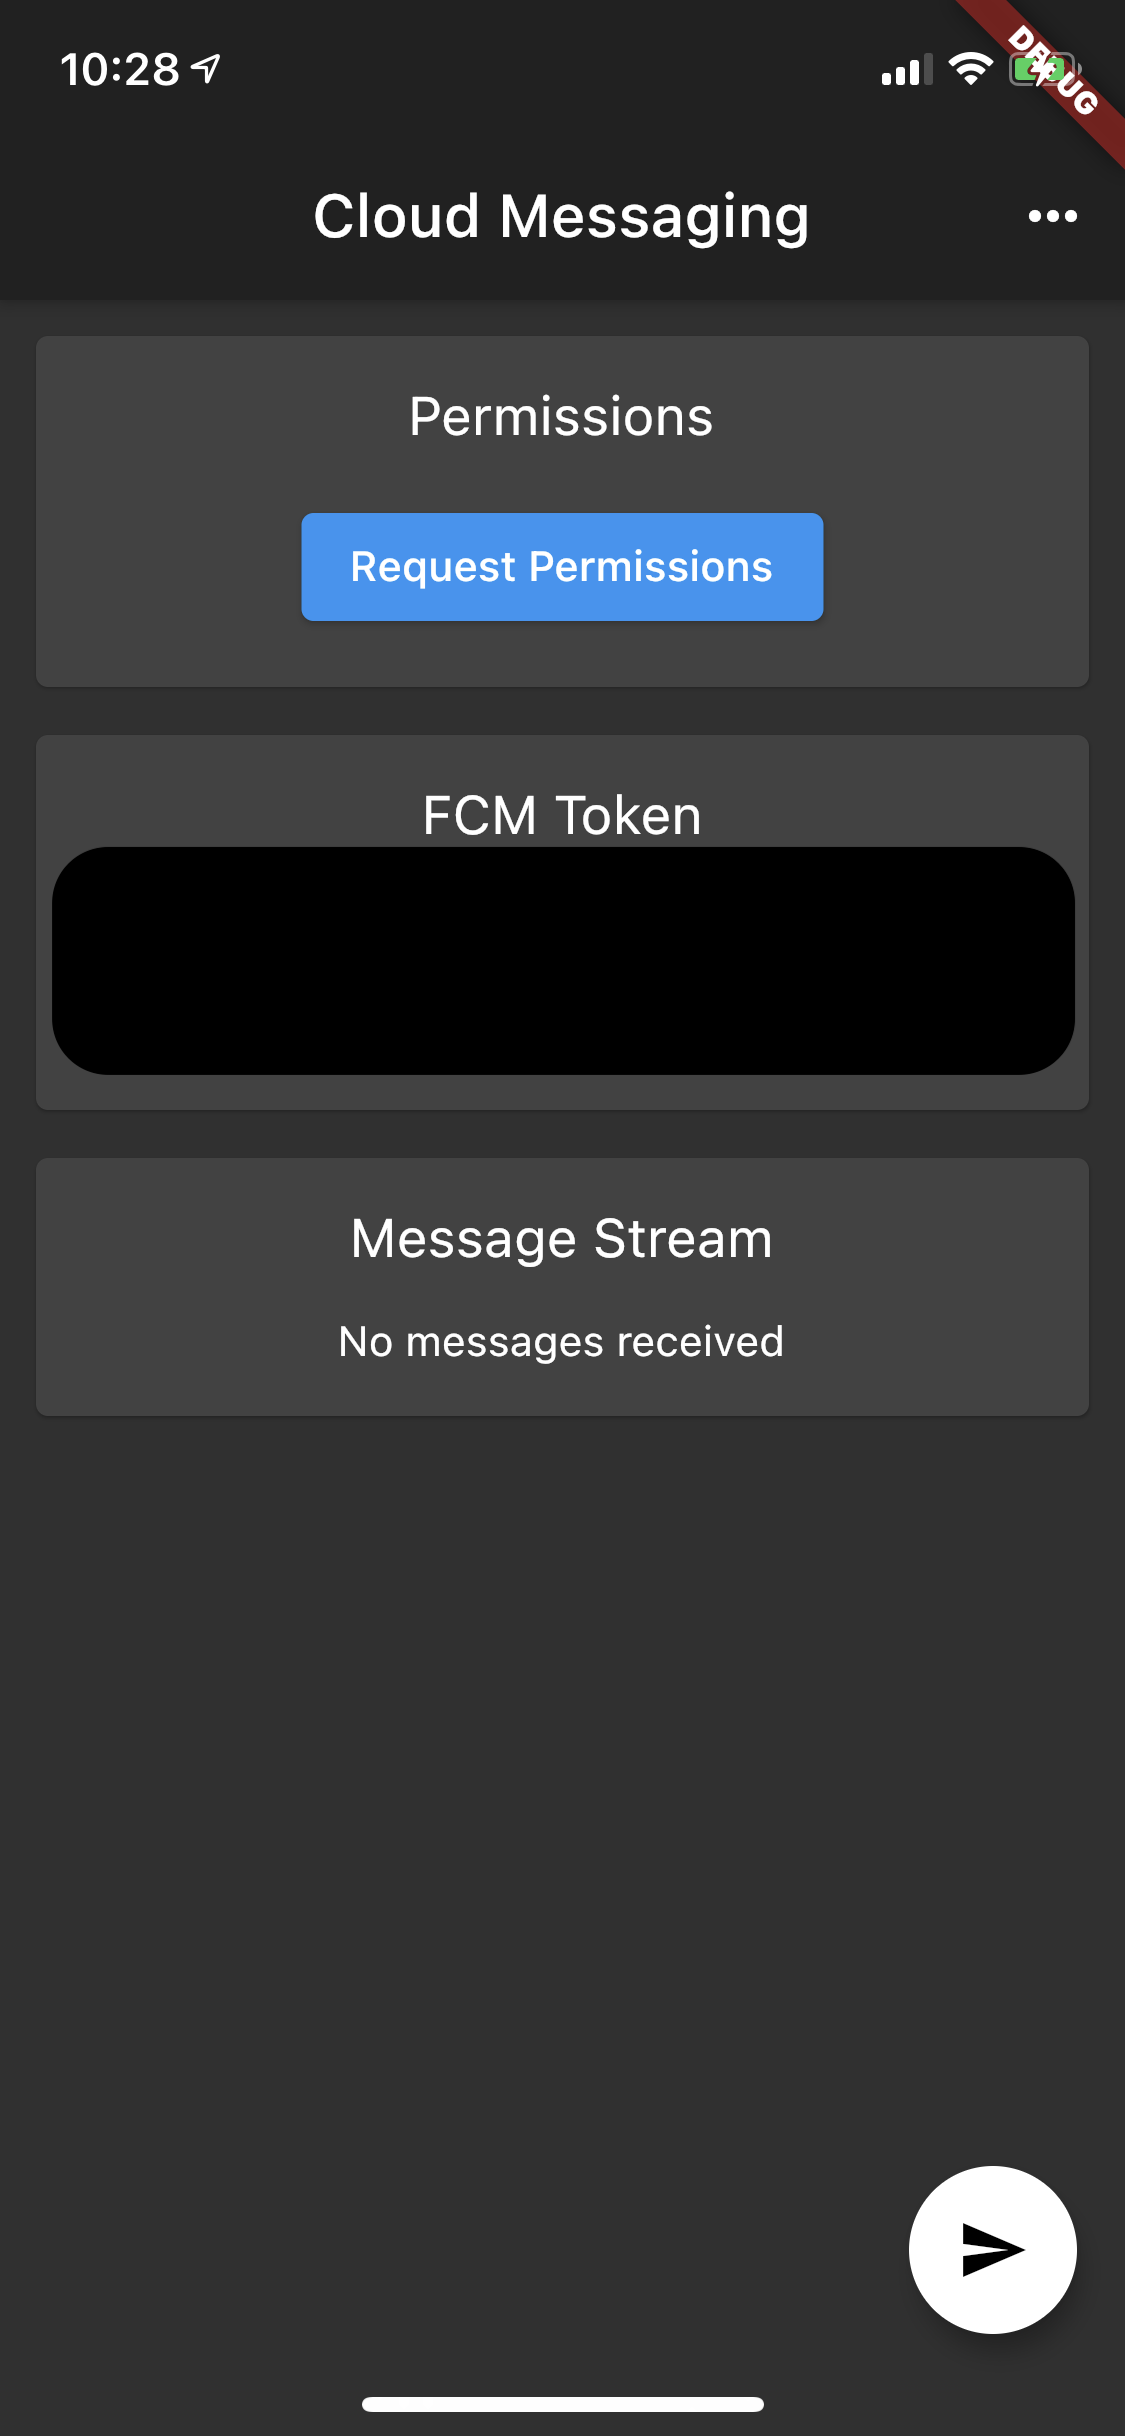
flutter: FCM Token: XXXXXXXXXXXXXXXXXXXXXXXXXXXXXXXXXXXXXXXXXXXXXXXXXXXXXXXXXXXXXXXXXXXXXXXXXXXXXXXXXXXXXXXXXXXXXXXXXXXXXXXX次に Request Permissions ボタンをタップします。
プッシュ通知パーミッション許可ダイアログが表示されるので許可をタップします。
今回は iOS のスクショを貼ってますが、Android も同様ダイアログが表示されます。

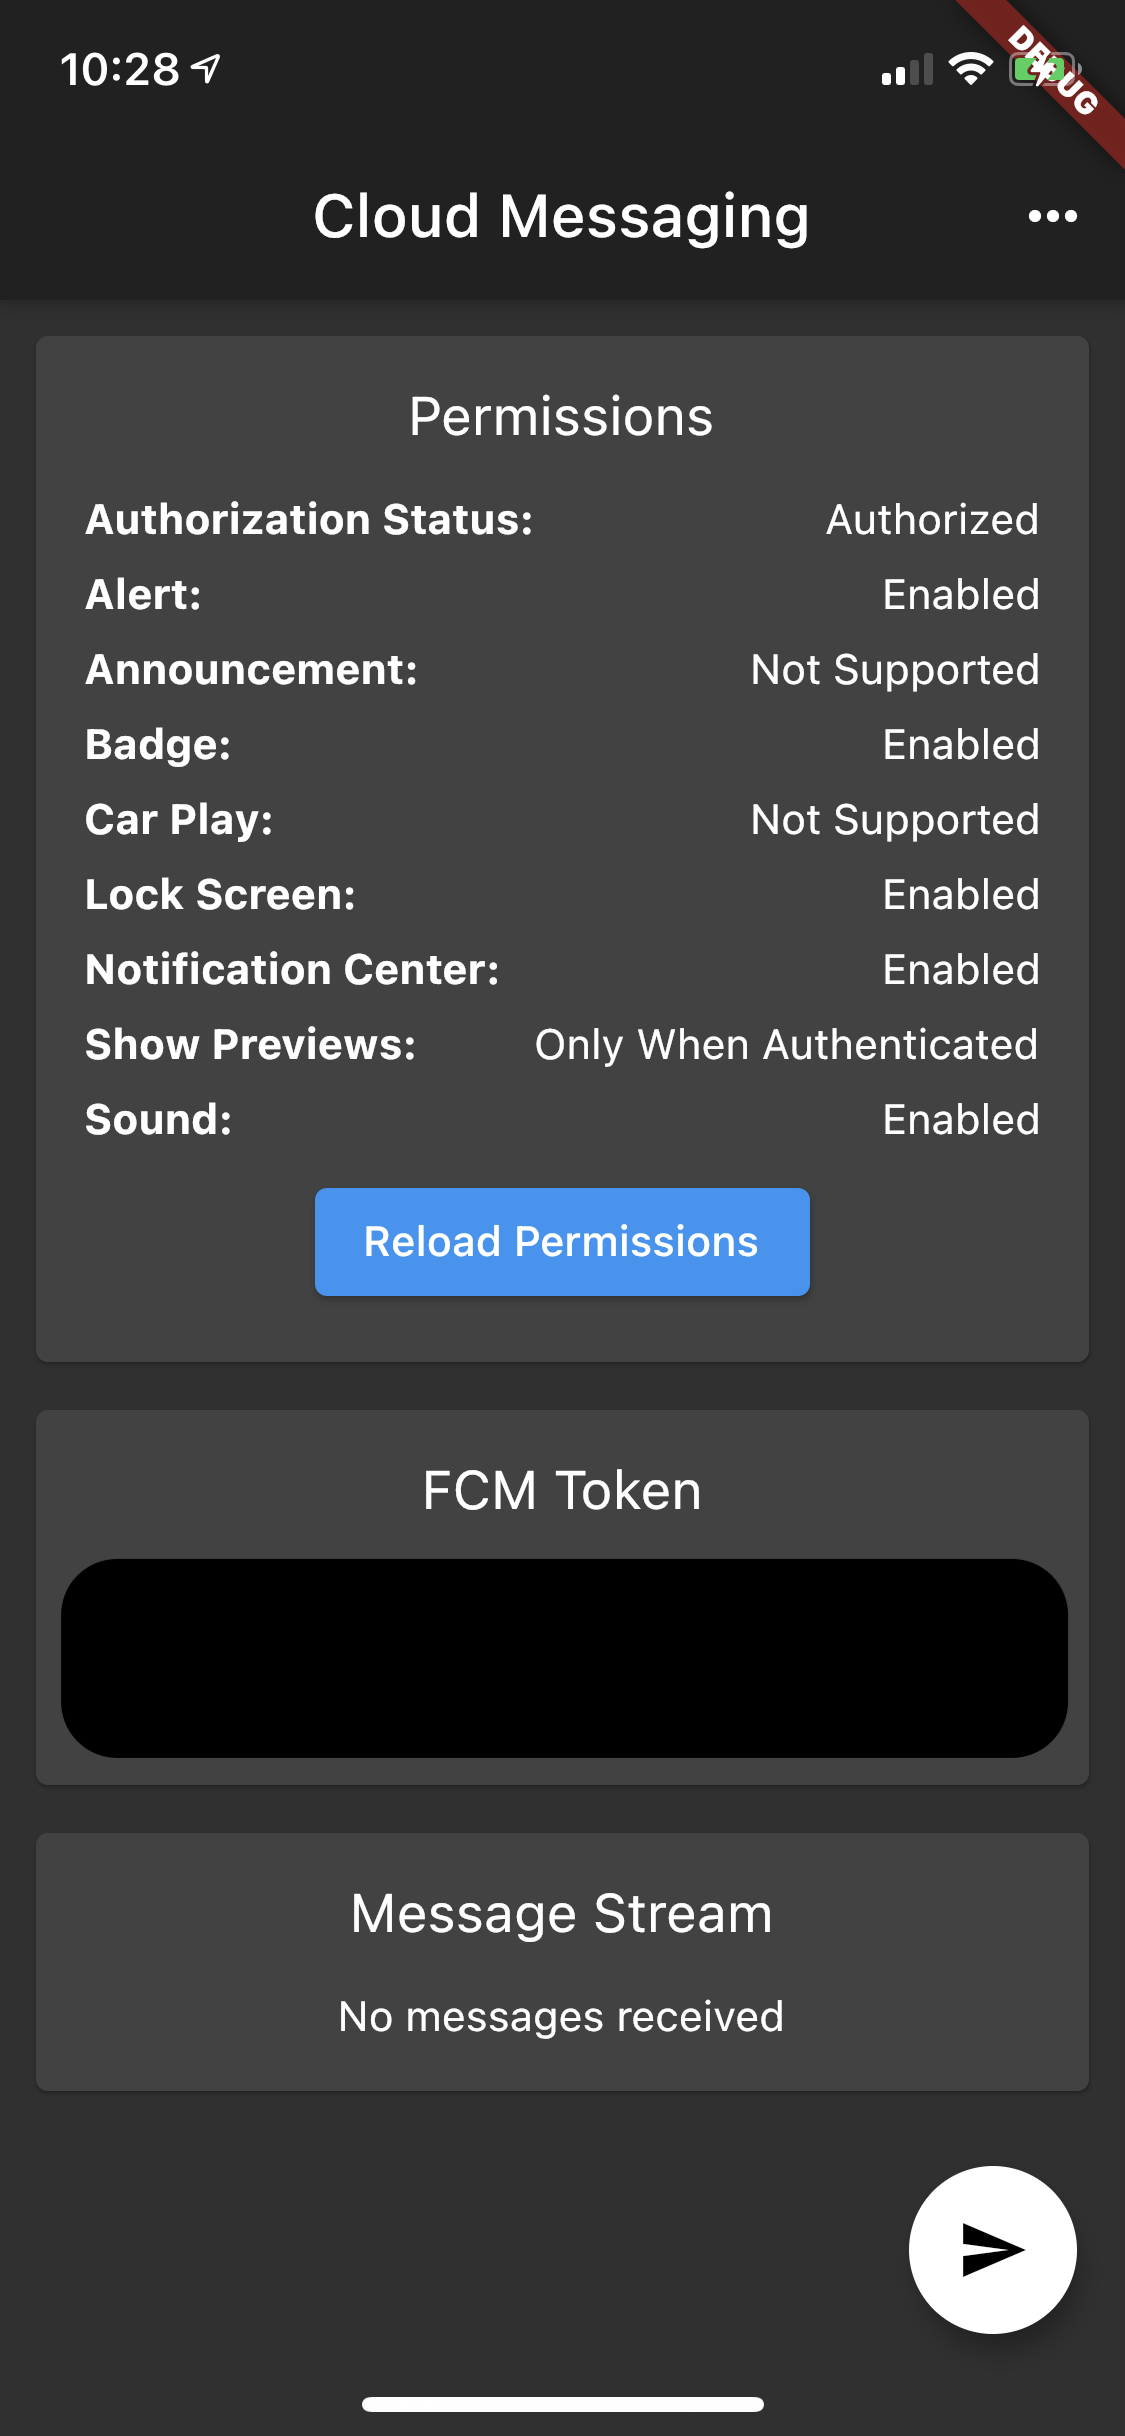
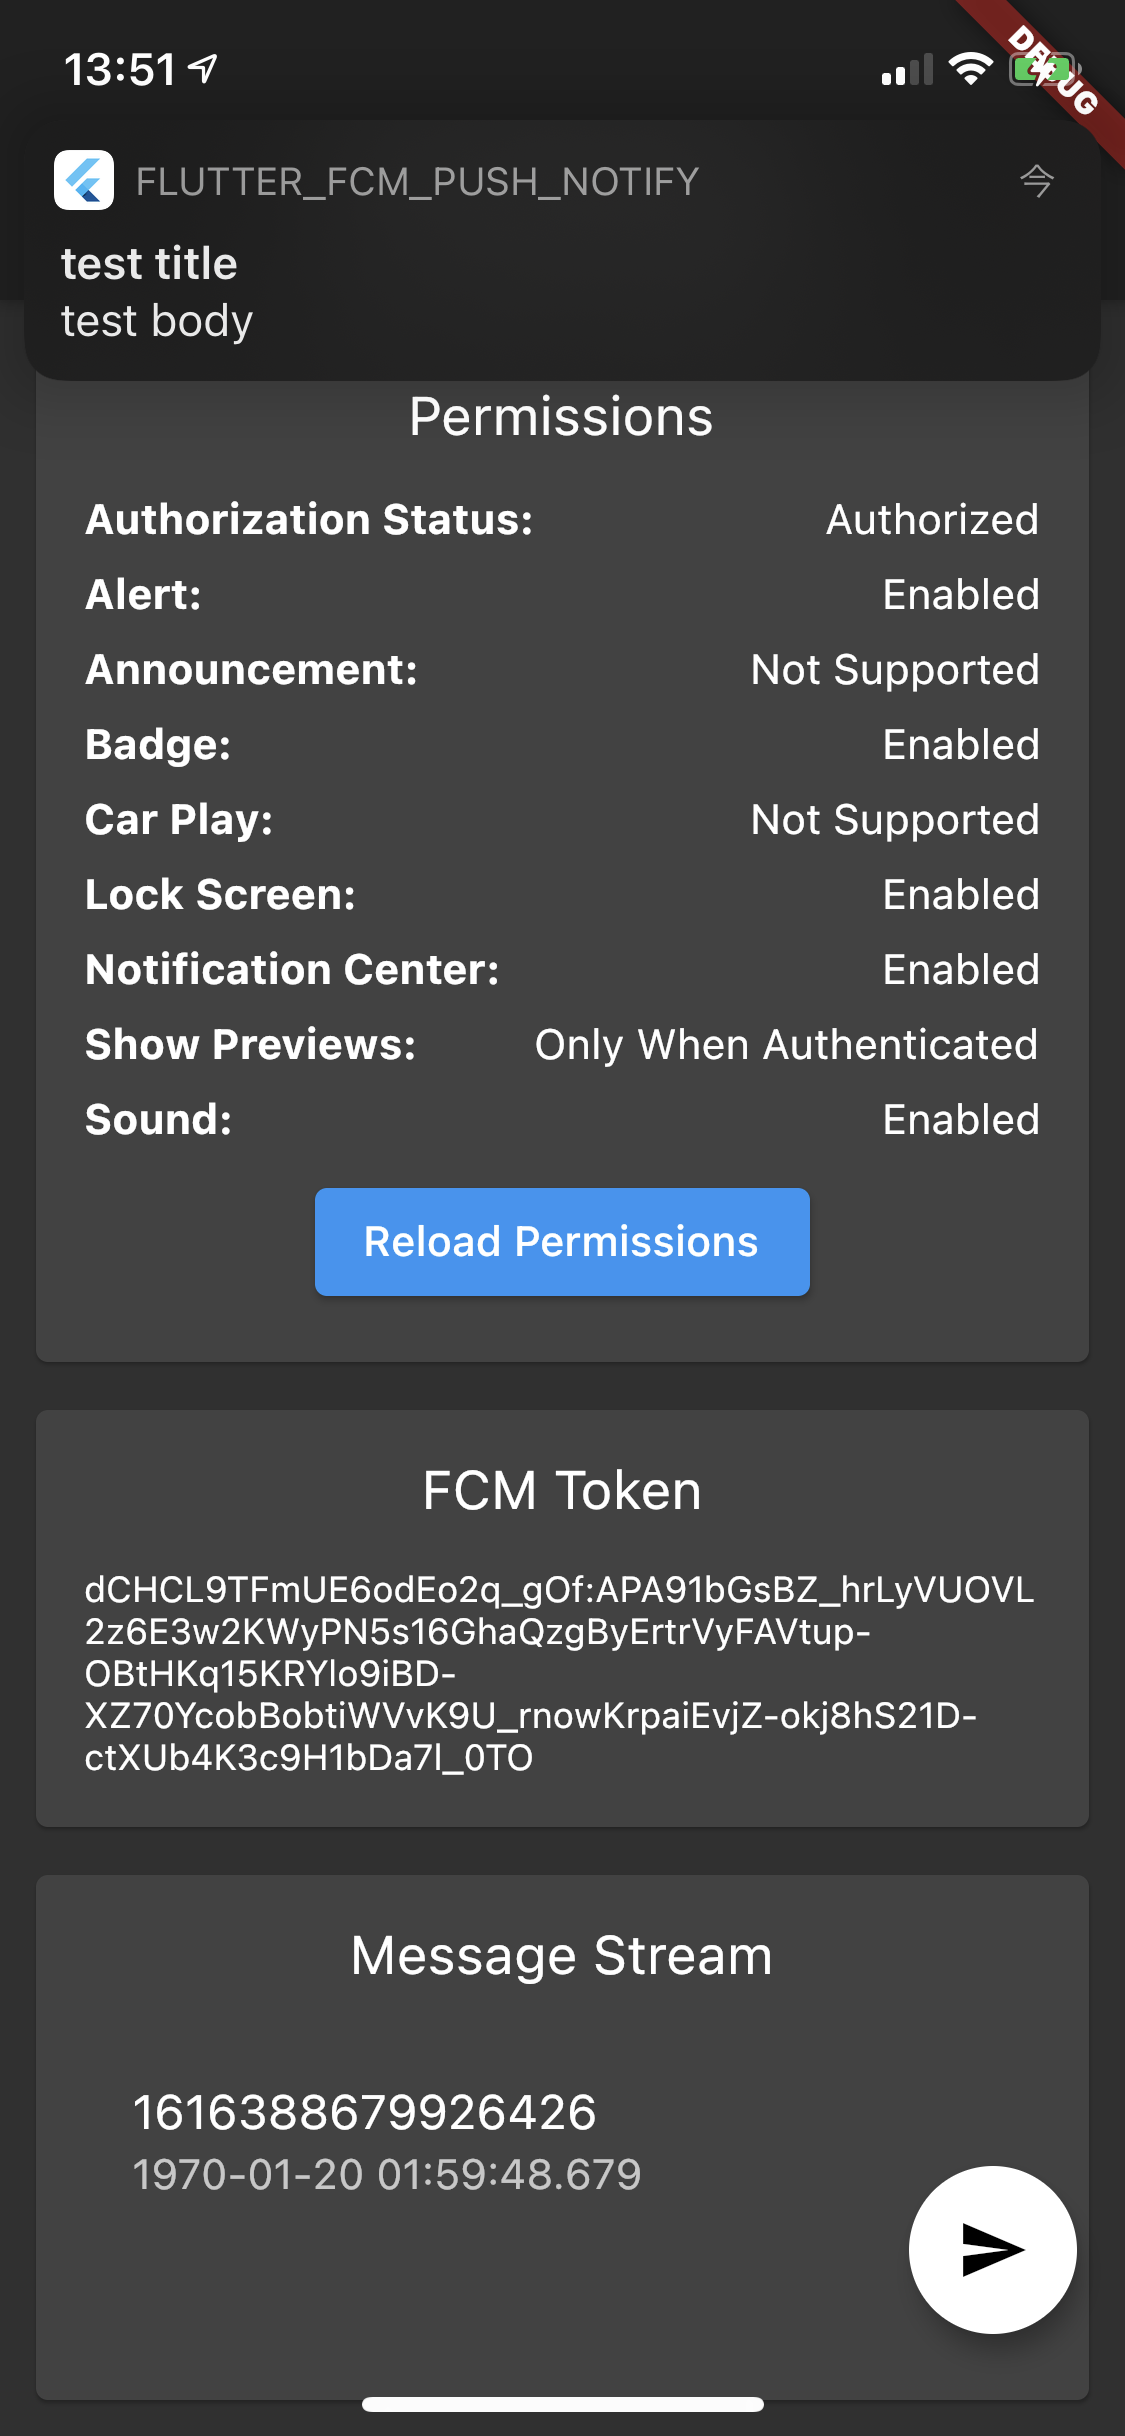
Permissions を確認するとアプリのパーミッション情報が表示されます。
パーミッションを許可すると iOS/Android 共に Authorization Status が Authorized になります。
iOS は更に Notification Center、Alert、Badge、Lock Screen、Sound が Enabled になっています。
これでプッシュ通知を受信する準備ができました。
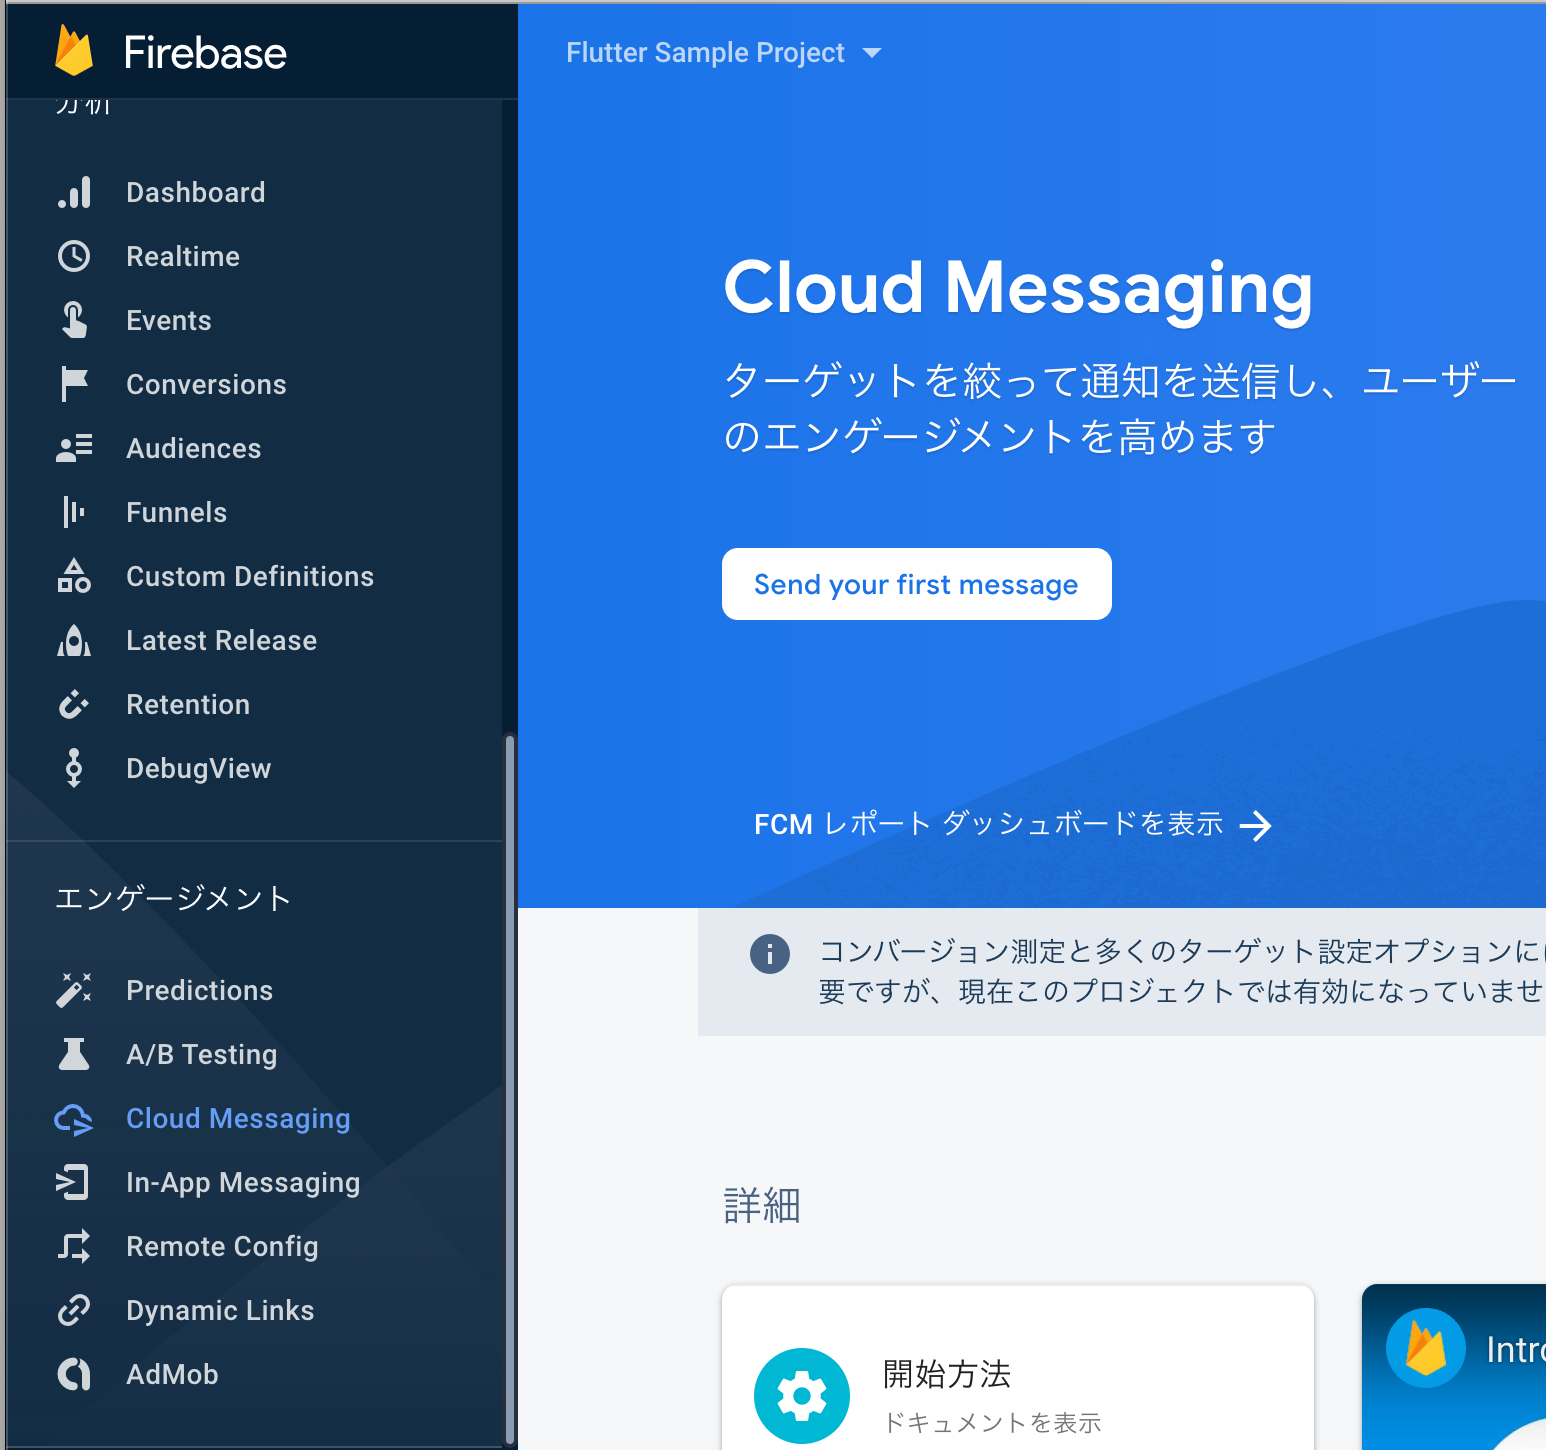
Firebase Console からプッシュ通知を送信する
Firebase Console からプロジェクトを選択します。
左メニューの Cloud Messaging から Cloud Message 画面を開きます。
Send Your first message.ボタンをクリックします。
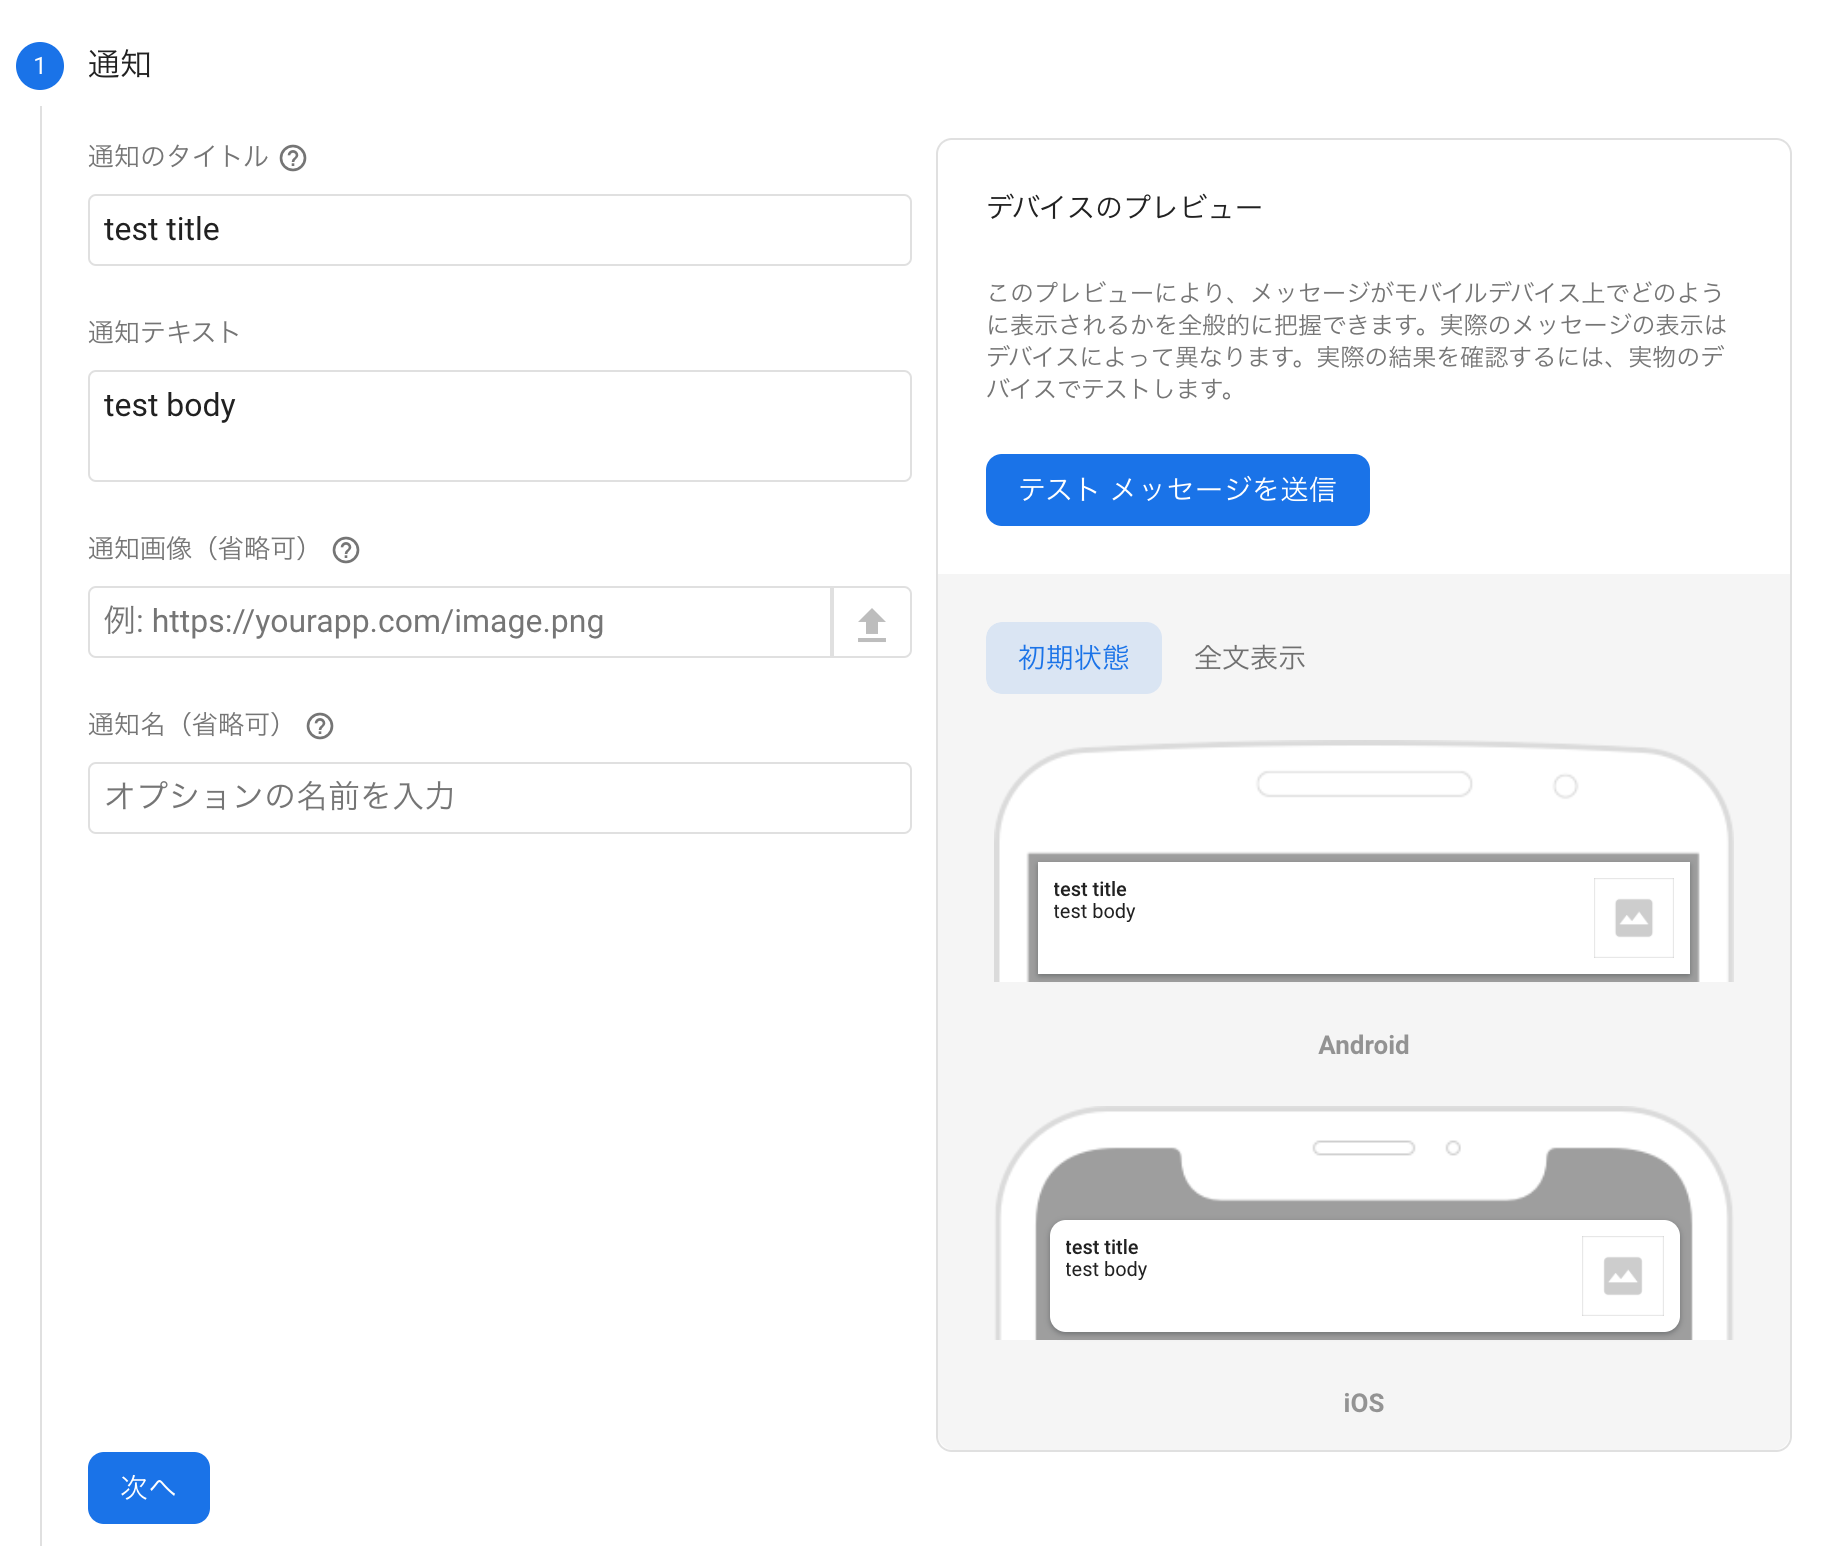
通知のタイトルと通知のテキストを入力します。
テストメッセージを送信ボタンをクリックします。
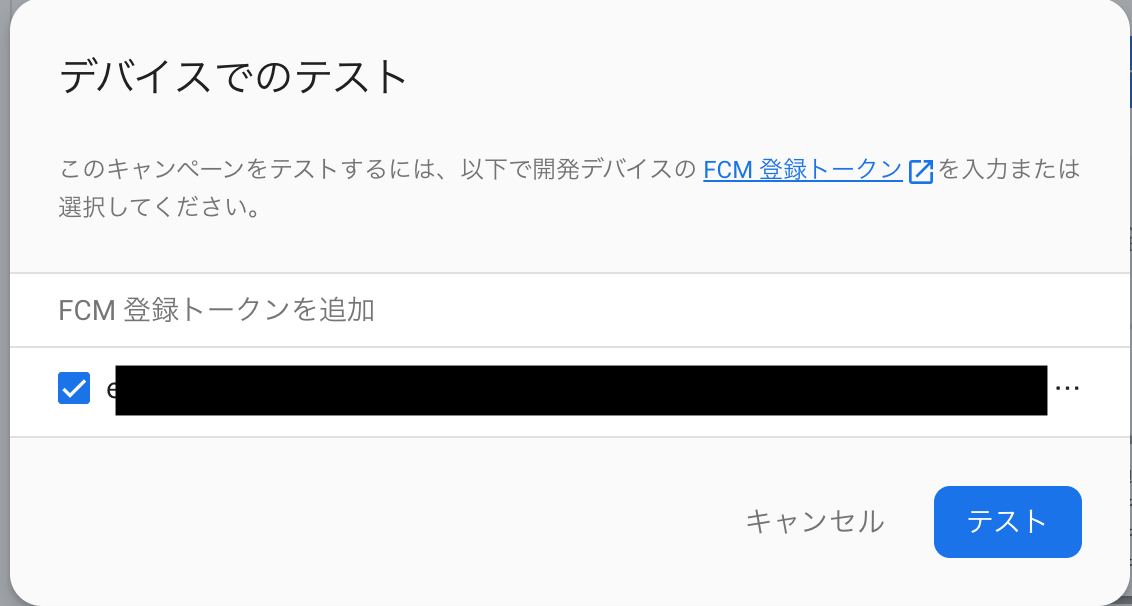
先程アプリを起動した際に出力された FCM Token を入力します。
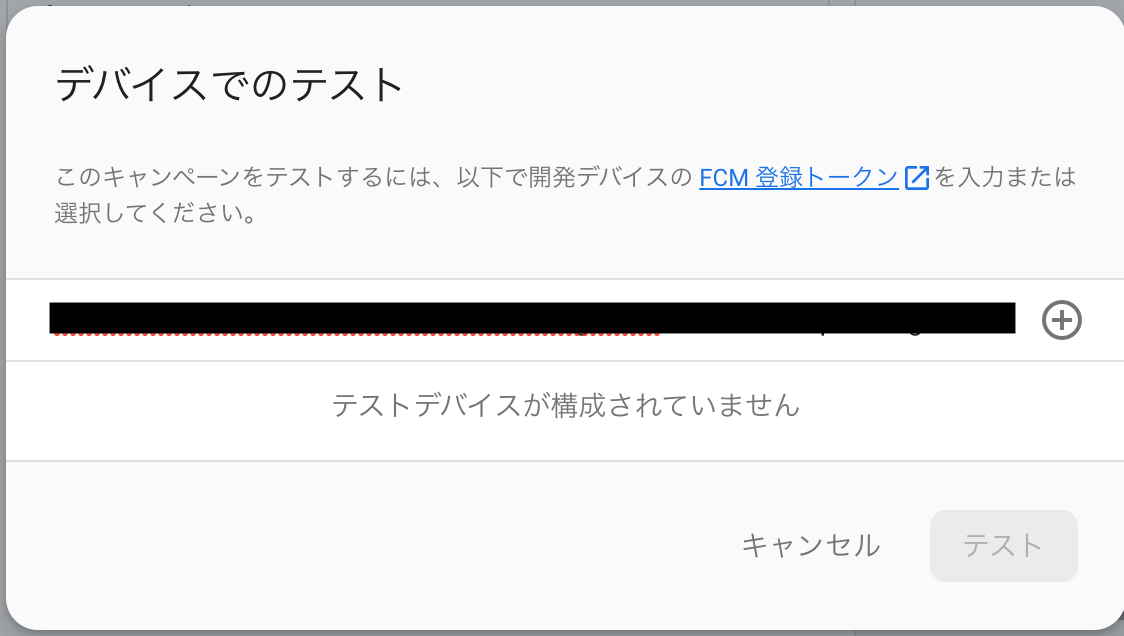
+ ボタンをクリックして FCM Token を追加してテストボタンをクリックします。
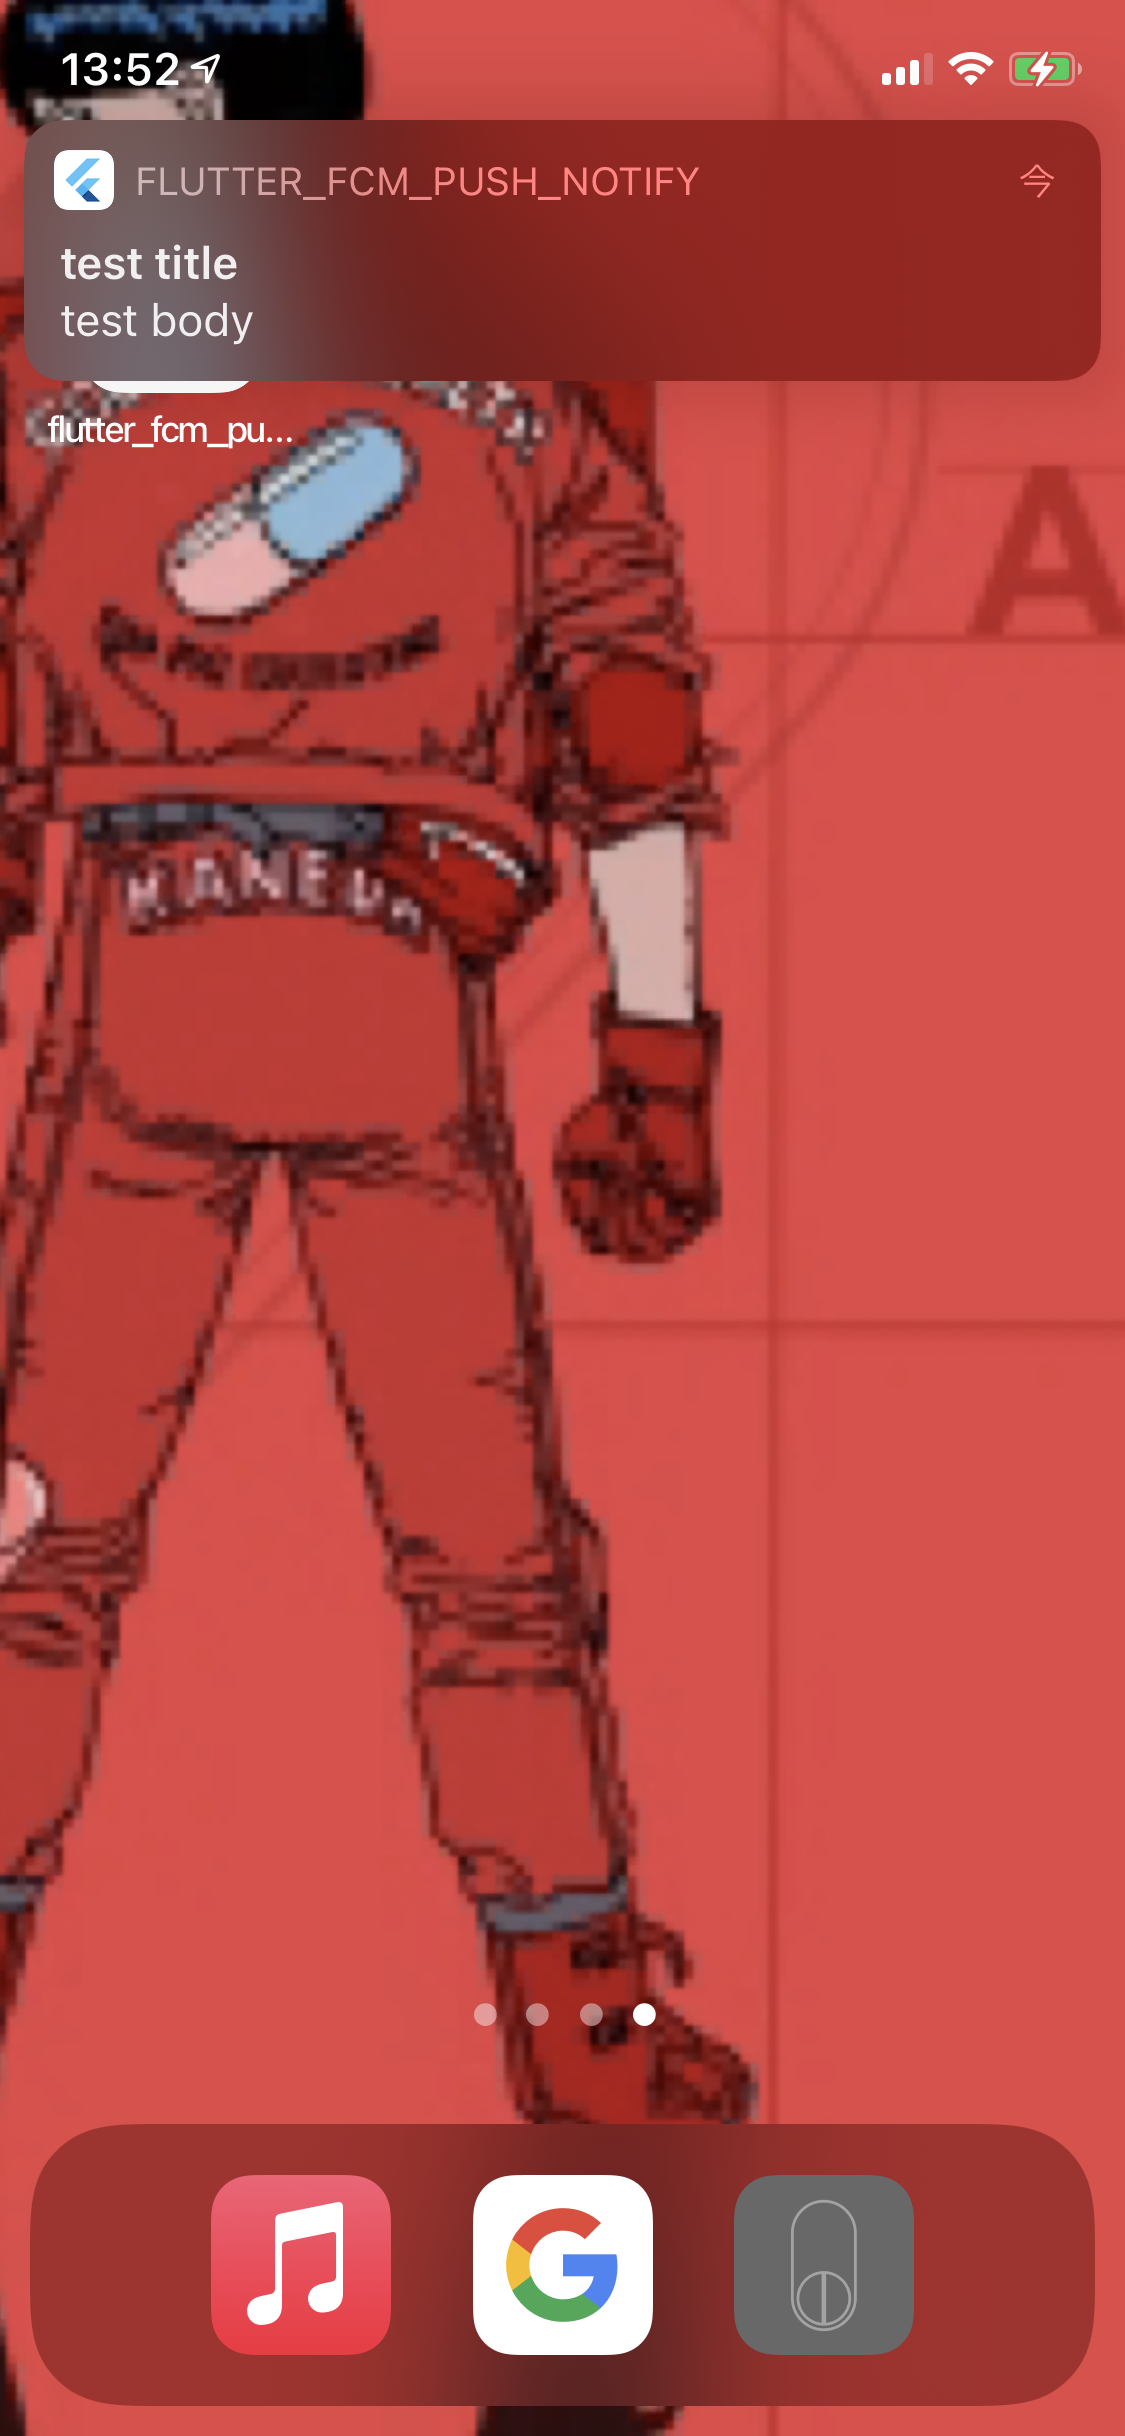
このようにアプリがフォアグラウンドの時にプッシュ通知が受信できました。
アプリがバックグラウンドの時にプッシュ通知を配信しても問題なくプッシュ通知が受信できます。
アプリのタスクを落とした(ターミネイト)状態でプッシュ通知を送信しても同じくプッシュ通知を受信できます。
ホーム、もしくはタスクトレイにあるプッシュ通知をクリックするとサンプルアプリが起動し、メッセージの詳細画面が表示されます。
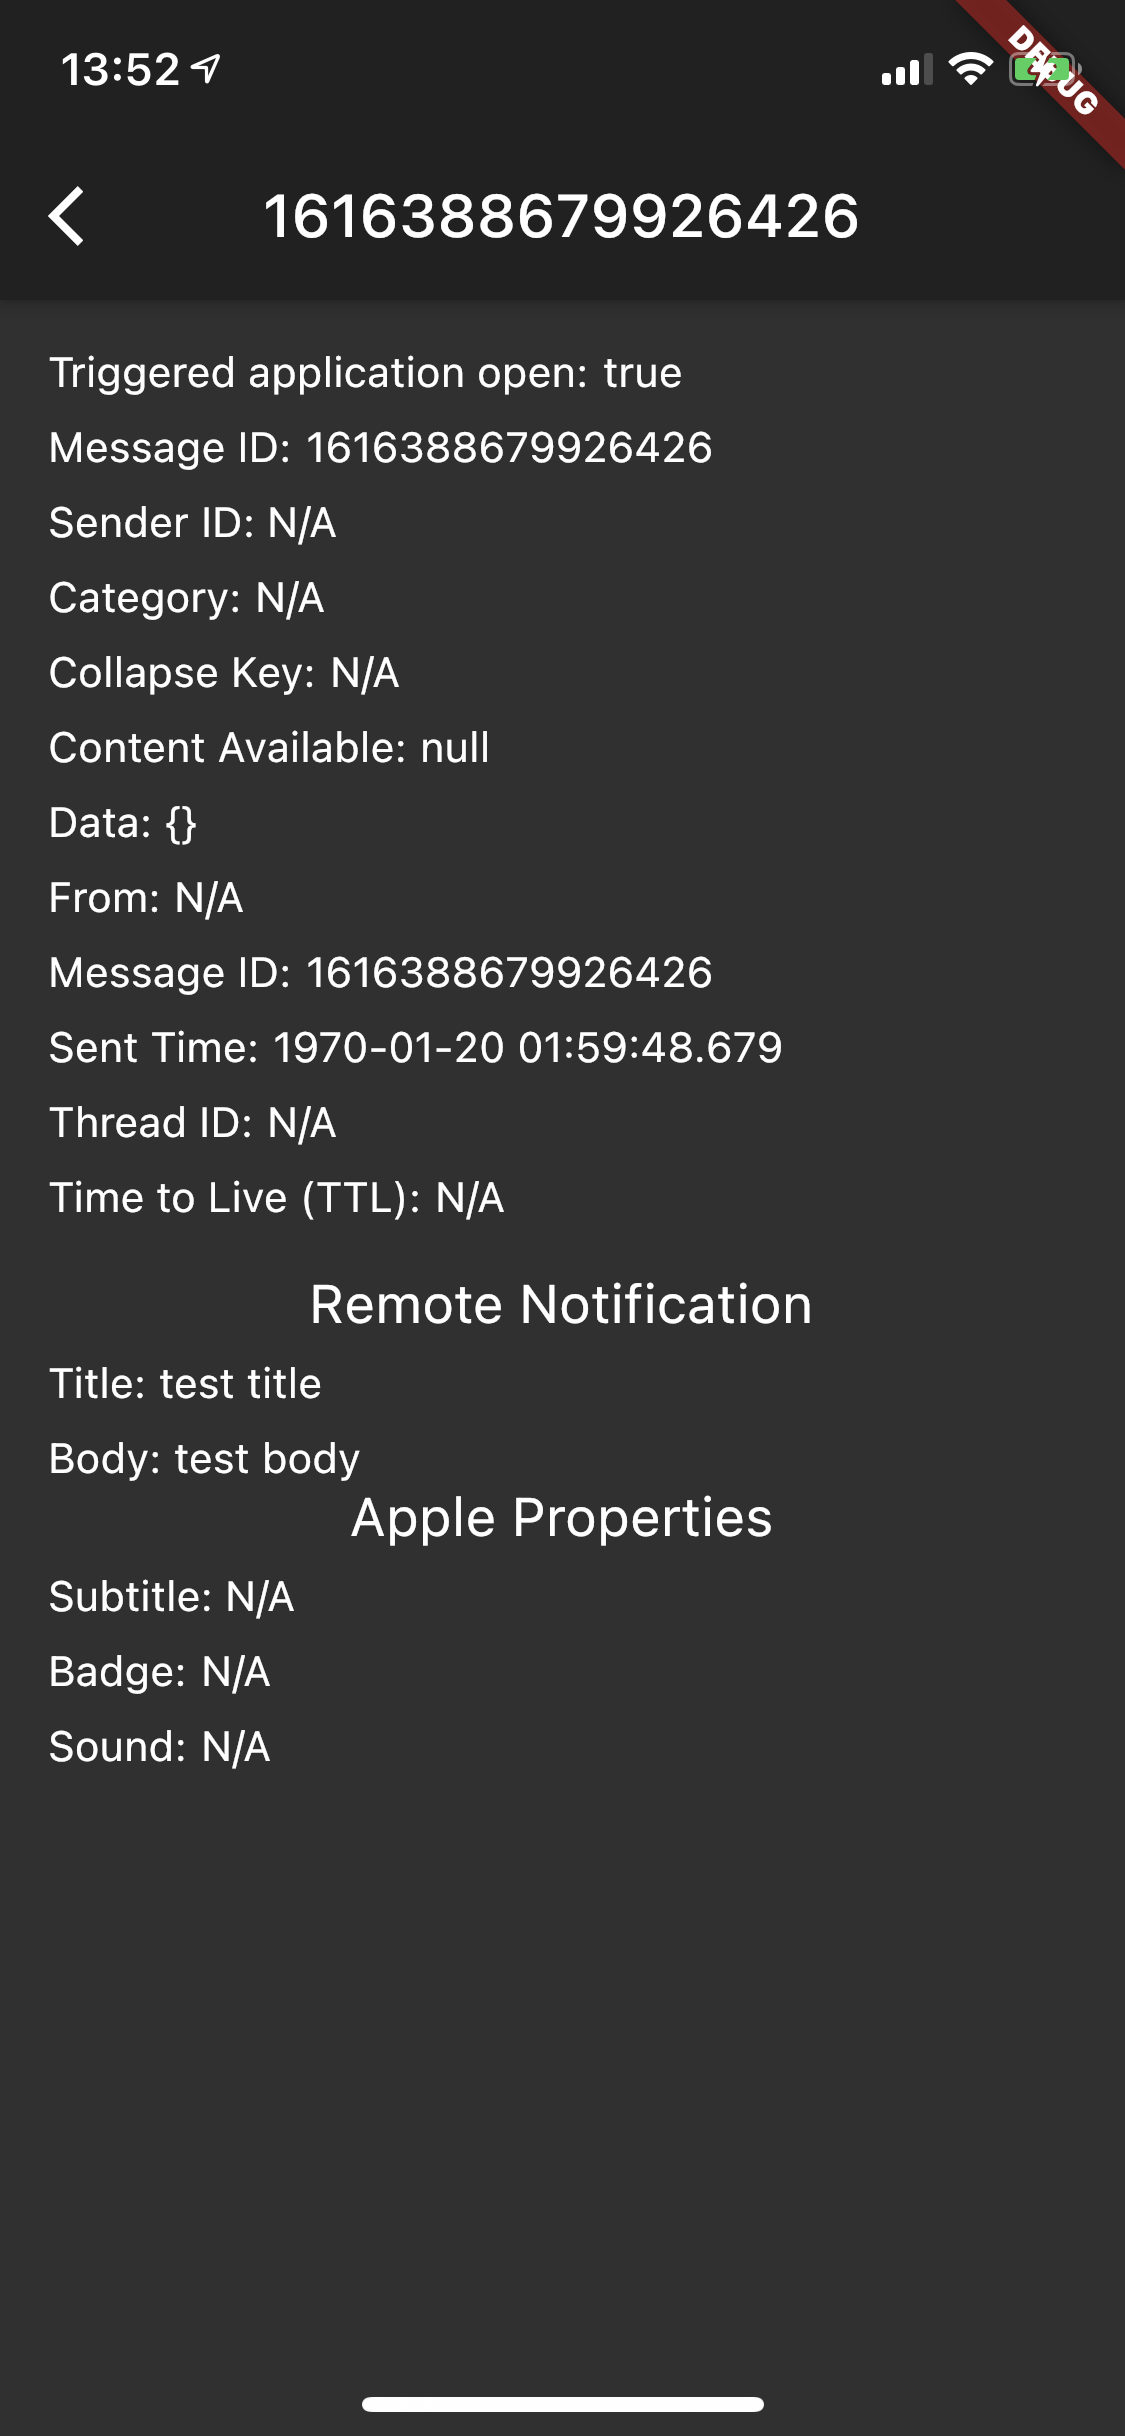
プッシュ通知からアプリを起動した場合、メッセージ詳細画面の Triggered application open は true となります。
Remote Notification にはプッシュ通知のタイトル、本文が表示されていますね。
今回は iOS のスクショのみ掲載していますが、Android でも同様フォアグラウンド、バックグラウンド、アプリのタスクが落ちてる(ターミネイト)状態でプッシュ通知が受信できます。
おわりに
前回 Firebase のプロジェクト設定から iOS/Android の FCM 設定を解説しました。
初学者にとって最初の壁の iOS の証明書周りも詳しく解説しているので、まだ設定が終わっていない方は是非こちらの記事をご覧ください。
さて前後編で FCM を利用したプッシュ通知の実装をしていきましたがどうでしたでしょうか。
Flutter でプッシュ通知を送信するまでに設定から実装までやる事が多かったですね。
筆者は Flutter 初学者ですが、過去実装した中でもプッシュ通知周りが一番大変でした。
Flutter は iOS/Android のネイティブな要素が入ると難易度が途端に上がりますね。
まだまだ Android の channel(カテゴリ)別の push 通知など未検証な部分がありますが、それはまた別の記事にしたいと思います。
再掲になりますが、今回のサンプルアプリ実装は部分的に掲載していますので、全てのソースを参照したい場合は上記の公式 examples か、筆者の Github を参照ください。
最後に開発・ステージング・本番環境別にプッシュ通知を配信する方法の記事を書いたので、より実践的にプッシュ通知を配信したい方はこちらをご覧ください。