
Flutter初心者がFCMを使ってプッシュ通知を受け取る〜設定編〜(2021/3/22版)
FCM (Firebase Cloud Messaging) のプッシュ通知設定とプッシュ通知を受信する Flutter アプリを実装します。
筆者は Flutter 初学者の為、モバイルアプリのプッシュ通知の設定が大変でした。
特に iOS の証明書周りの作業は骨が折れるので、なるべくスクショを多めにして分かりやすく解説できればと思います。
もし内容の誤りや、もっとこういうやり方があるよ、という方は Twitter で DM していただくか Contact で連絡して頂けると大変助かります。
記事が長くなったので、設定編とアプリ実装編の前後編に分けました。
アプリの実装編の記事はこちらになります。
今回は Firebase のプロジェクト作成から FCM の iOS/Android 設定までをご紹介します。
環境
- macOS Big Sur 11.2.1
- Android Studio 4.1.2
- Flutter 2.0.0
- Dart 2.12.0
Firebase プロジェクトを作成する
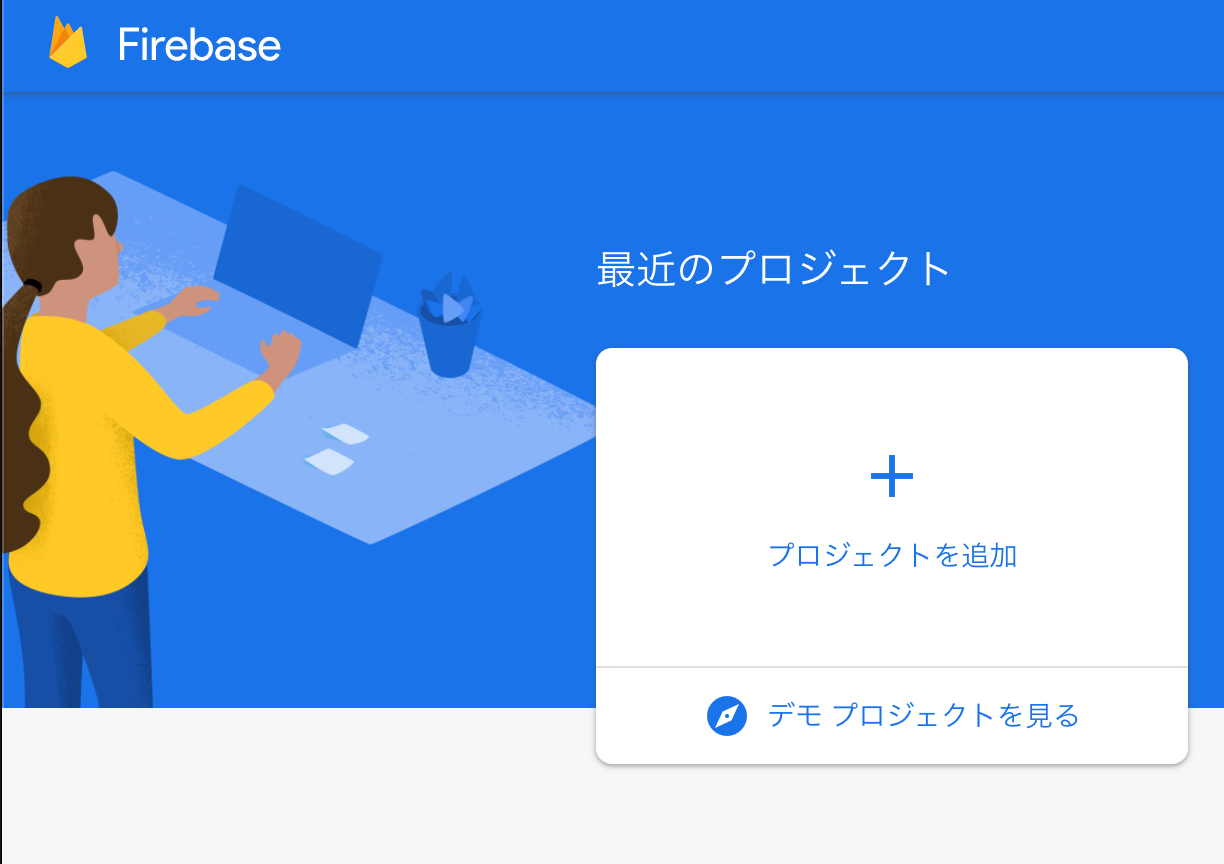
まず Firebase Console を開き Firebase プロジェクトを作成します。
プロジェクトを追加をクリックします。
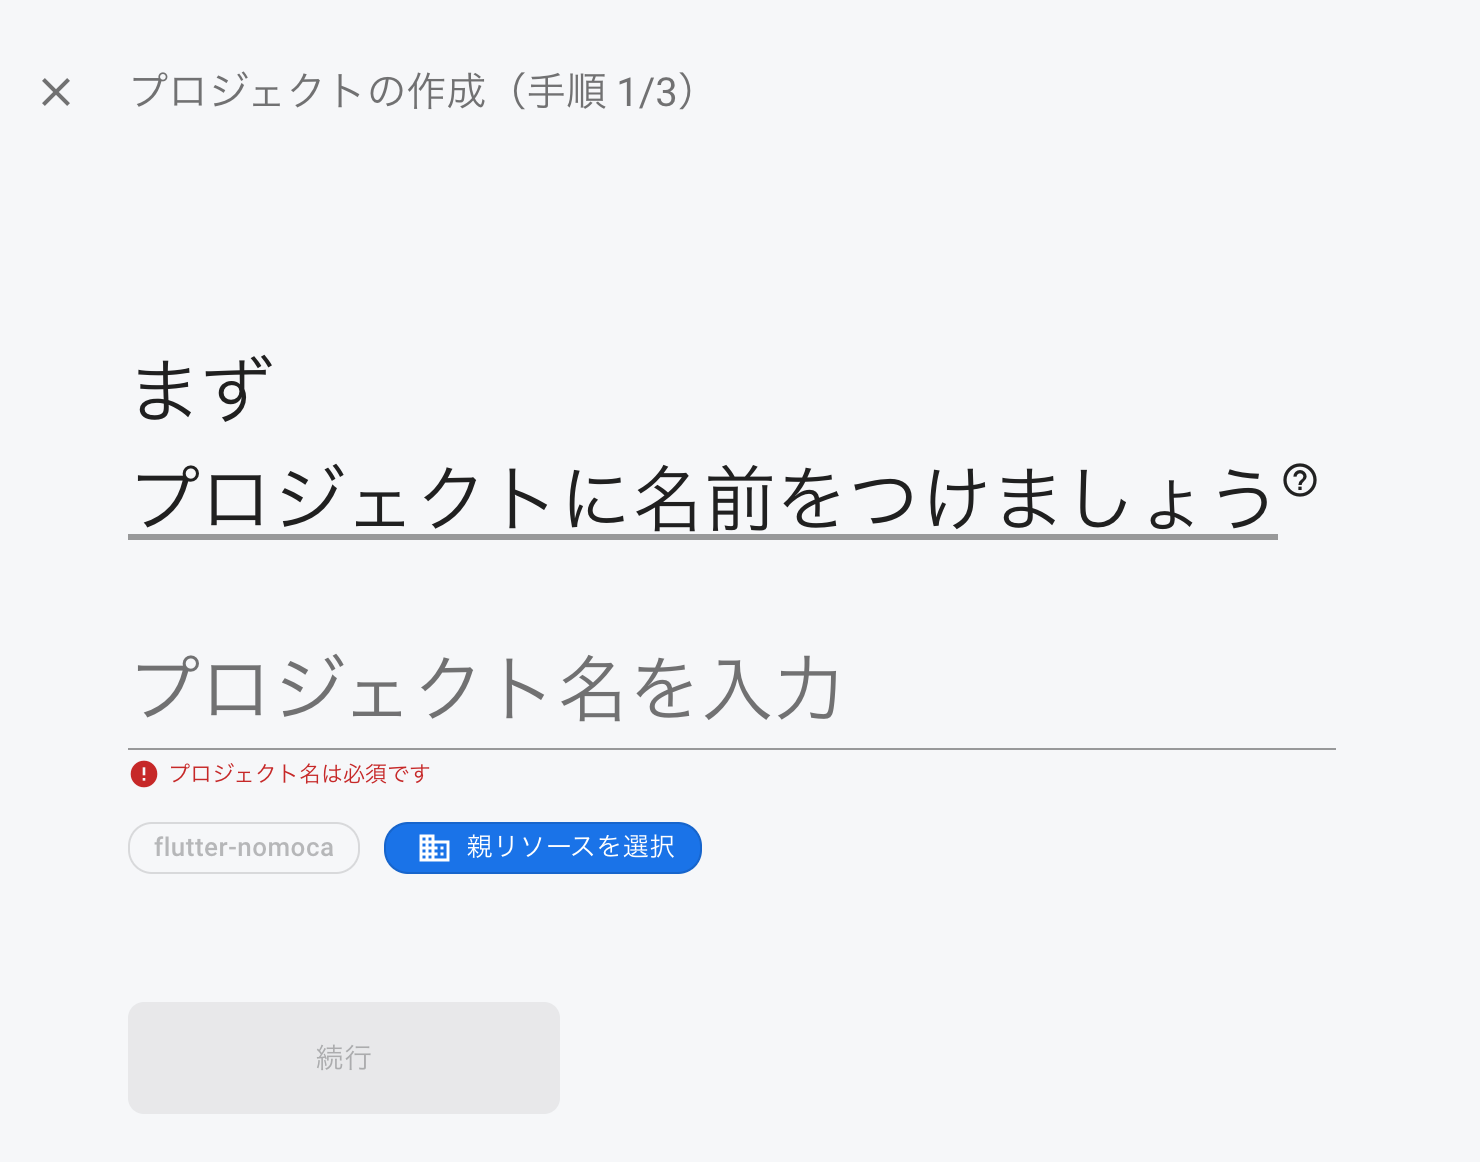
次に任意のプロジェクト名を入力、親リソースを選択します。
次に Google アナリティクス(以後 GA)の設定をします。
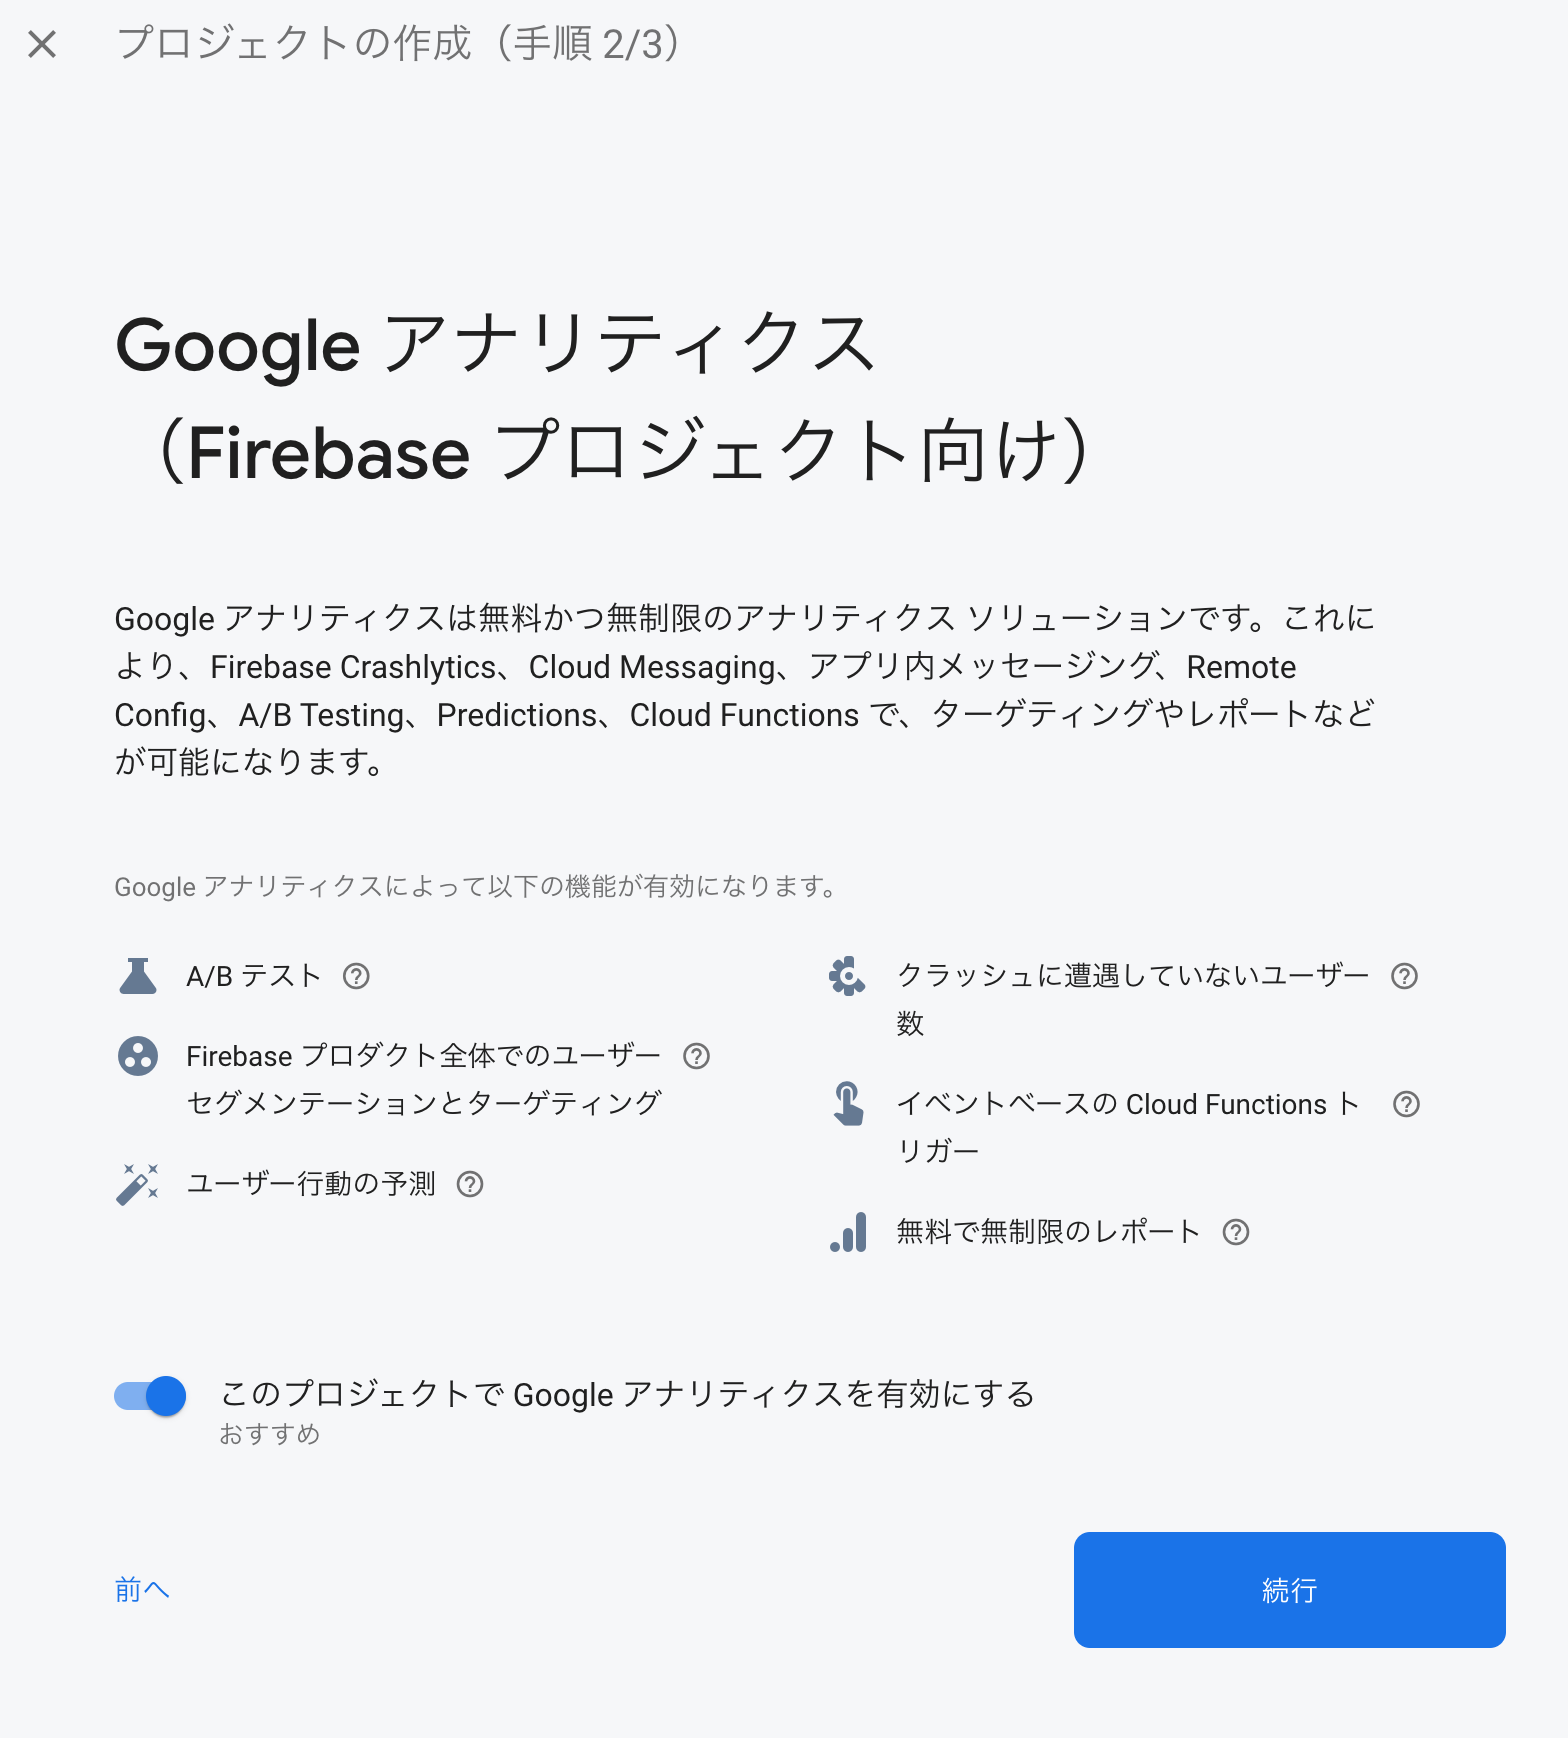
こちらは任意で選択してください。
今回は検証プロジェクトの為、GA は無効にします。
続行 ボタンを押すしてしばらくするとプロジェクトが作成されます。

Firebase プロジェクトに Android アプリを追加する
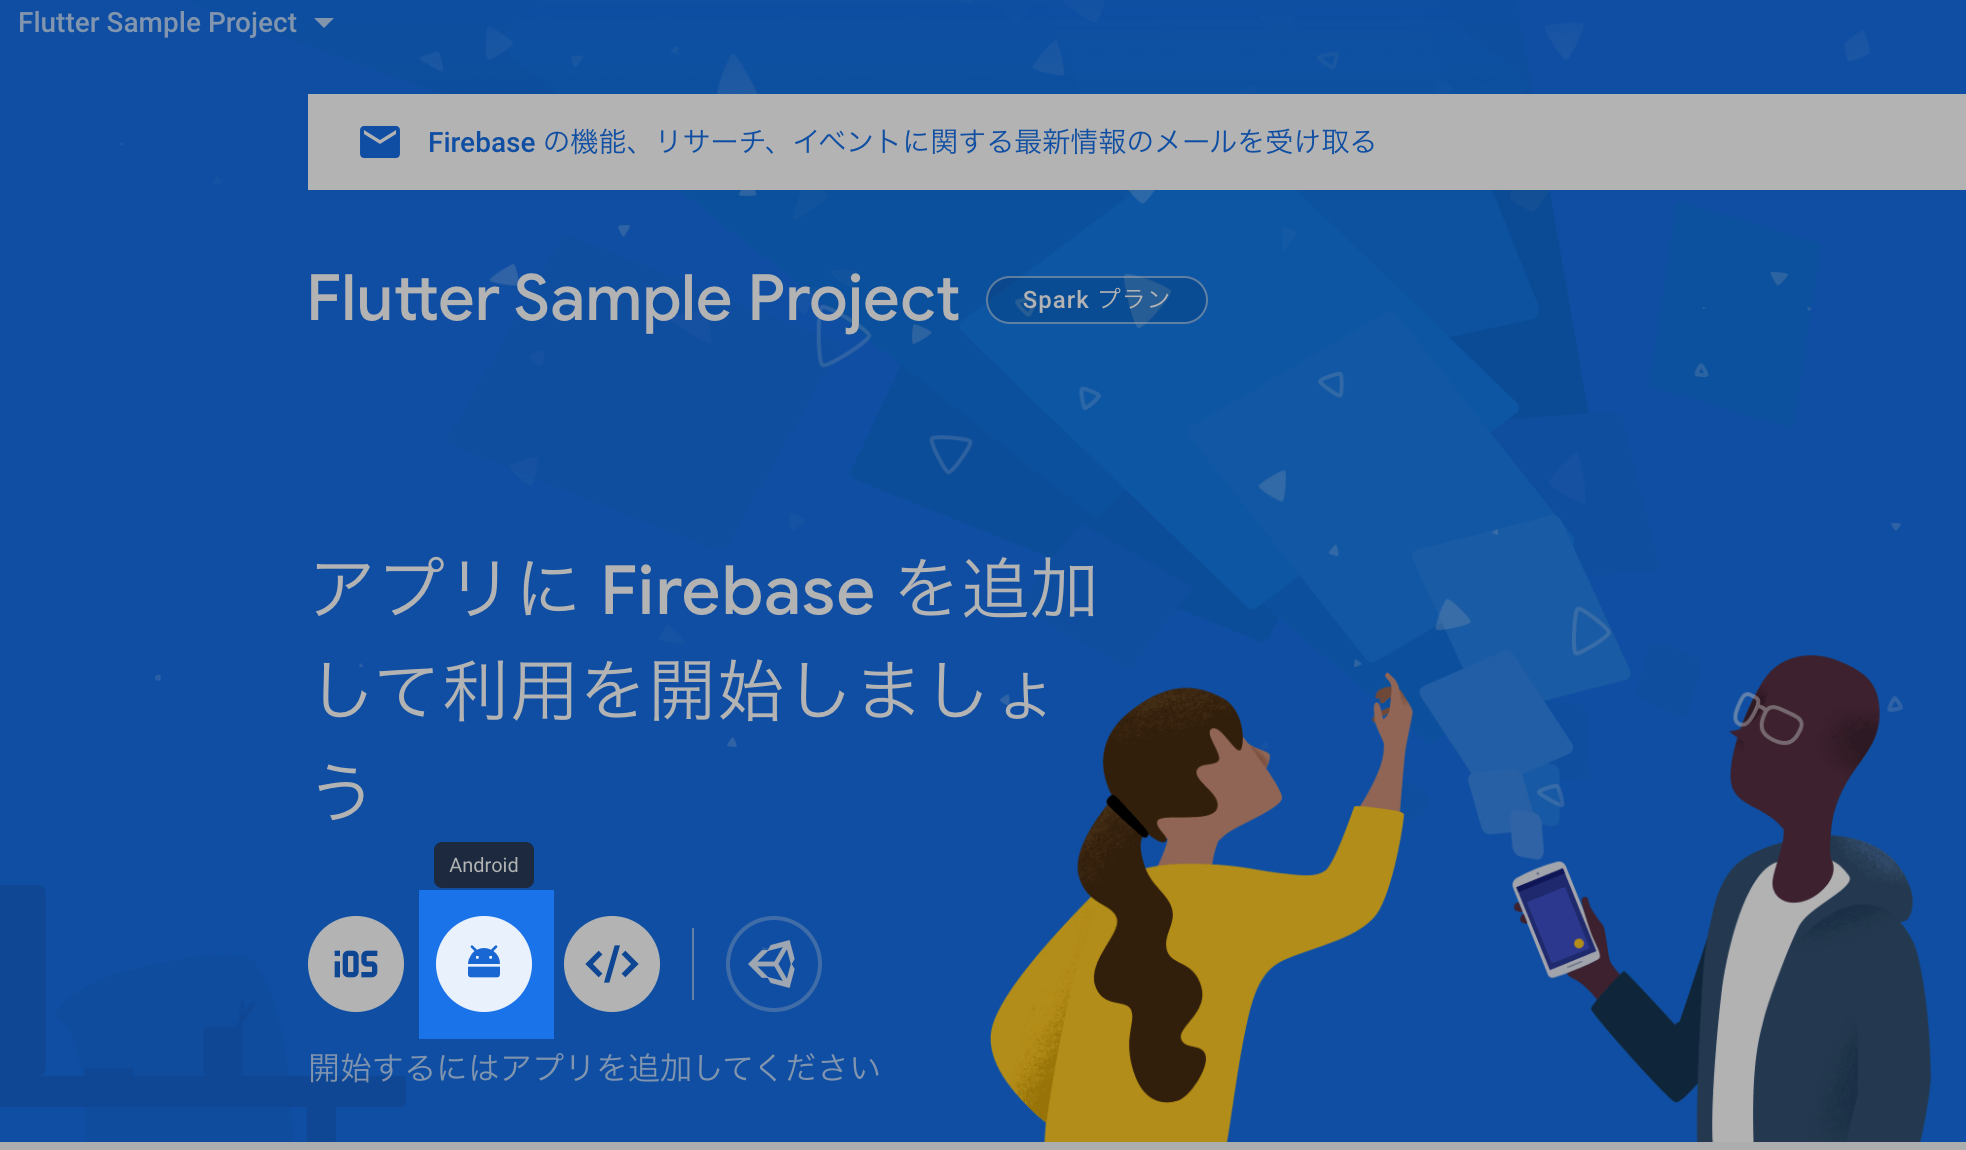
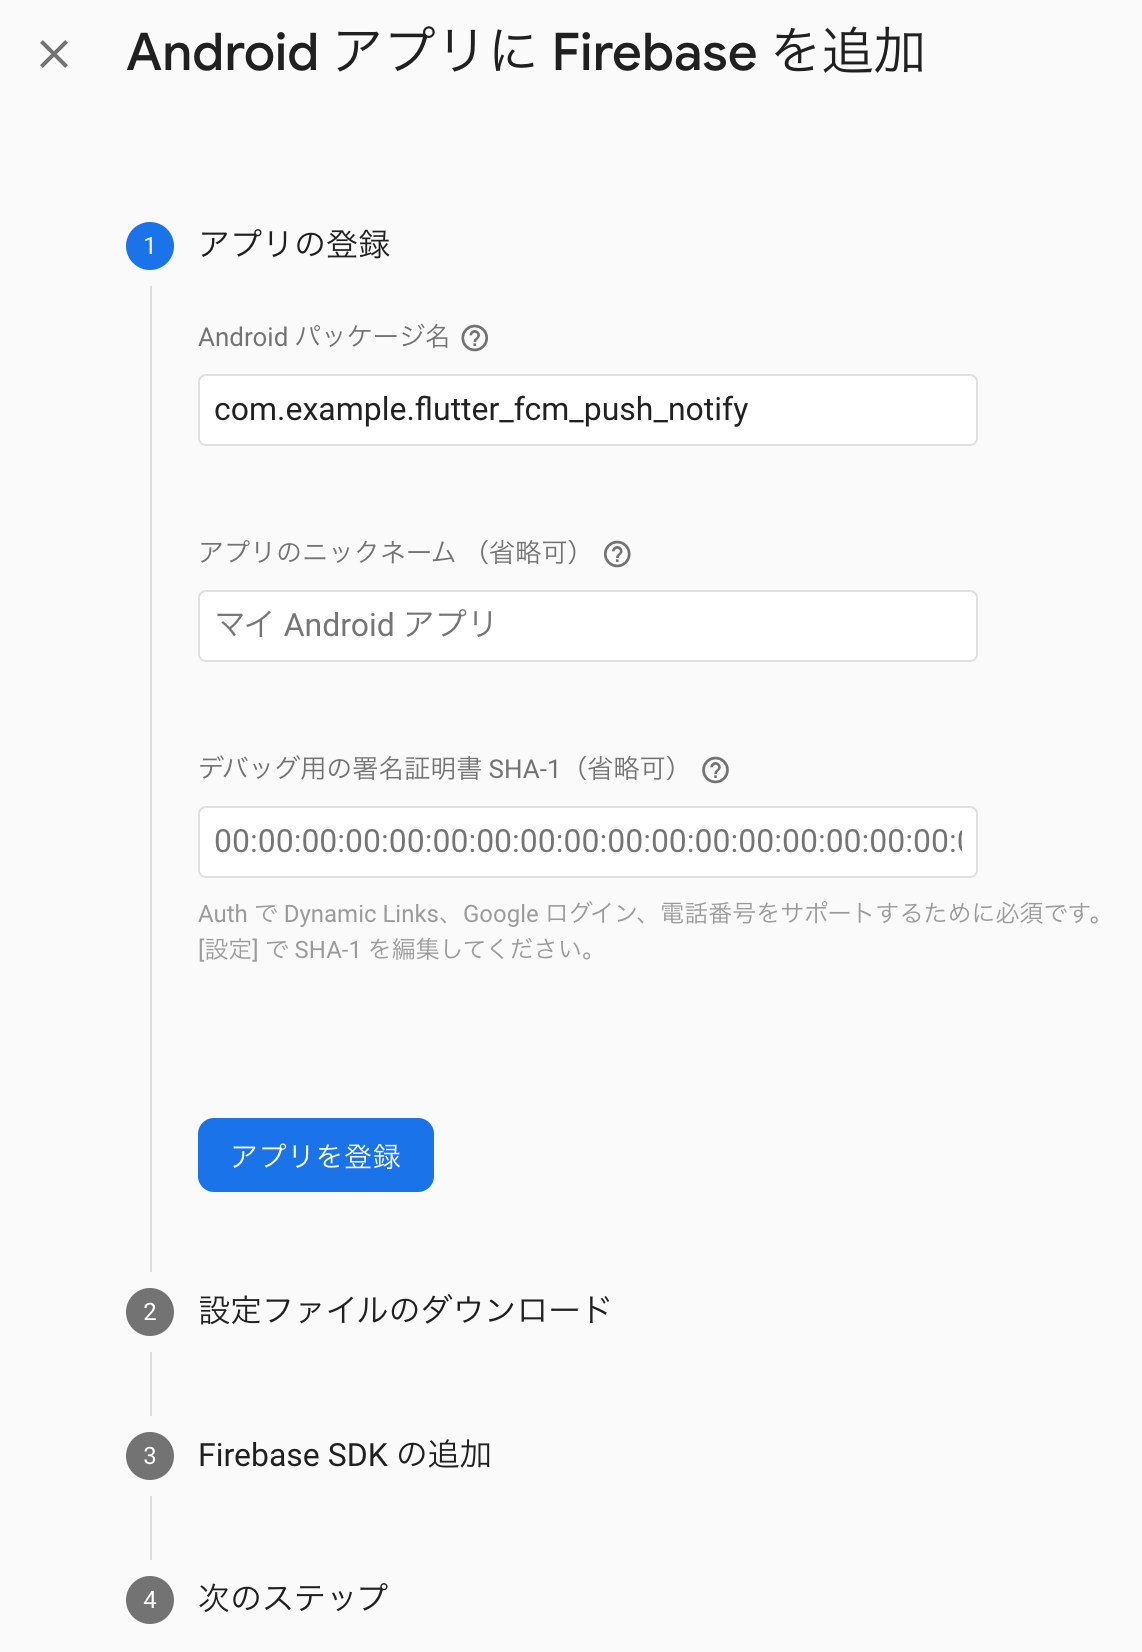
プロジェクト作成後、Firebase のプロジェクト Top ページで以下ハイライト部分のボタンをクリックします。
今回 Flutter のプロジェクト名は flutter_fcm_push_notify とします。
Android パッケージ名を入力しますが今回サンプルなので com.example.flutter_fcm_push_notify としました。
Google Play Store では com.example のパッケージ名は審査が通らないのでプロダクトで利用する場合は注意しましょう。
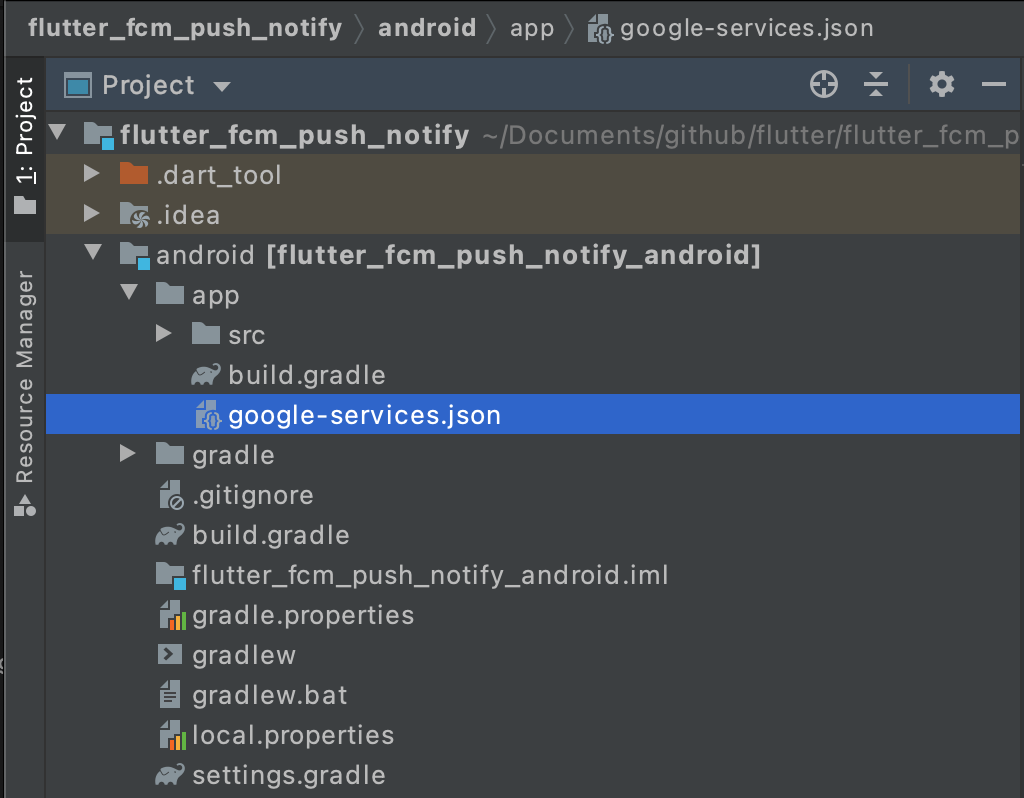
次にプッシュ通知をする際に必須の設定である google-services.json を DL します。
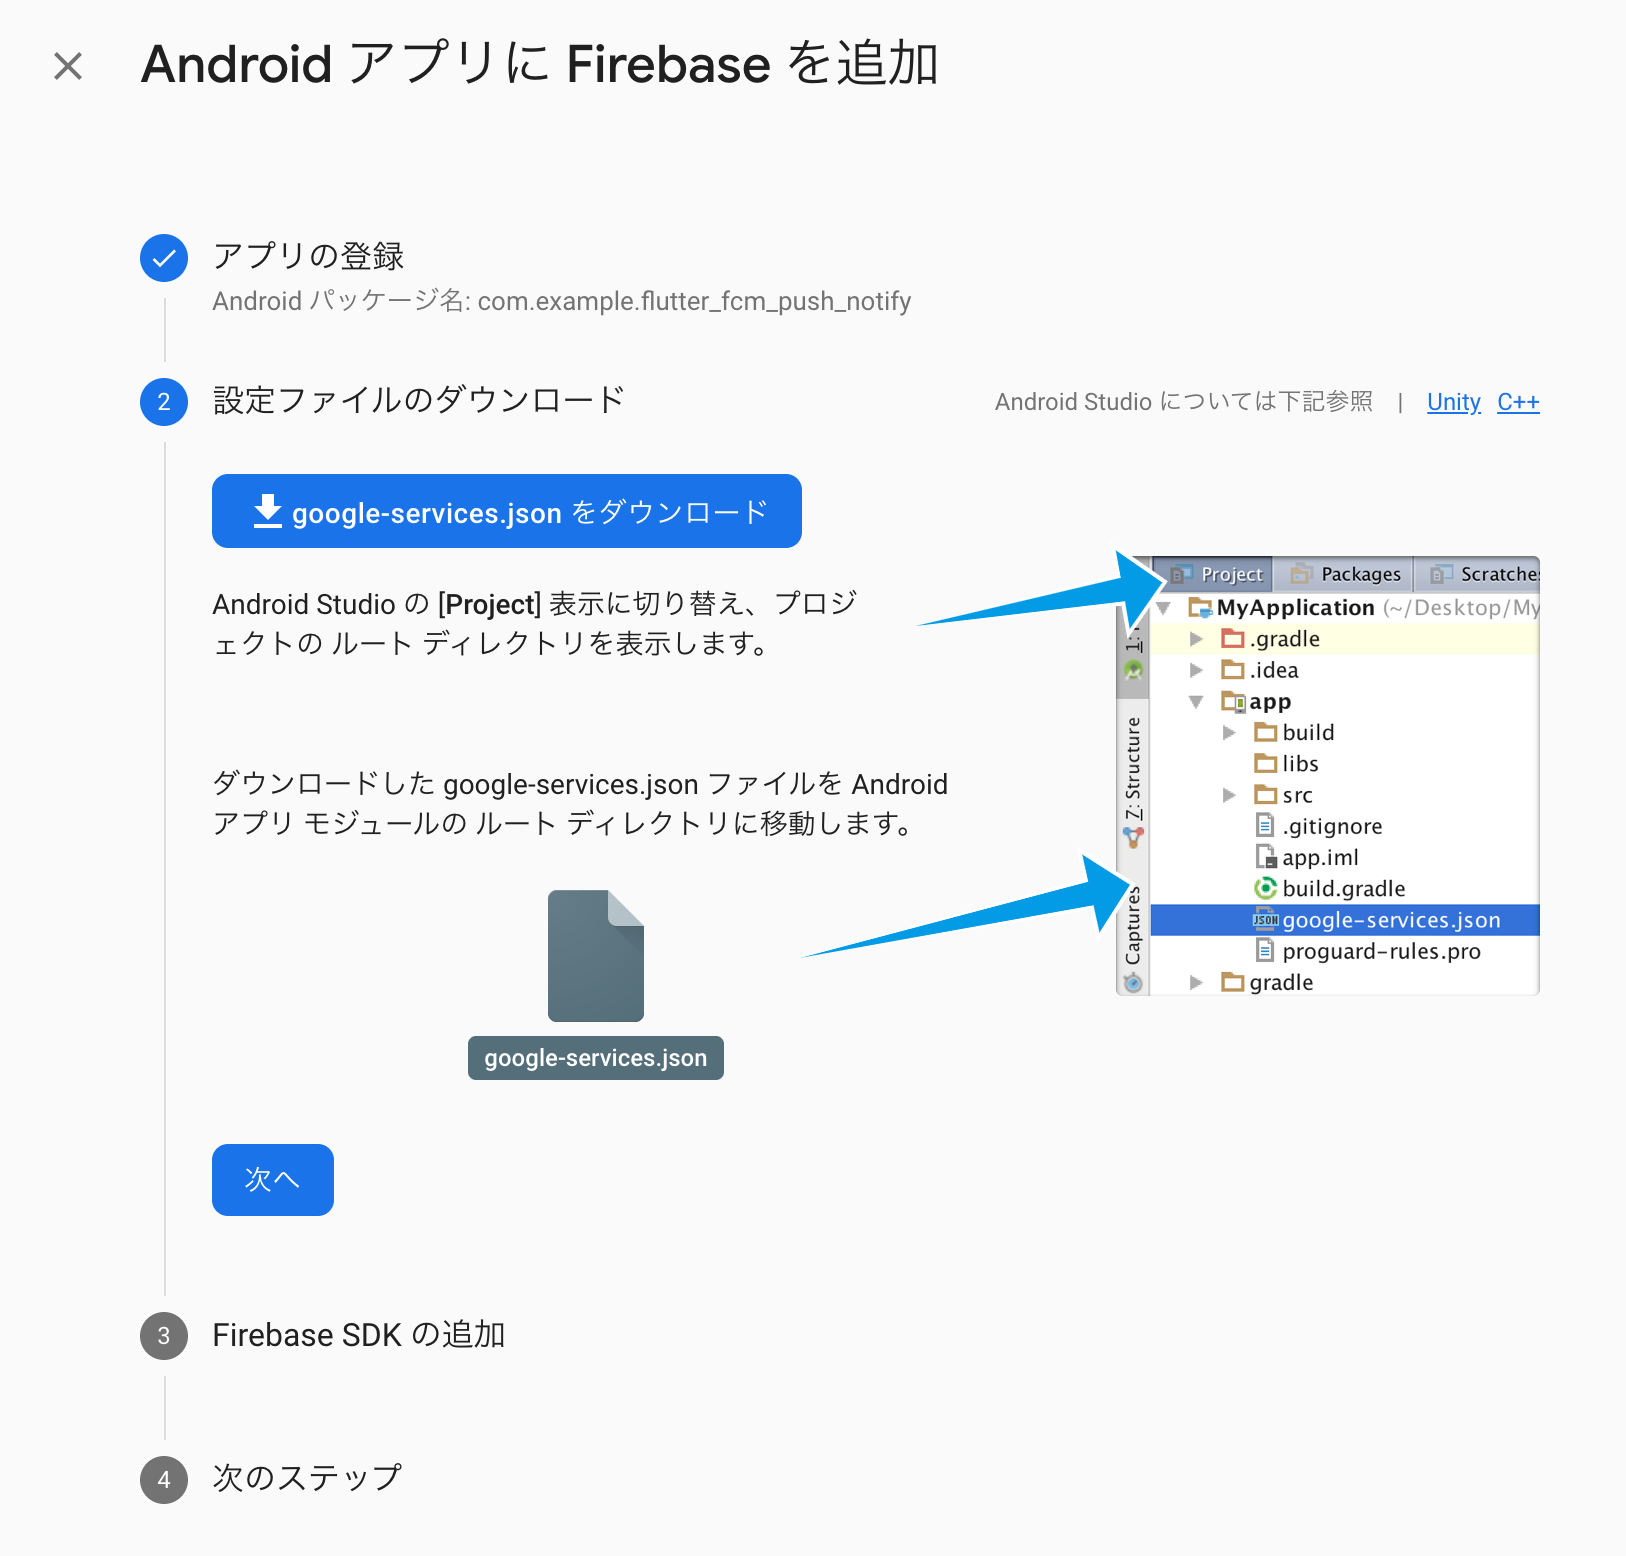
DL した google-services.json は プロジェクトの /android/app/ の下に置きます。
後は何もせず 次へ 押してコンソールへ戻ります。
Firebase プロジェクトに iOS アプリを追加する
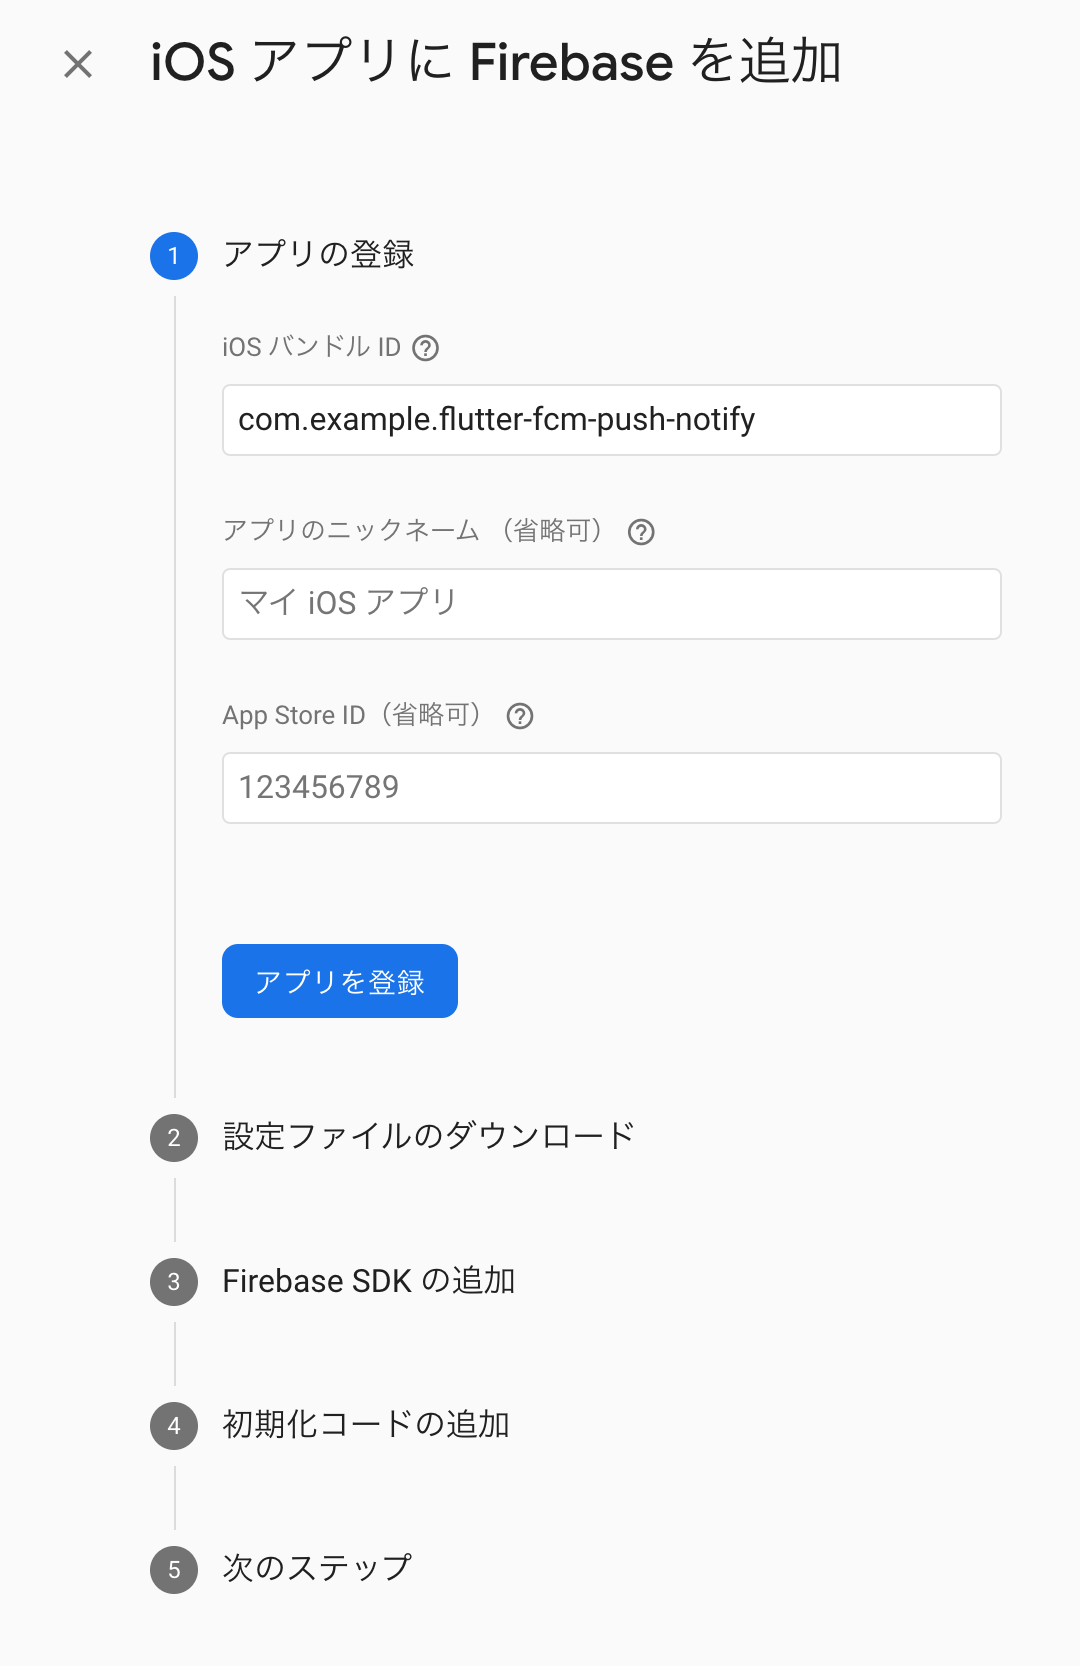
プロジェクト Top 画面に戻り、以下のアプリを追加ボタンをクリックして iOS を選択します。

iOS バンドル ID を入力します。今回サンプルなので com.example.flutter-fcm-push-notify としました。
Android では com.example.flutter_fcm_push_notify ですが、iOS のバンドル ID にはアンダースコアが使用できないので、flutter_fcm_push_notify から flutter-fcm-push-notify としています。
アプリを登録 ボタンをクリックします。
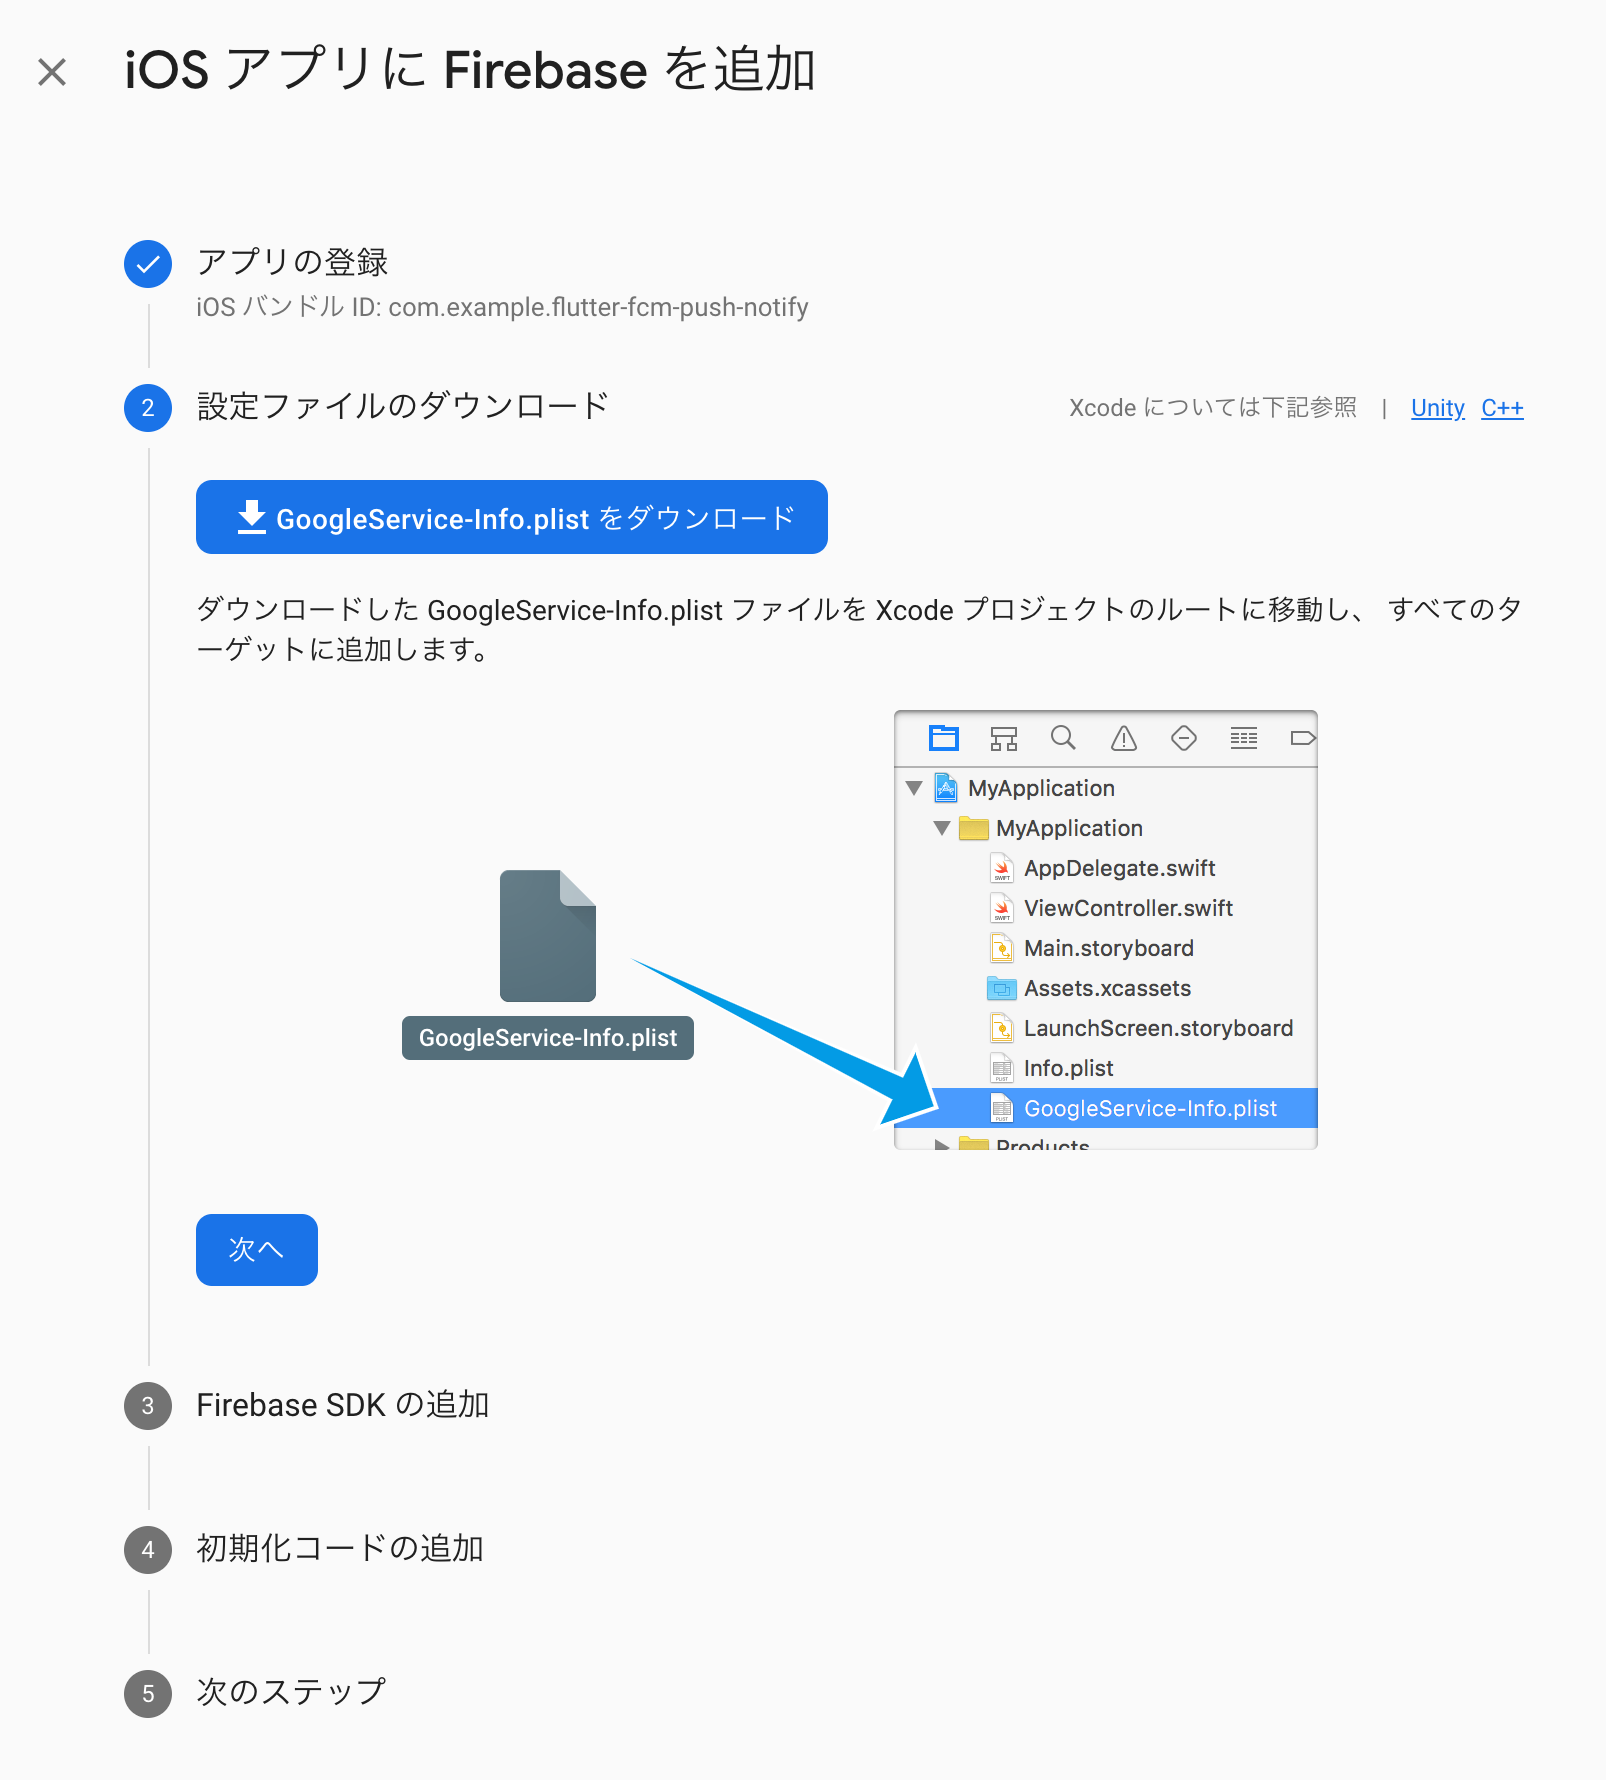
次にプッシュ通知をする際に必須の設定である GoogleService-Info.plist を DL します。
後は何もせず 次へ 押してコンソールへ戻ります。
DL した GoogleService-Info.plist は Xcode プロジェクトの Runner の下に置きます。
Xcode プロジェクトを開くには Terminal を開いて以下のコマンドを実行します。
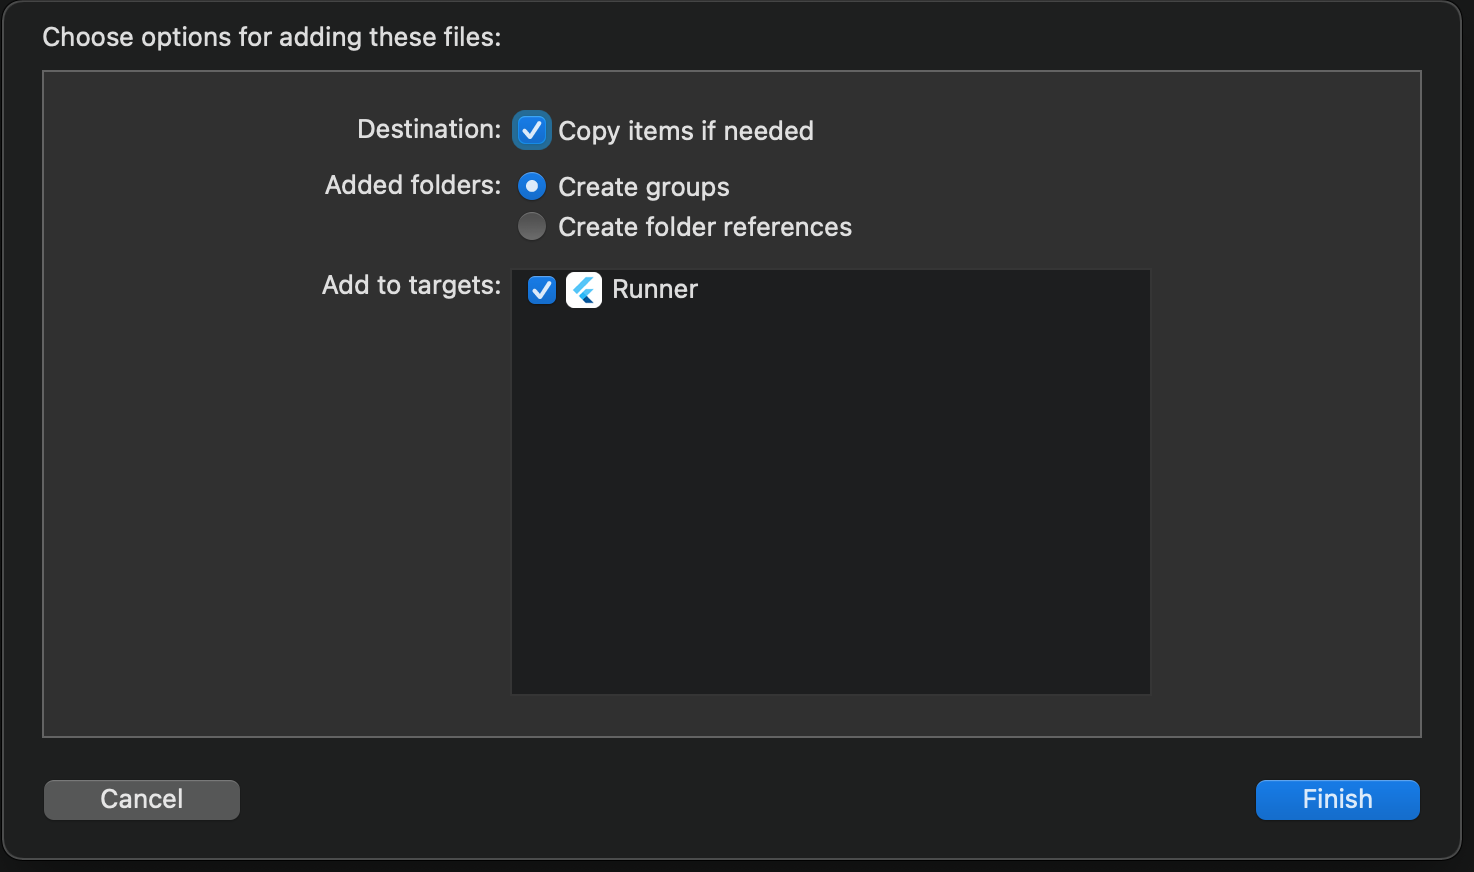
open ios/Runner.xcworkspace/Xcode にファイルをコピーする時は Copy items if needed にチェックをいれましょう。
Xcode に実ファイルをコピーしてくれます。
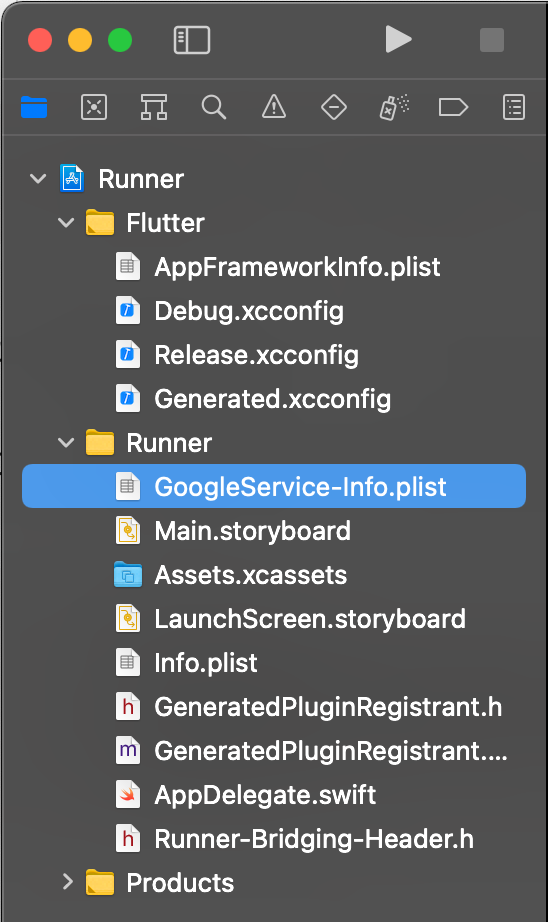
Runner 配下に GoogleService-Info.plist をコピーした後はこのような状態になります。
Android のプッシュ通知設定
Android のプッシュ通知設定は基本的に Android Studio で完結できます。
それでは設定していきましょう。
build.gradle に com.google.gms:google-services を追記する
/android/build.gradle を開き以下を追記します。
buildscript {
ext.kotlin_version = '1.3.50'
repositories {
google()
jcenter()
}
dependencies {
classpath 'com.android.tools.build:gradle:4.1.0'
classpath "org.jetbrains.kotlin:kotlin-gradle-plugin:$kotlin_version"
classpath 'com.google.gms:google-services:4.3.5' // added
}
}
allprojects {
repositories {
google()
jcenter()
}
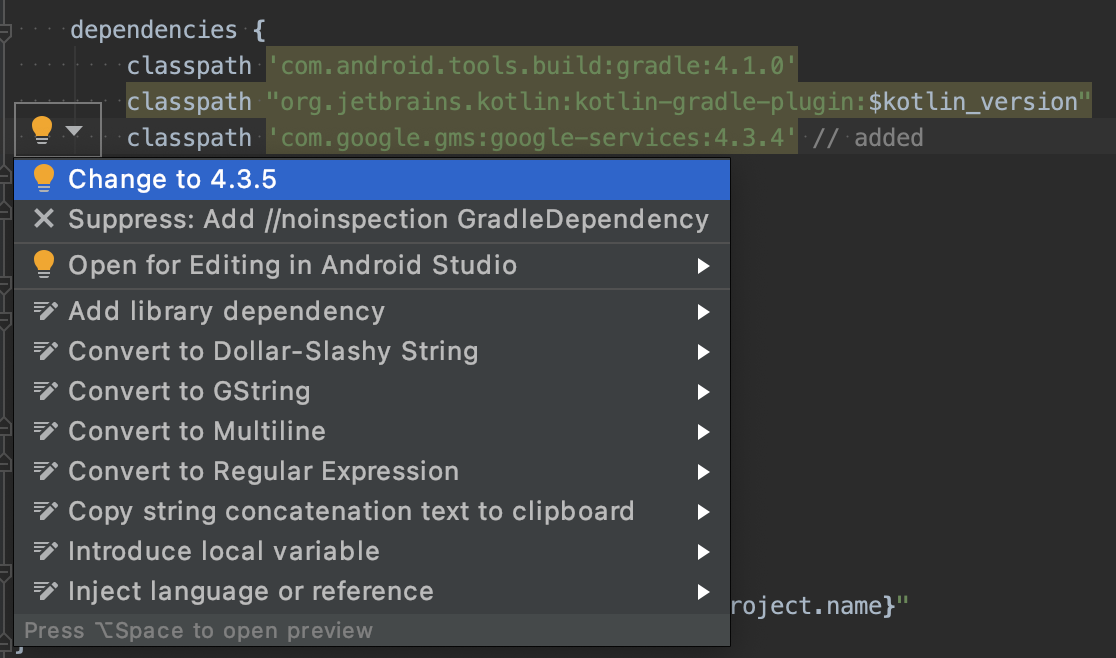
}com.google.gms:google-services の最新 version が分からなくても大丈夫です。
version が古い場合、以下のように黄色くハイライトしてくれます。
ハイライト部分にフォーカスを当てて電球マークをクリックするとヘルパーが出て最新 version への書き換えを行ってくれます。
app/build.gradle に com.google.gms:google-services を追記する
次に /android/app/build.gradle に com.google.gms.google-services を追記します。
Android には /android/build.gradle /android/app/build.gradle と build.gradle が 2 種類あります。
/android/app/build.gradle の方にも com.google.gms:google-services を追記します。
また、バッググラウンド通知を受け取る為に dependencies に implementation "com.google.firebase:firebase-messaging: を追記します。
ここでも最新 version が分からなくても version が古い場合 IDE がハイライトで教えてくれます。
apply plugin: 'com.android.application'
apply plugin: 'kotlin-android'
apply from: "$flutterRoot/packages/flutter_tools/gradle/flutter.gradle"
apply plugin: 'com.google.gms.google-services' // added
                               :
                               :
                               :
dependencies {
    implementation "org.jetbrains.kotlin:kotlin-stdlib-jdk7:$kotlin_version"
    implementation "com.google.firebase:firebase-messaging:21.0.1" // added
}
app/build.gradle の minSdkVersion を変更する
/android/app/build.gradle の minSdkVersion を 16 から 23 に変更します。
    defaultConfig {
        // TODO: Specify your own unique Application ID (https://developer.android.com/studio/build/application-id.html).
        applicationId "com.example.flutter_fcm_push_notify"
        minSdkVersion 23 // 16 -> 23
        targetSdkVersion 30
        versionCode flutterVersionCode.toInteger()
        versionName flutterVersionName
    }
こちらを変更しない場合 Android の build 時に以下警告が出力されます。
注意:/Users/zuma/development/flutter/.pub-cache/hosted/pub.dartlang.org/firebase_admob-0.9.0+10/android/src/main/java/io/flutter/plugins/firebaseadmob/AdRequestBuilderFactory.javaは非推奨のAPIを使用またはオーバーライドしています。
注意:詳細は、-Xlint:deprecationオプションを指定して再コンパイルしてください。
注意:/Users/zuma/development/flutter/.pub-cache/hosted/pub.dartlang.org/firebase_core-0.4.3+1/android/src/main/java/io/flutter/plugins/firebase/core/FirebaseCorePlugin.javaは非推奨のAPIを使用またはオーバーライドしています。
注意:詳細は、-Xlint:deprecationオプションを指定して再コンパイルしてください。
注意:/Users/zuma/development/flutter/.pub-cache/hosted/pub.dartlang.org/cloud_firestore-0.13.0+1/android/src/main/java/io/flutter/plugins/firebase/cloudfirestore/CloudFirestorePlugin.javaの操作は、未チェックまたは安全ではありません。
注意:詳細は、-Xlint:uncheckedオプションを指定して再コンパイルしてください。
注意:/Users/zuma/development/flutter/.pub-cache/hosted/pub.dartlang.org/firebase_analytics-5.0.9/android/src/main/java/io/flutter/plugins/firebaseanalytics/FirebaseAnalyticsPlugin.javaは非推奨のAPIを使用またはオーバーライドしています。
注意:詳細は、-Xlint:deprecationオプションを指定して再コンパイルしてください。
注意:/Users/zuma/development/flutter/.pub-cache/hosted/pub.dartlang.org/package_info-0.4.0+13/android/src/main/java/io/flutter/plugins/packageinfo/PackageInfoPlugin.javaは非推奨のAPIを使用またはオーバーライドしています。
注意:詳細は、-Xlint:deprecationオプションを指定して再コンパイルしてください。
詳しく調査していないのですが、どうやら Firebase SDK を build する最低限の SDK Version にする必要があるようです。
警告が出ている状態でも動作はするのですが、今回は対応します。
Application.kt を作成する
バックグラウンドでプッシュ通知を受け取る設定をします。
/android/app/src/main/kotlin/<projectのpackage名> 配下に新規に Application.kt を作成します。
package com.example.yourapp

import io.flutter.app.FlutterApplication
import io.flutter.plugin.common.PluginRegistry
import io.flutter.plugin.common.PluginRegistry.PluginRegistrantCallback
import io.flutter.plugins.firebase.messaging.FlutterFirebaseMessagingBackgroundService
import io.flutter.plugins.firebase.messaging.FlutterFirebaseMessagingPlugin

class Application : FlutterApplication(), PluginRegistrantCallback {
    override fun onCreate() {
        super.onCreate()
        FlutterFirebaseMessagingBackgroundService.setPluginRegistrant(this)
    }

    override fun registerWith(registry: PluginRegistry?) {
        val key: String? = FlutterFirebaseMessagingPlugin::class.java.canonicalName
        if (!registry?.hasPlugin(key)!!) {
            FlutterFirebaseMessagingPlugin.registerWith(registry?.registrarFor("io.flutter.plugins.firebase.messaging.FlutterFirebaseMessagingPlugin"));
        }
    }
}
package 名はご自身の project の package 名に修正してください。
AndroidManifest.xml に android:name=".Application" を追記する
先程実装した Application.kt を認識させる為、AndroidManifest.xml に android:name=".Application" を追記します。
/android/app/src/main/AndroidManifest.xml を開いて Application タグに android:name=".Application" を追記してください。
<manifest xmlns:android="http://schemas.android.com/apk/res/android"
    package="com.example.flutter_fcm_push_notify">
   <application
        android:name=".Application"
        android:label="flutter_fcm_push_notify"
        android:icon="@mipmap/ic_launcher">
AndroidManifest.xml に FLUTTER_NOTIFICATION_CLICK を追記する
ユーザがシステムトレイへ届いた通知をクリックした時、アプリ内で onResume や onLaunch で通知を受けとる設定をします。
/android/app/src/main/AndroidManifest.xml を開いて FLUTTER_NOTIFICATION_CLICK を追記します。
            <intent-filter>
                <action android:name="FLUTTER_NOTIFICATION_CLICK" />
                <category android:name="android.intent.category.DEFAULT" />
            </intent-filter>
場所は <activity></activity> の閉じタグの手前です。
<manifest xmlns:android="http://schemas.android.com/apk/res/android"
    package="com.example.flutter_fcm_push_notify">
   <application
        android:name=".Application"
        android:label="flutter_fcm_push_notify"
        android:icon="@mipmap/ic_launcher">
                      :
                      :
                      :
            <intent-filter>
                <action android:name="android.intent.action.MAIN"/>
                <category android:name="android.intent.category.LAUNCHER"/>
            </intent-filter>
            <intent-filter>
                <action android:name="FLUTTER_NOTIFICATION_CLICK" />
                <category android:name="android.intent.category.DEFAULT" />
            </intent-filter>
        </activity>
以上 Android のプッシュ通知設定となります。
iOS のプッシュ通知設定
iOS はプッシュ通知に必要な証明書を揃える必要があります。
Apple Developer コンソールを使用するには Apple アカウントが必要なので事前に作成しましょう。
それでは設定していきます。
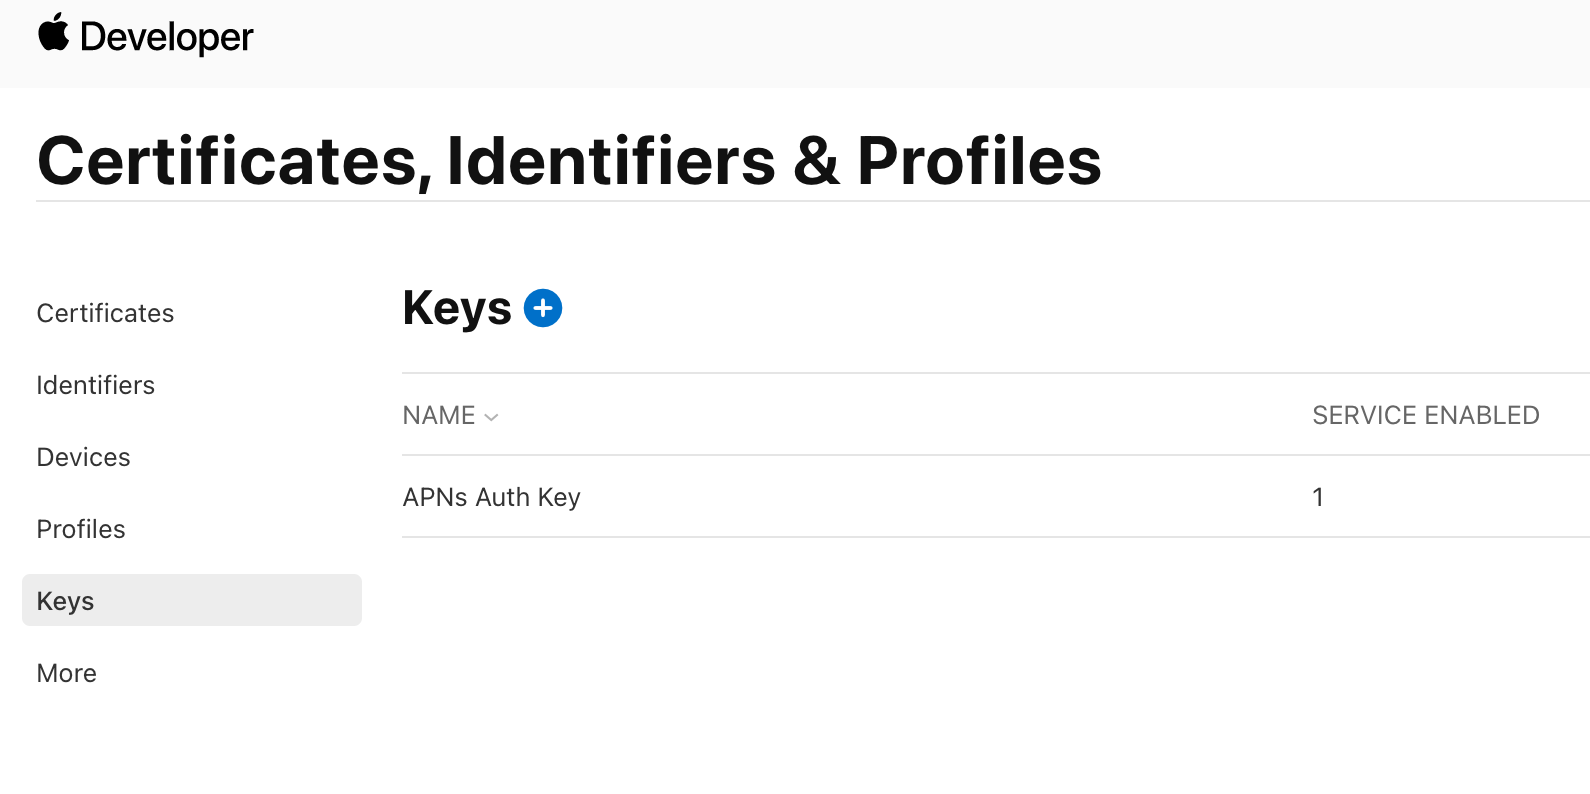
Apple Developer Console で APNs Key を作成する
Apple Developer Console の Certificates, Identifiers & Profiles にアクセスします。
左メニュー Keys から Key 一覧画面を開きます。
+ ボタンをクリックして Key 作成画面を開きます。
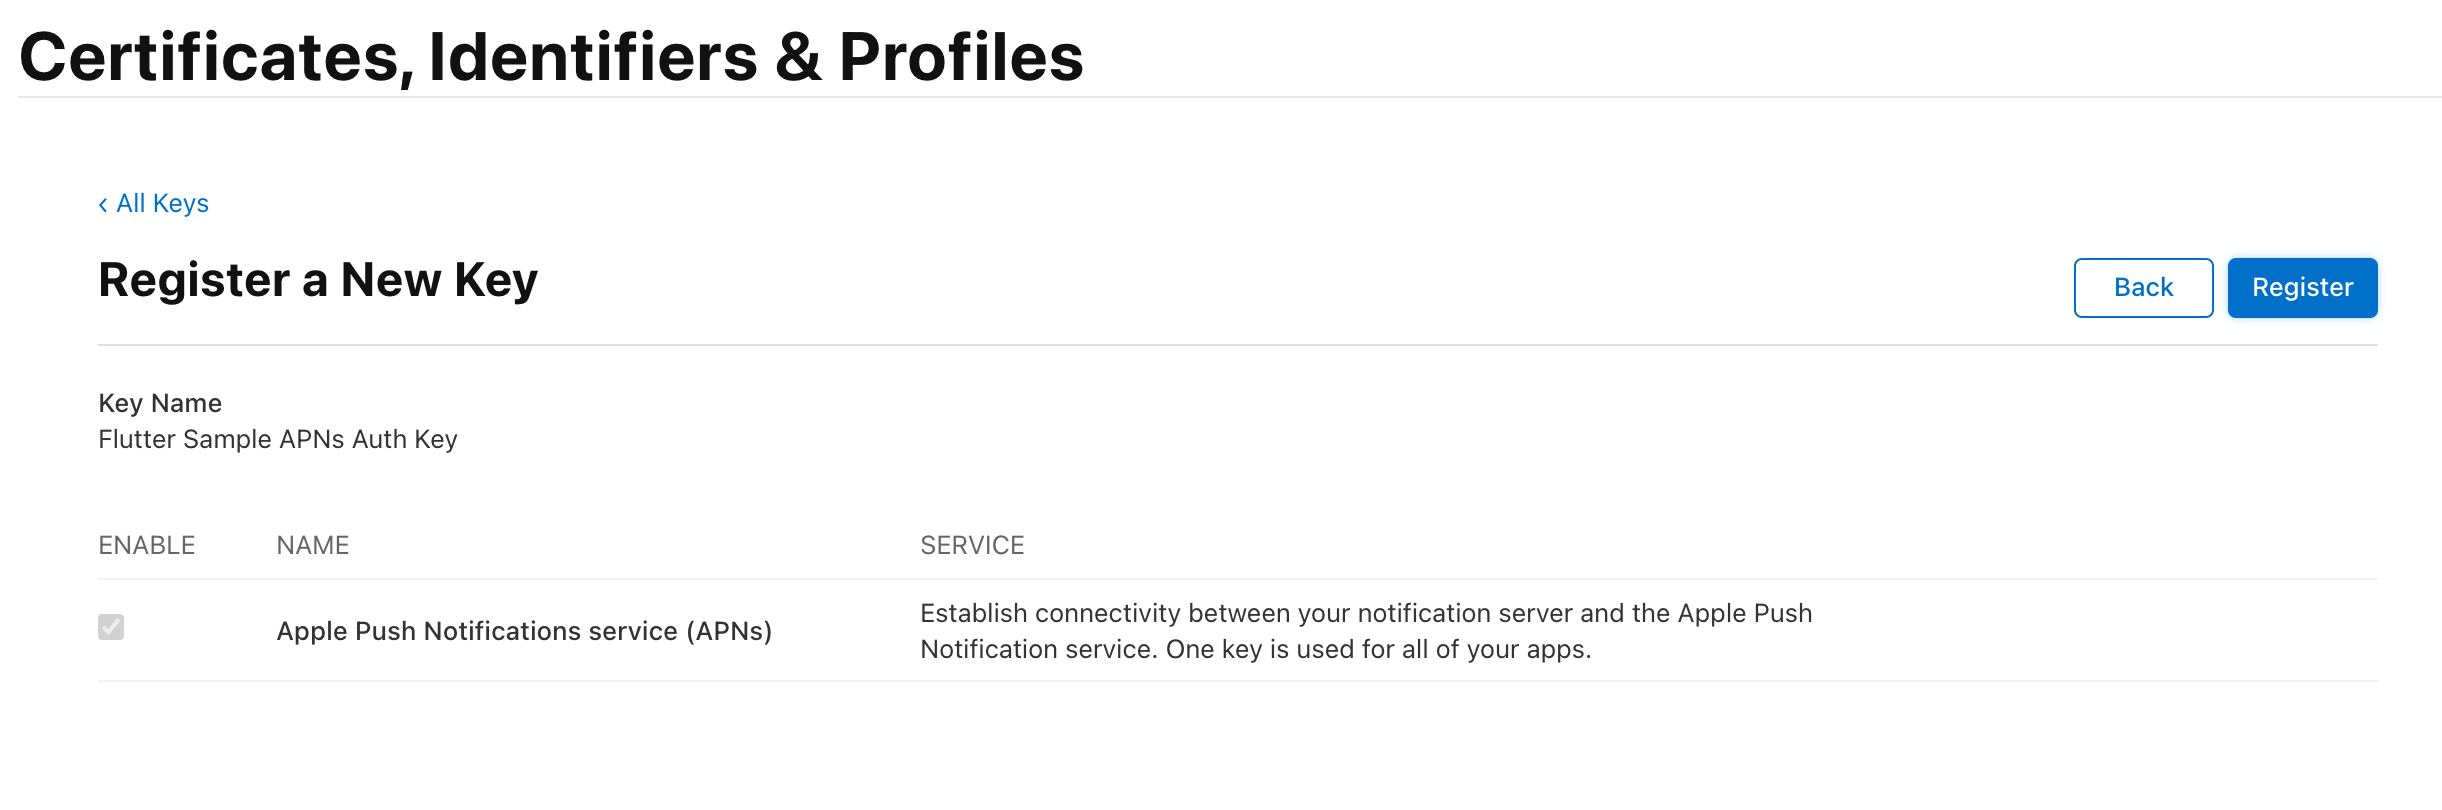
Key Name に作成する Key 名を入力します。
また Apple Push Notifications service(APNs) の ENABLE にチェックをします。
Continue ボタンをクリックして次の画面に進みます。

Register ボタンをクリックします。
Download Your Key 画面で Key を DL します。
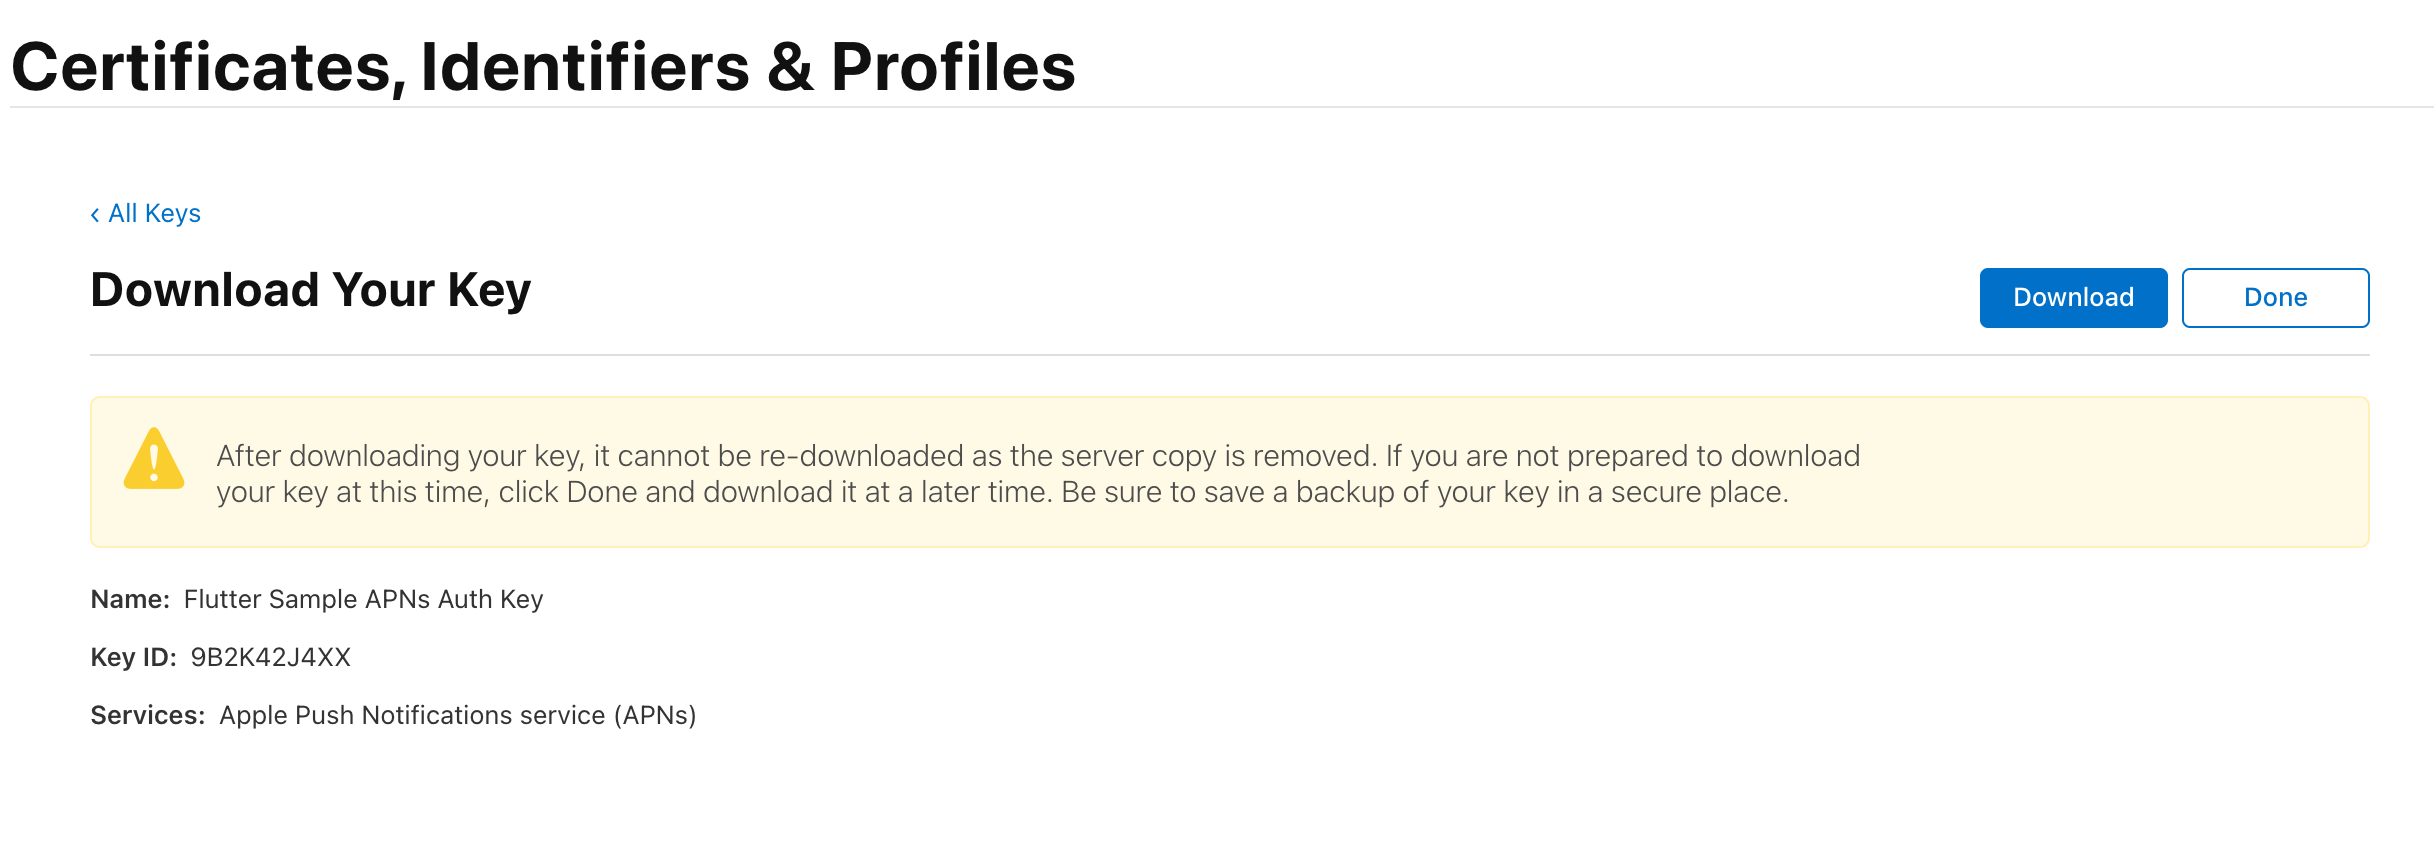
After downloading your key, it cannot be re-downloaded as the server copy is removed. If you are not prepared to download your key at this time, click Done and download it at a later time. Be sure to save a backup of your key in a secure place.キーをダウンロードした後、サーバーコピーが削除されているため、キーを再ダウンロードすることはできません。現時点でキーをダウンロードする準備ができていない場合は、[完了]をクリックして、後でダウンロードしてください。キーのバックアップは必ず安全な場所に保存してください。
こちらの警告が表示されている通り、一度 DL すると再取得できないので Key のバックアップを必ずとりましょう。
DL した Key は AuthKey_XXXXXXXX.p8 のようなファイル名です。
アプリの Identifier を作成する
次に左メニュー Identifiers から Identifier 一覧画面を開きます。
+ ボタンから identifier 新規作成画面に進みます。
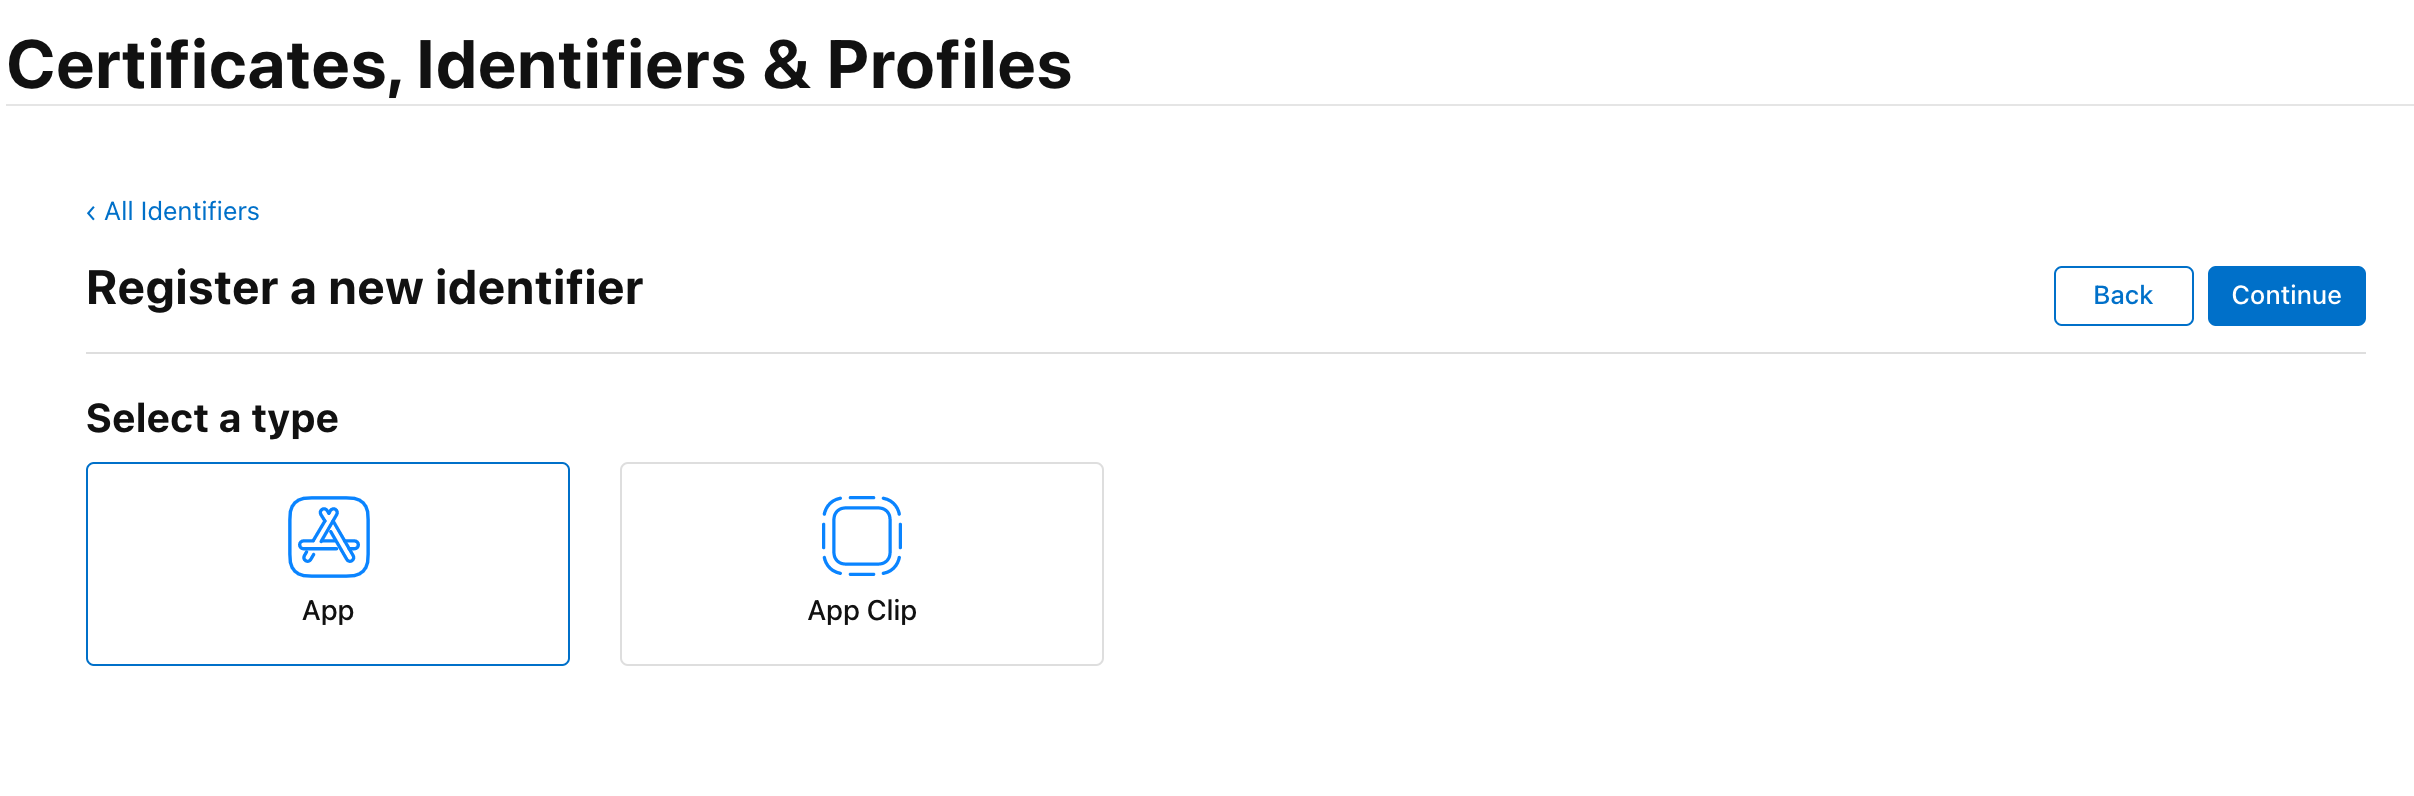
App IDs にチェックをして Continue ボタンをクリックします。
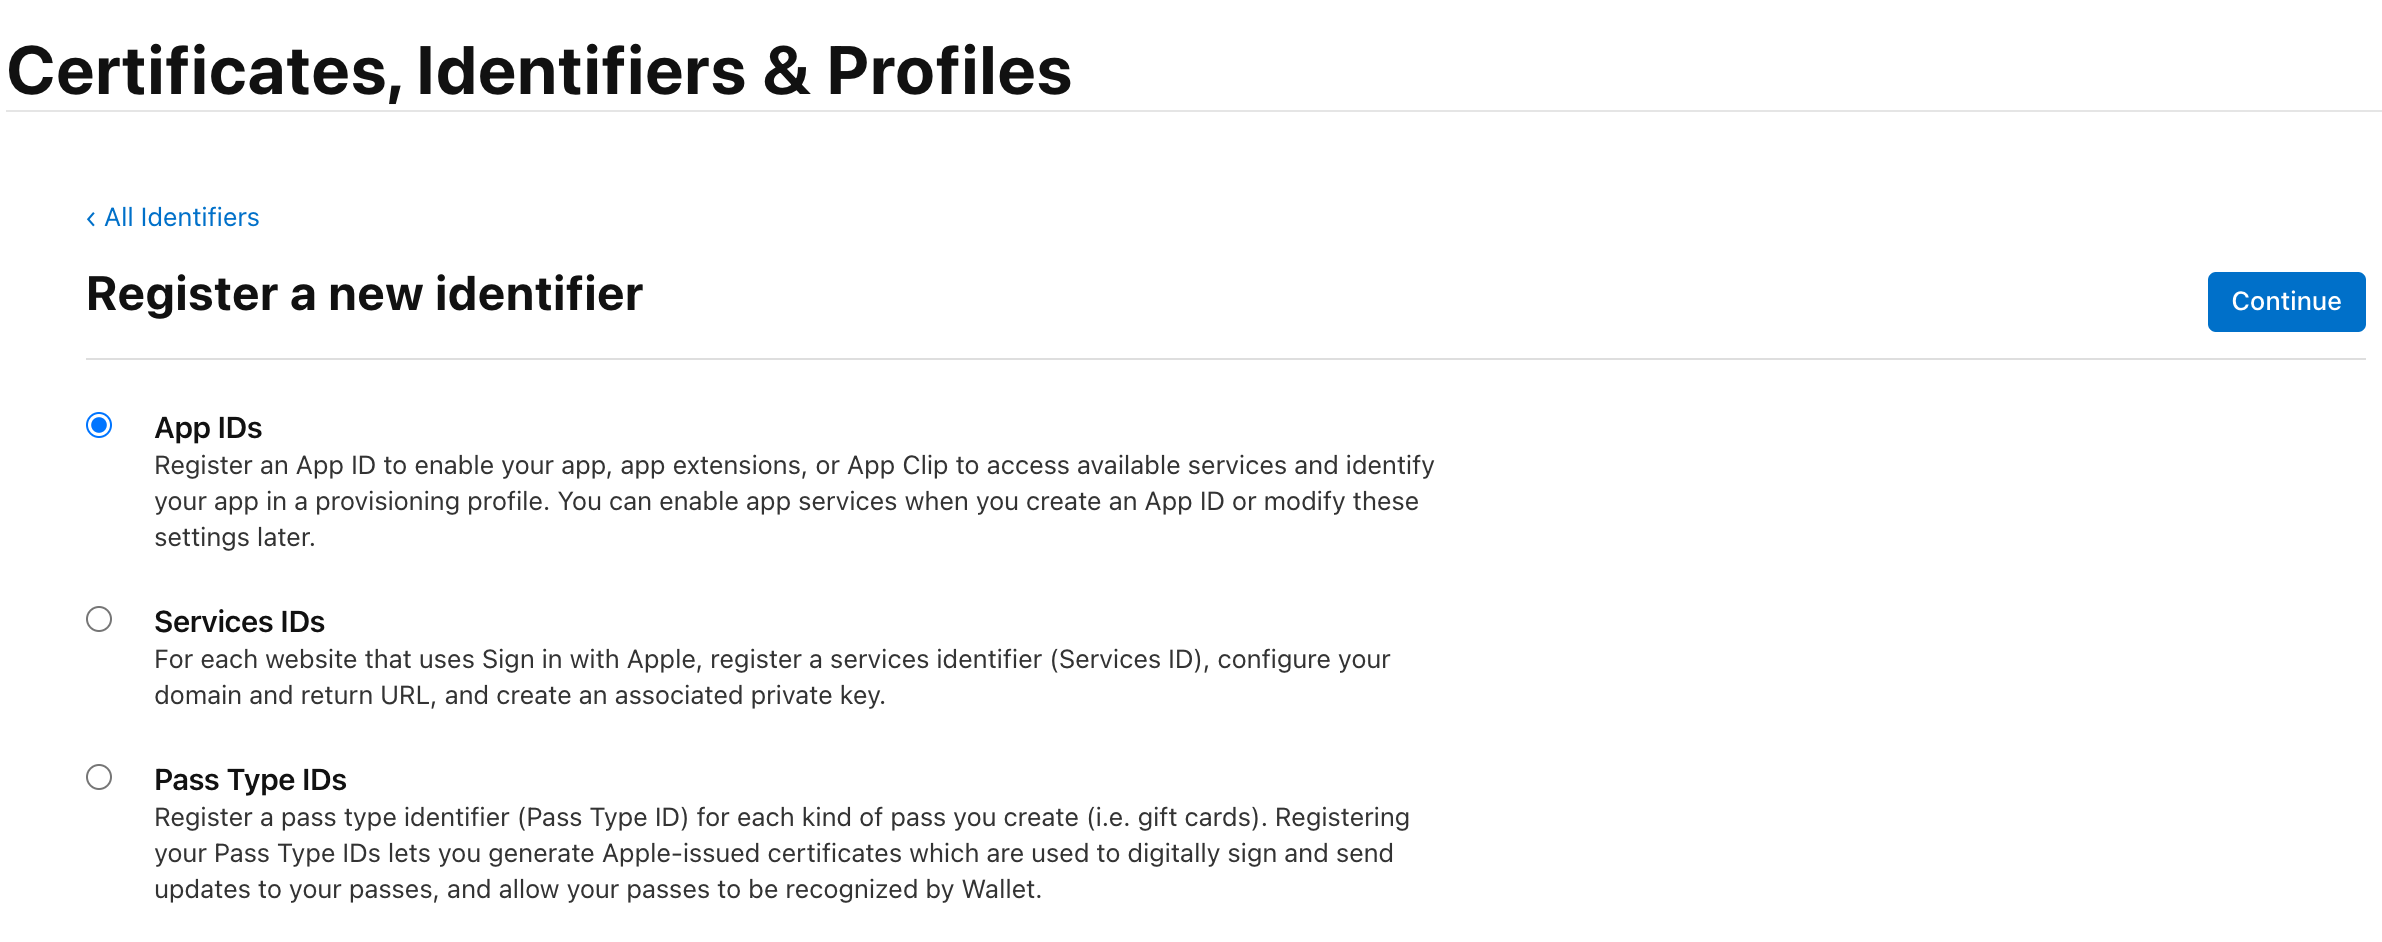
Select a type は App を選択して Continue ボタンをクリックします。
次に Bundle ID を設定します。
Explicit にチェックをつけて Firebase の iOS アプリを追加した時と同じ Bundle ID を入力します。
今回は com.example.flutter-fcm-push-notify と入力します。
また Description も必須項目なのでアプリの説明を入力します。
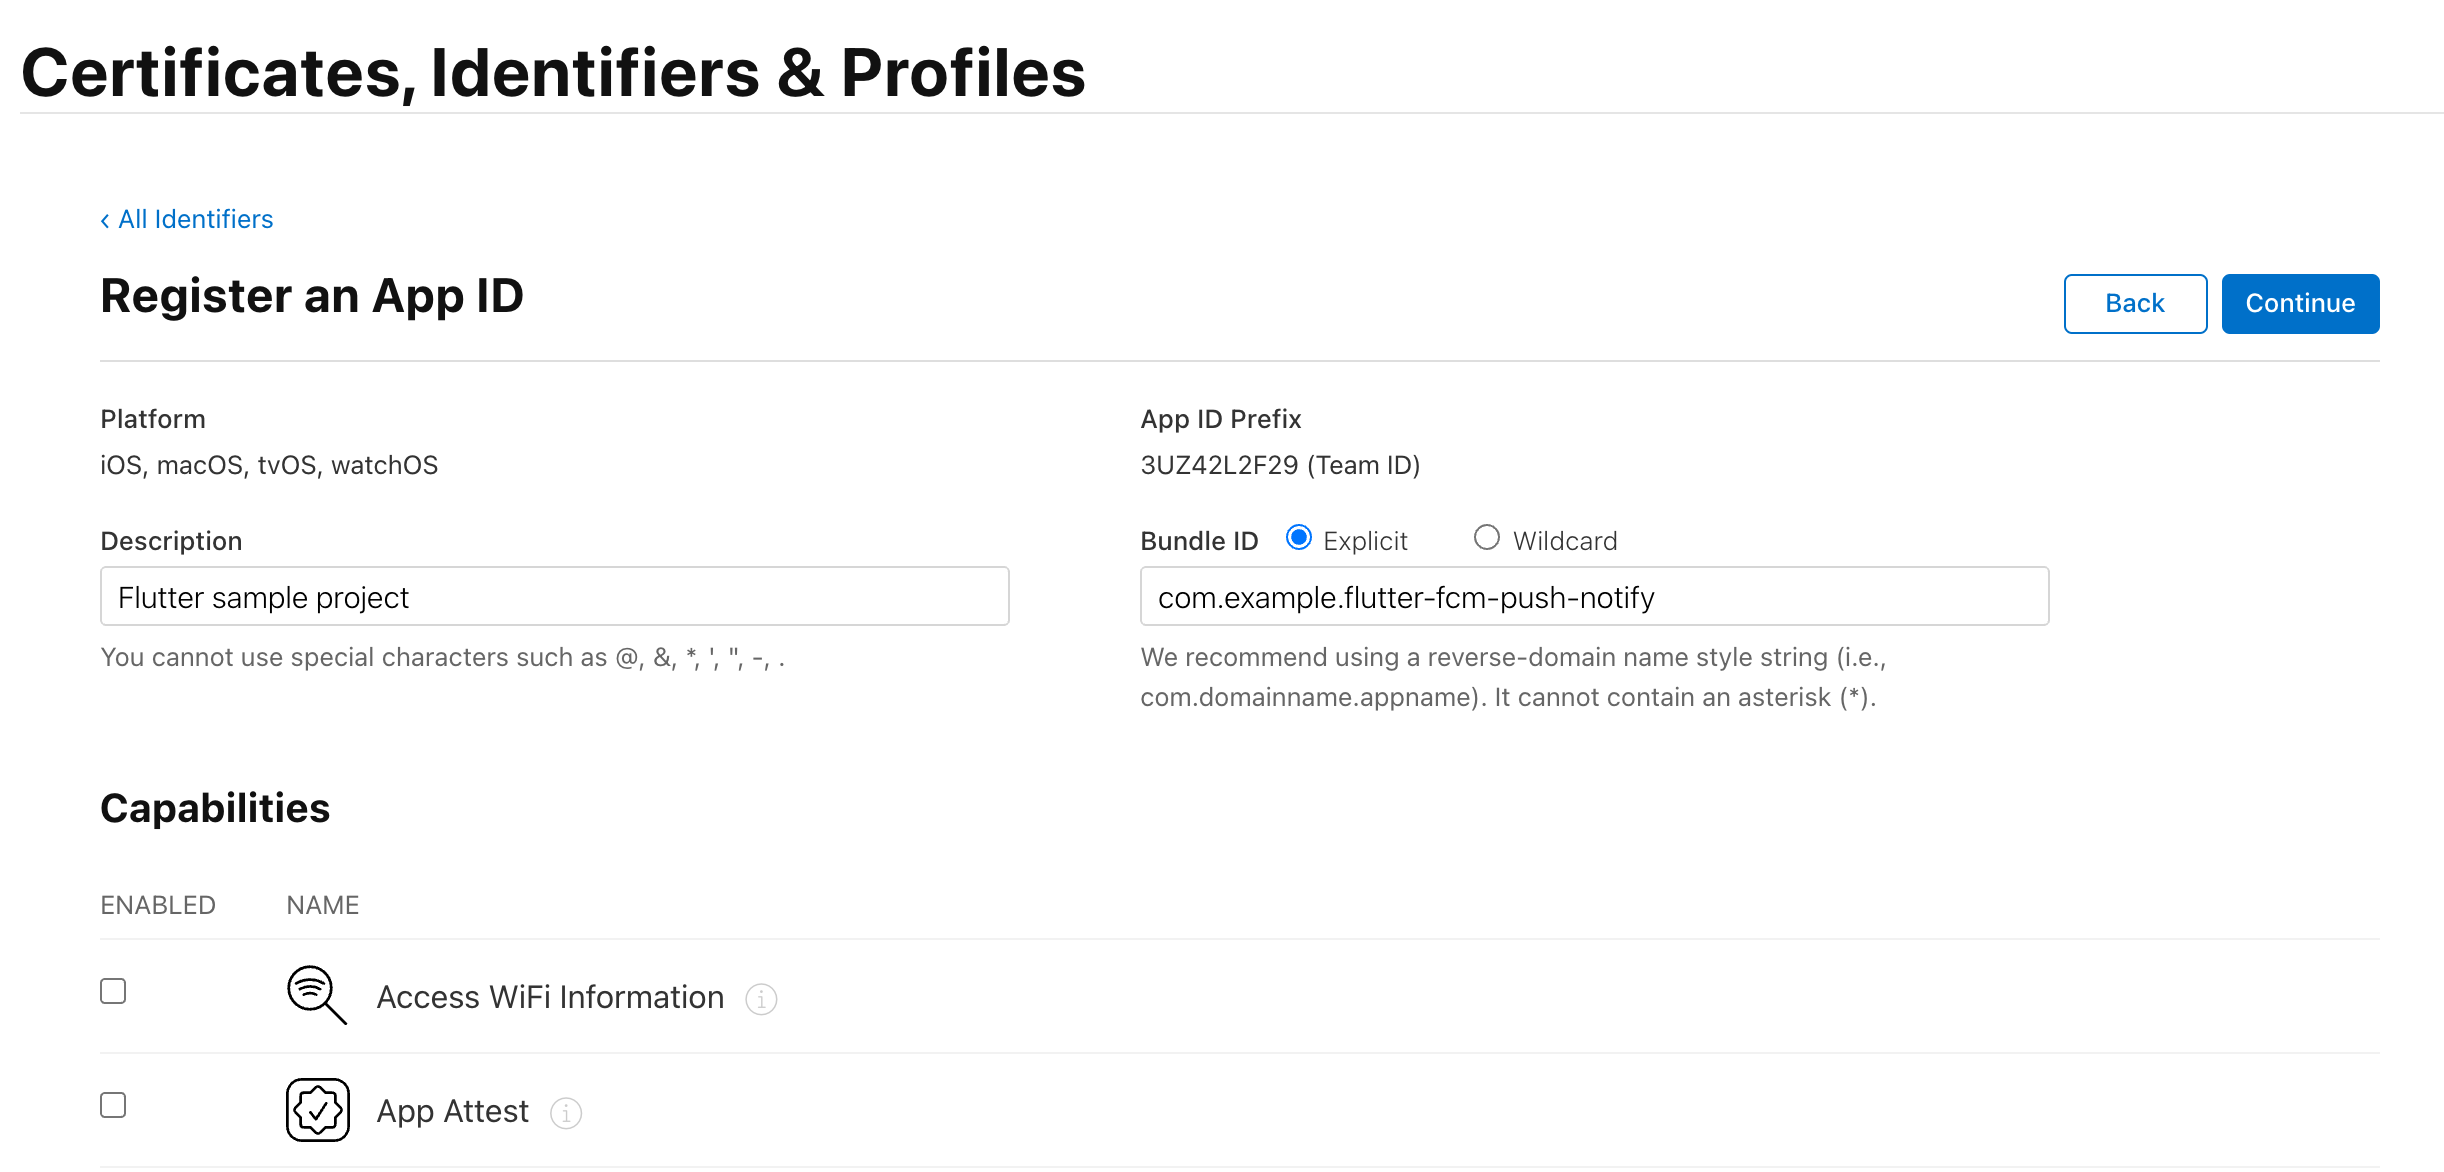
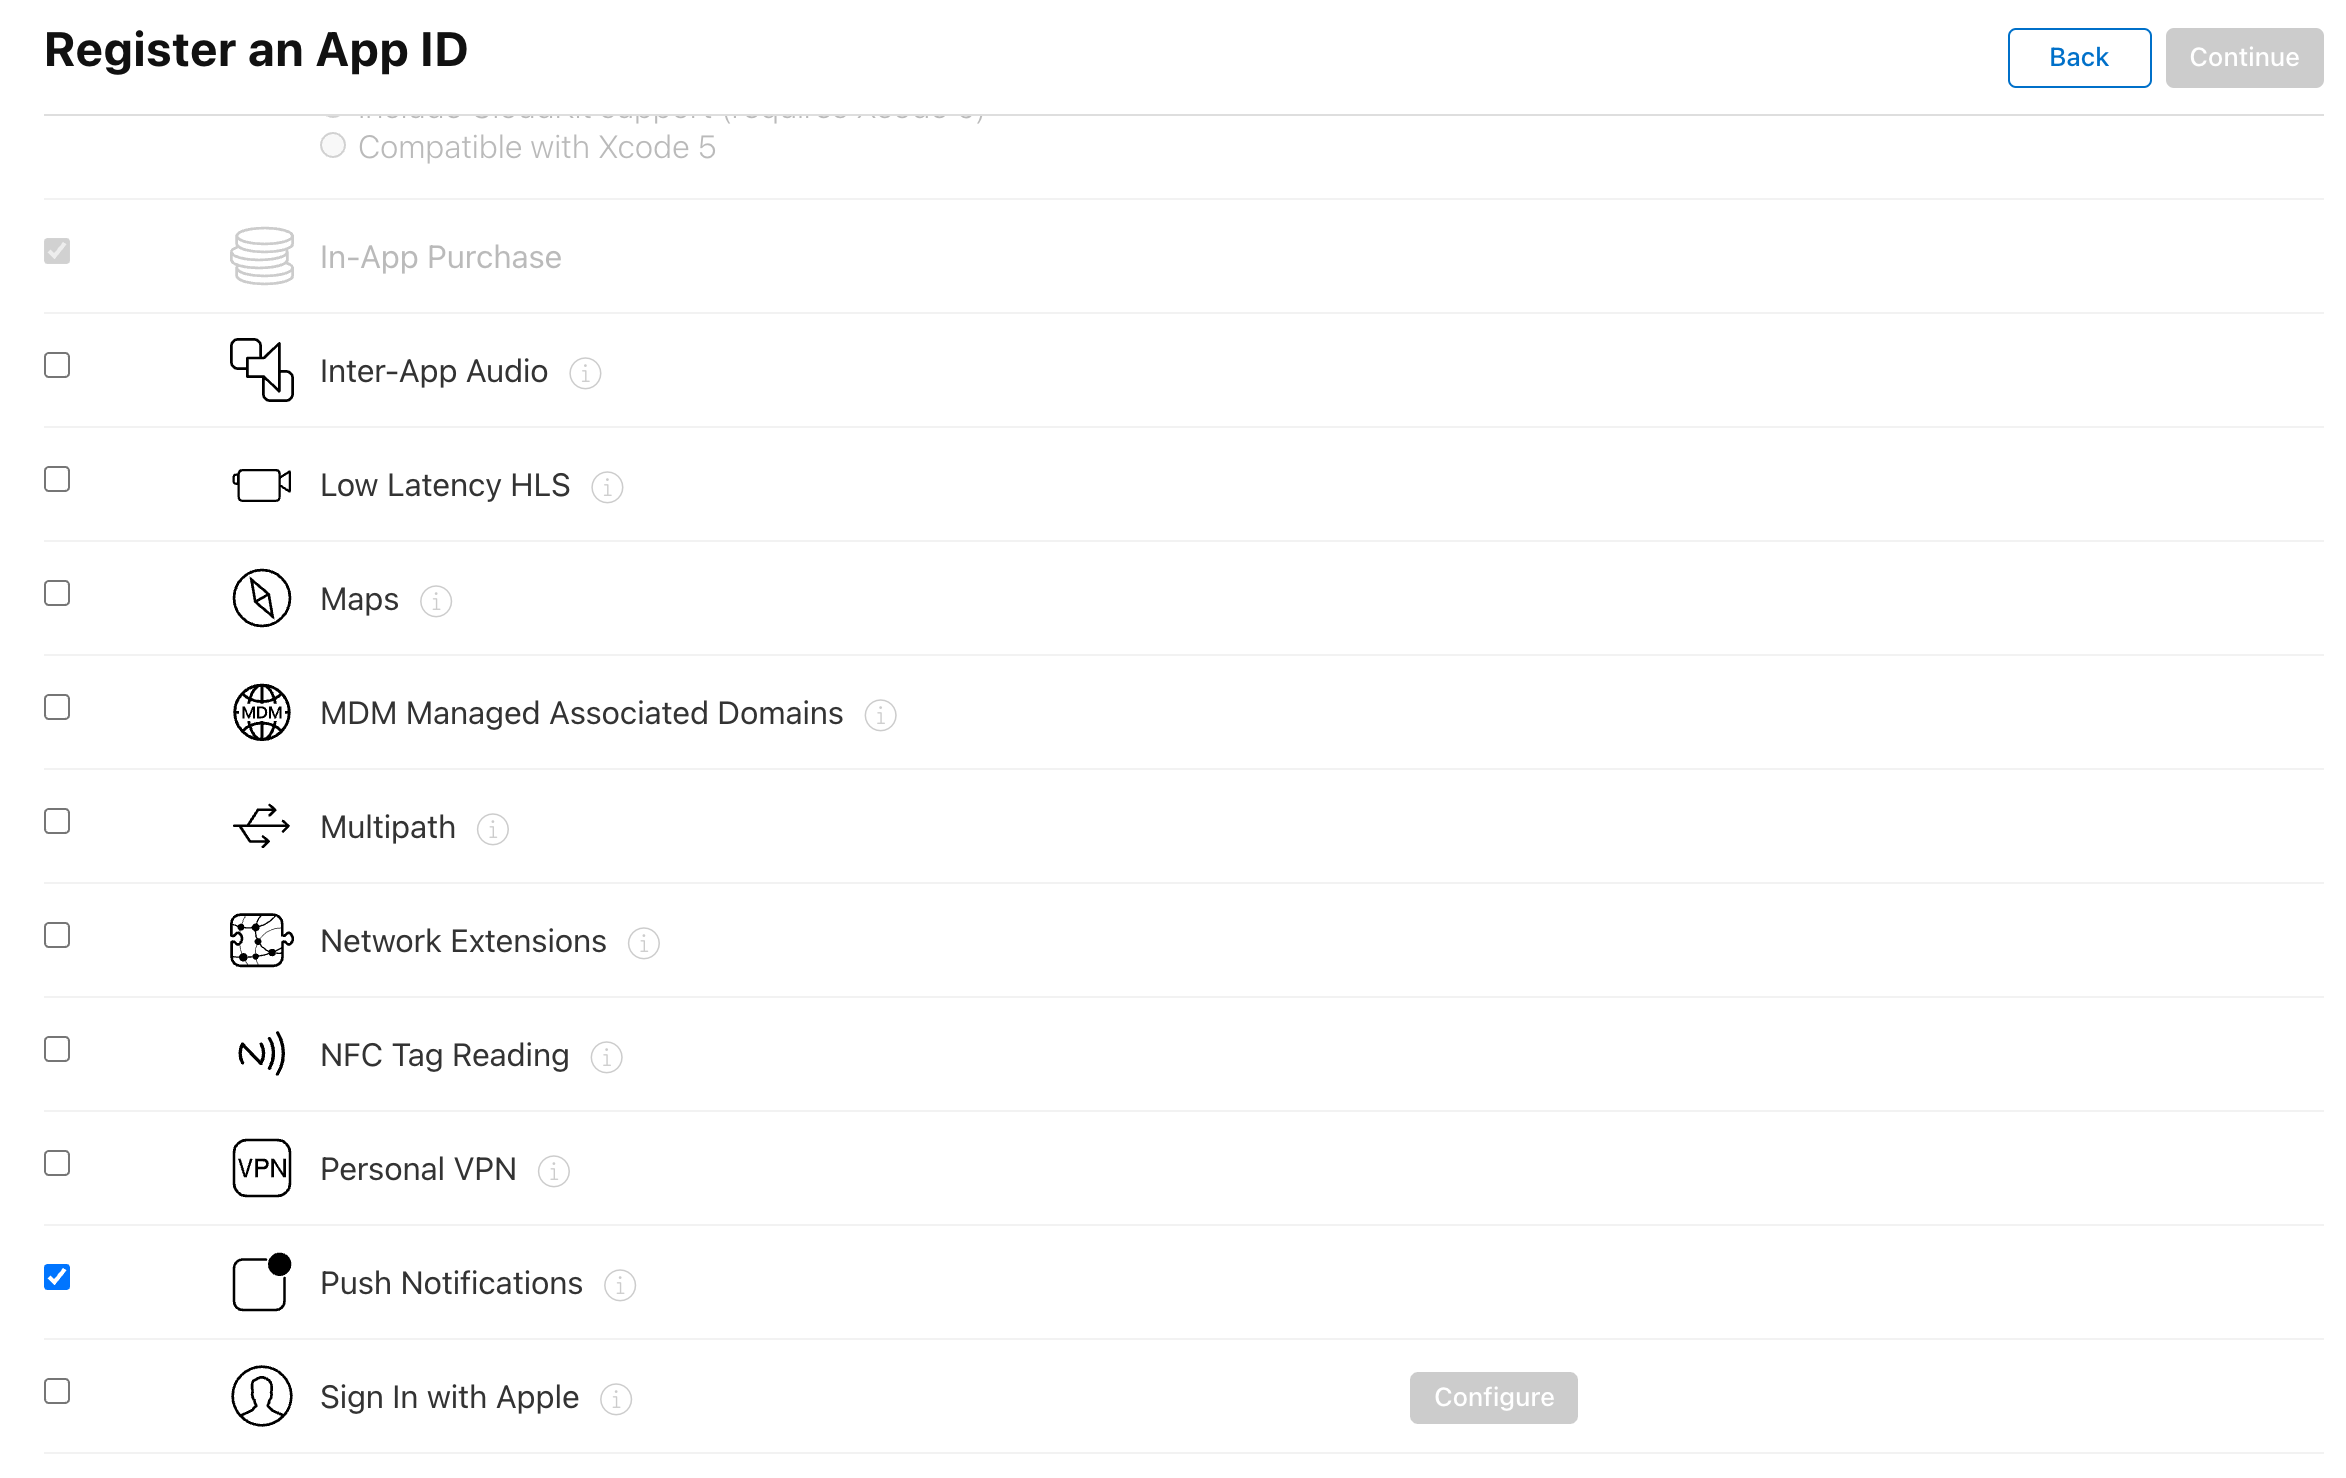
Capabilities の一覧で Push Notifications の ENABLED にチェックをつけます。
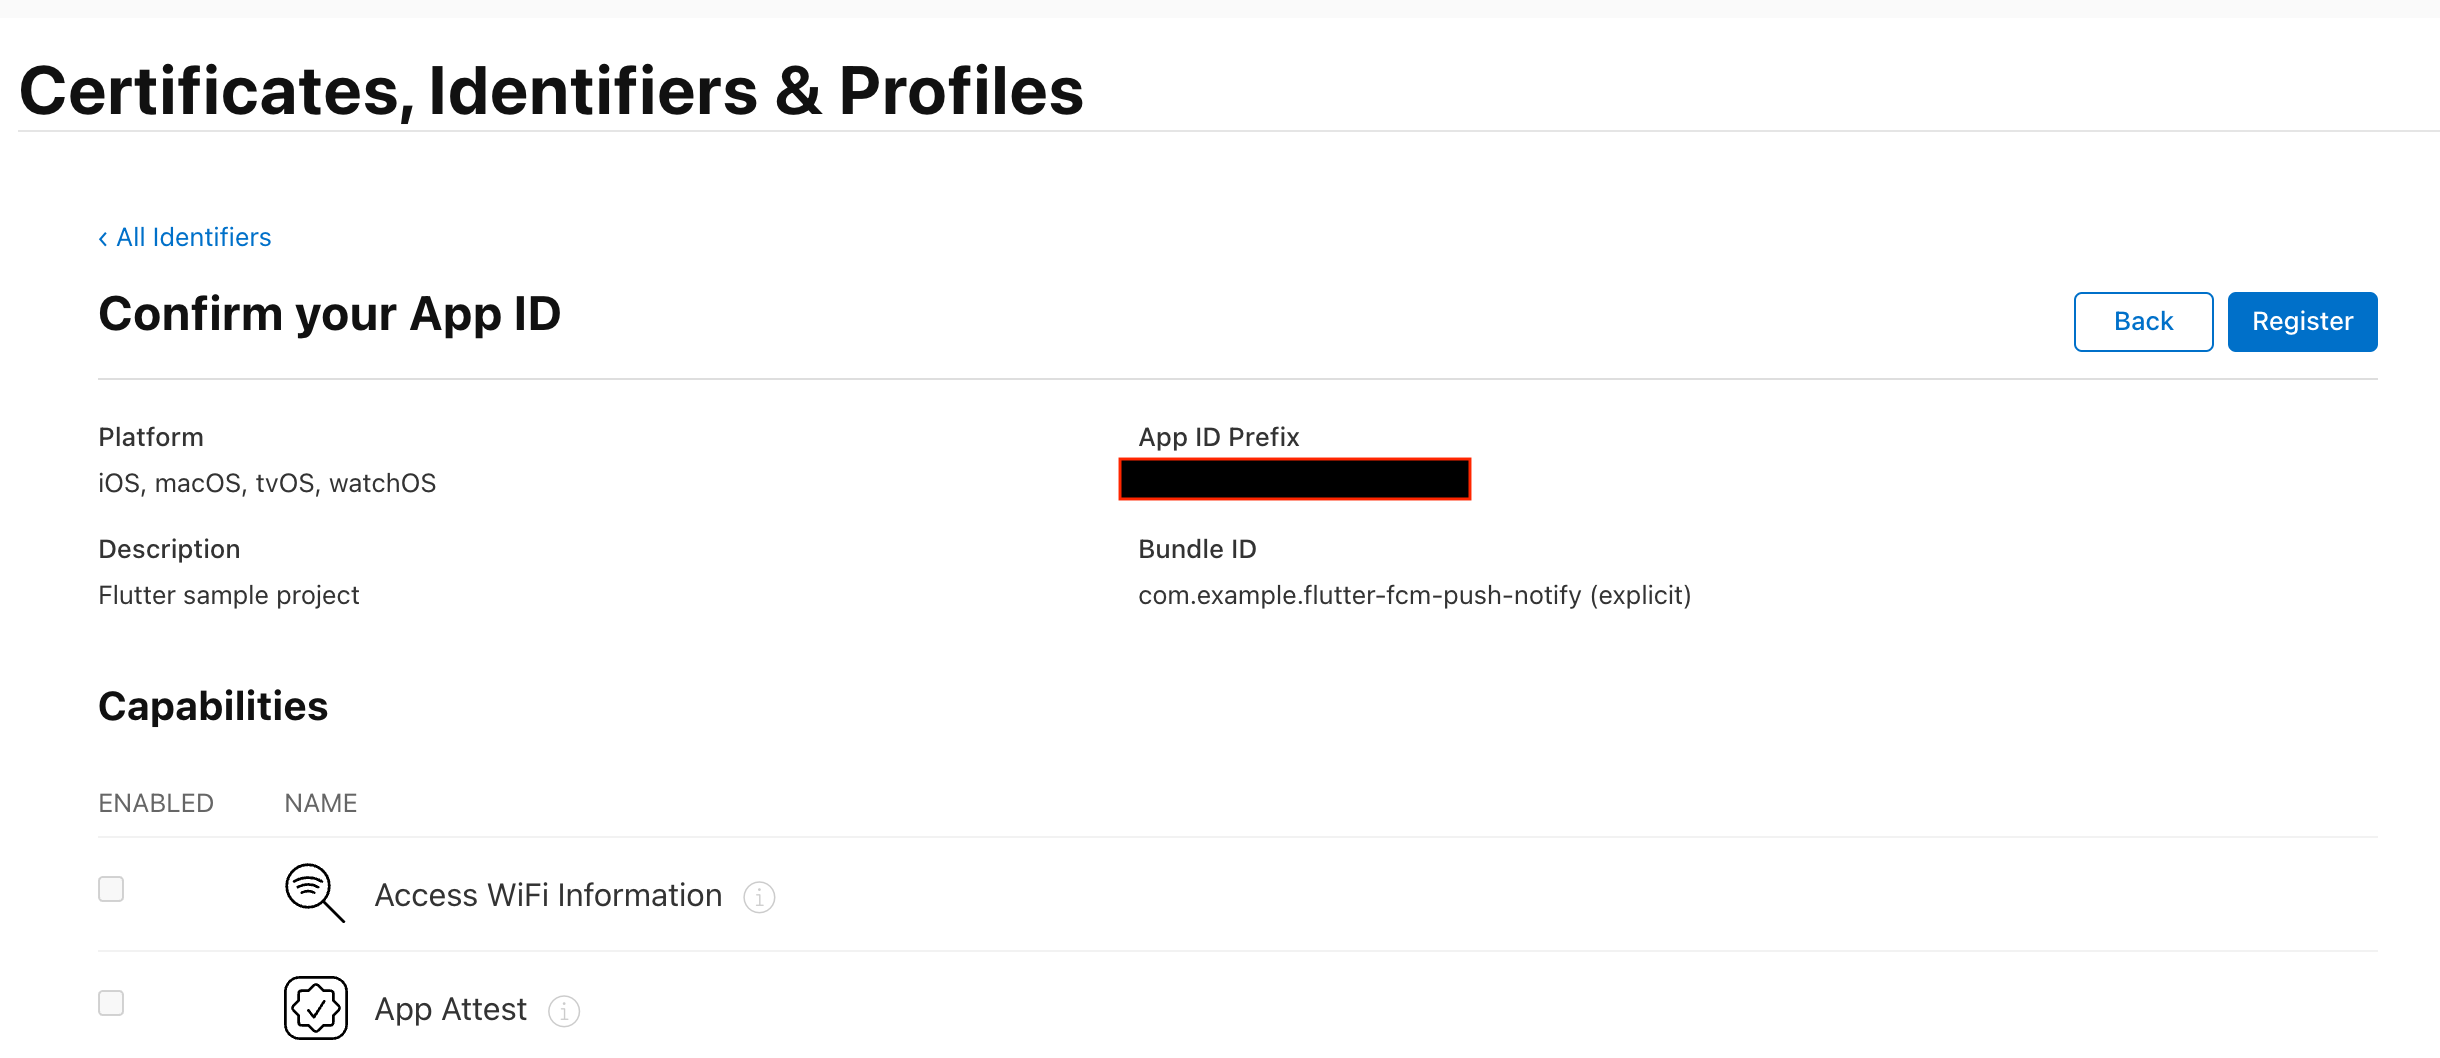
Continue をクリックして次に進みます。
Register ボタンをクリックして登録完了です。
Provisioning Profile を作成する
左メニューの Profiles から profile 一覧画面を開きます。
+ ボタンから profile 新規登録画面を開きます。
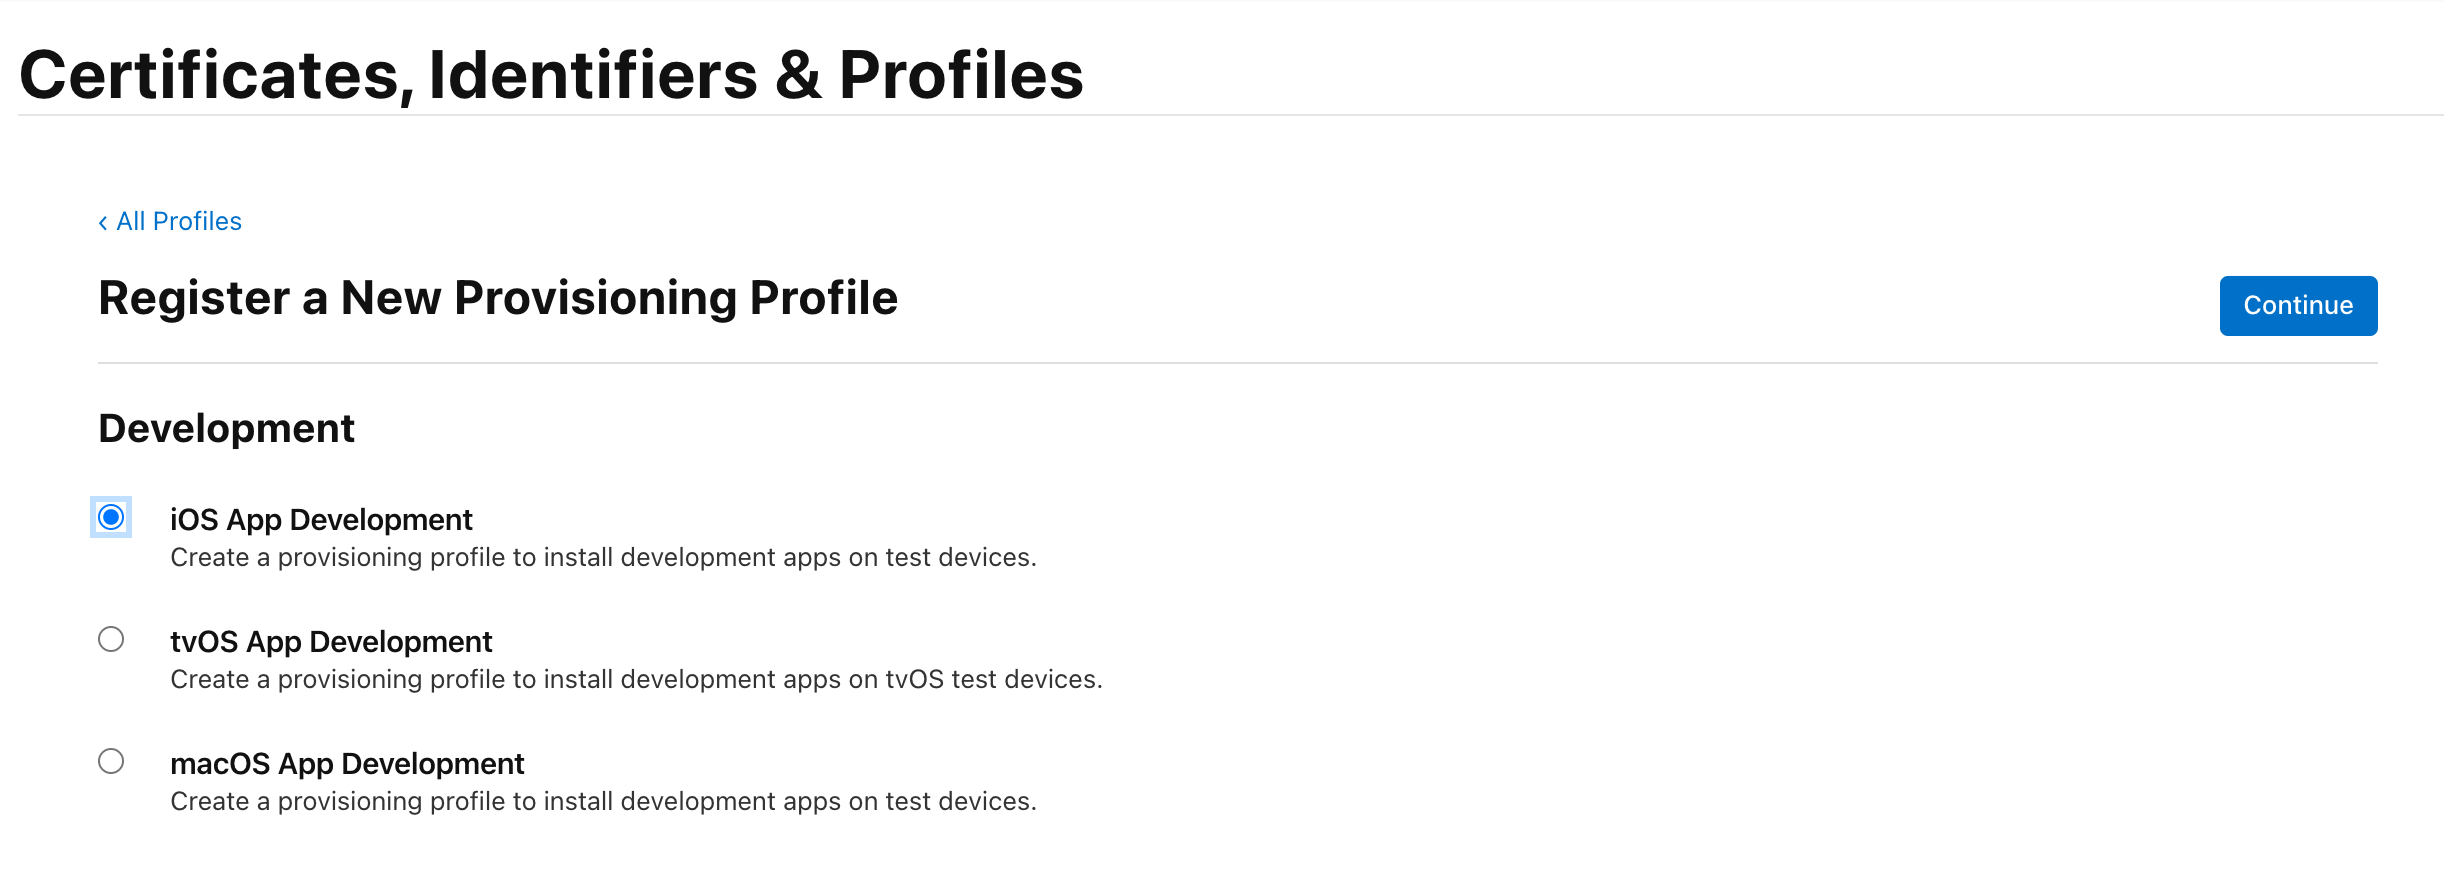
今回検証目的なので Development の profile を作成します。
iOS App Development を選択して Continue ボタンをクリックします。
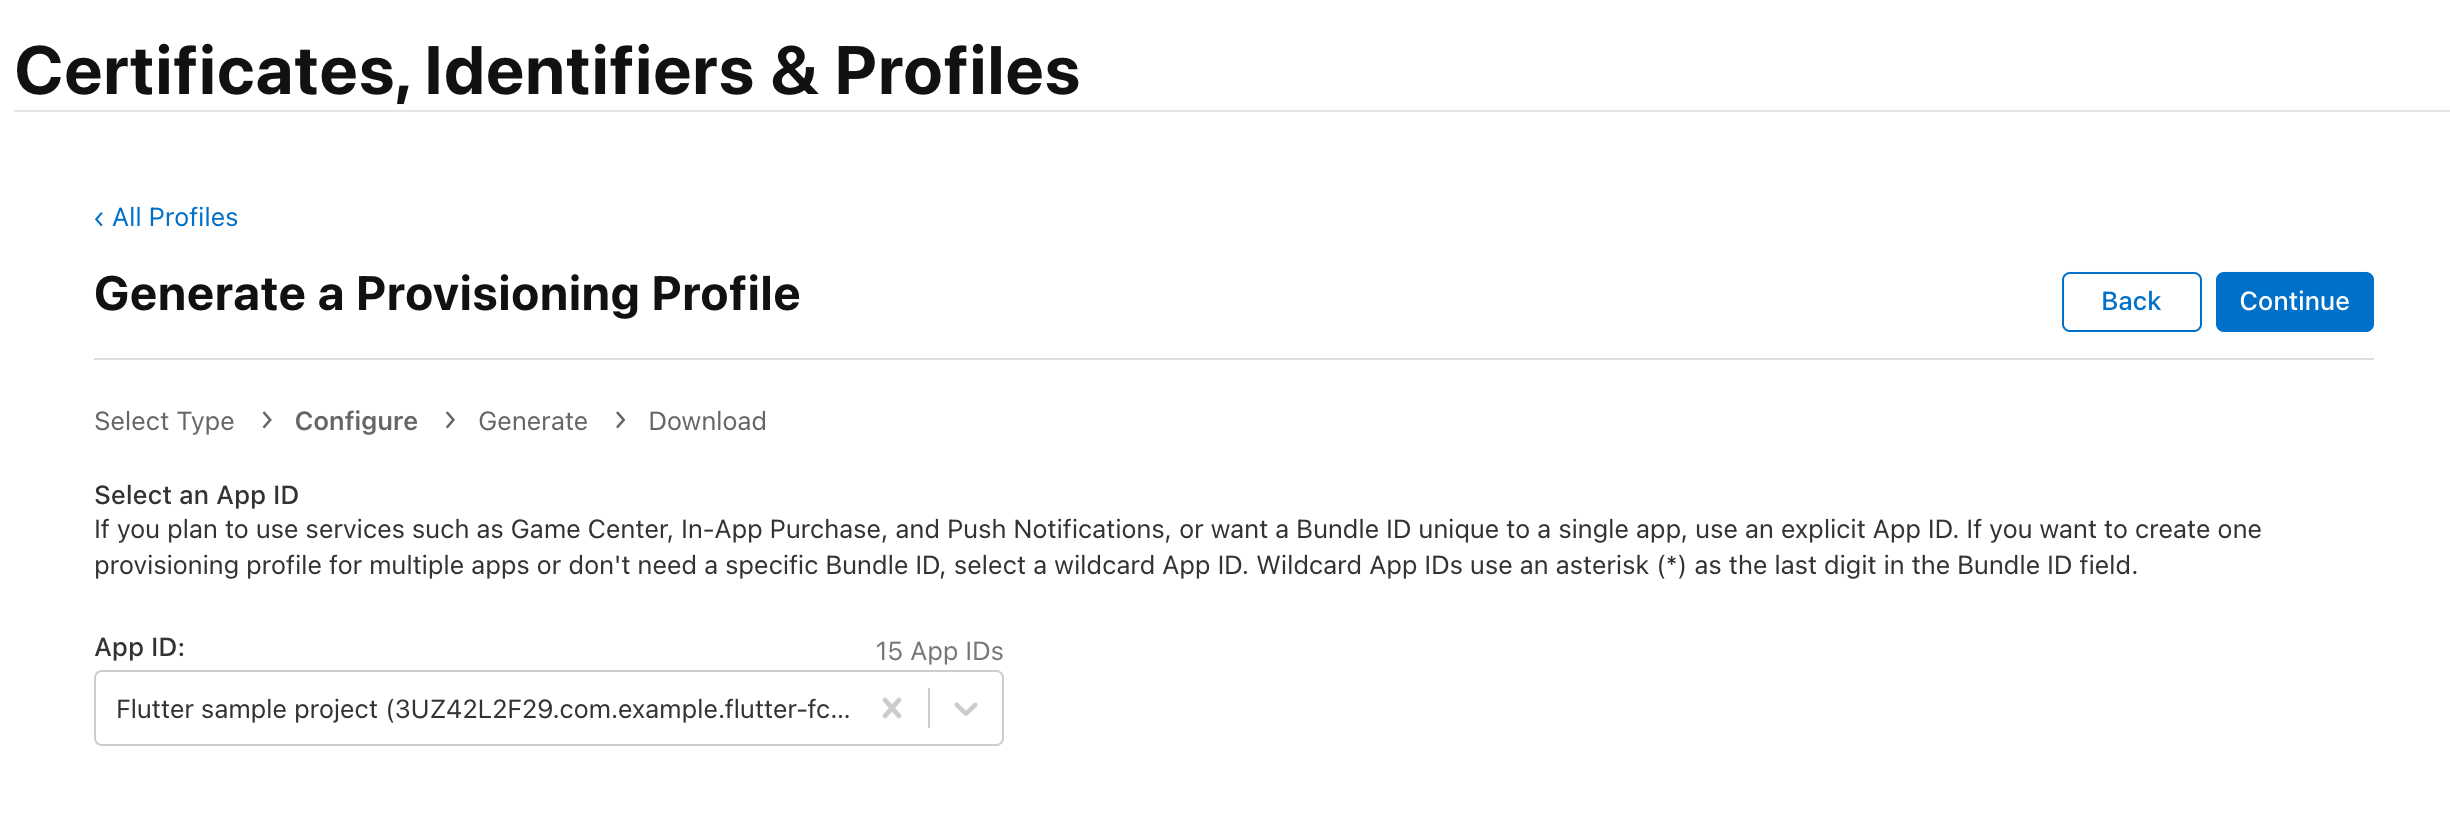
App ID プルダウンで先程作成した Identifier を選択して Continue ボタンをクリックします。
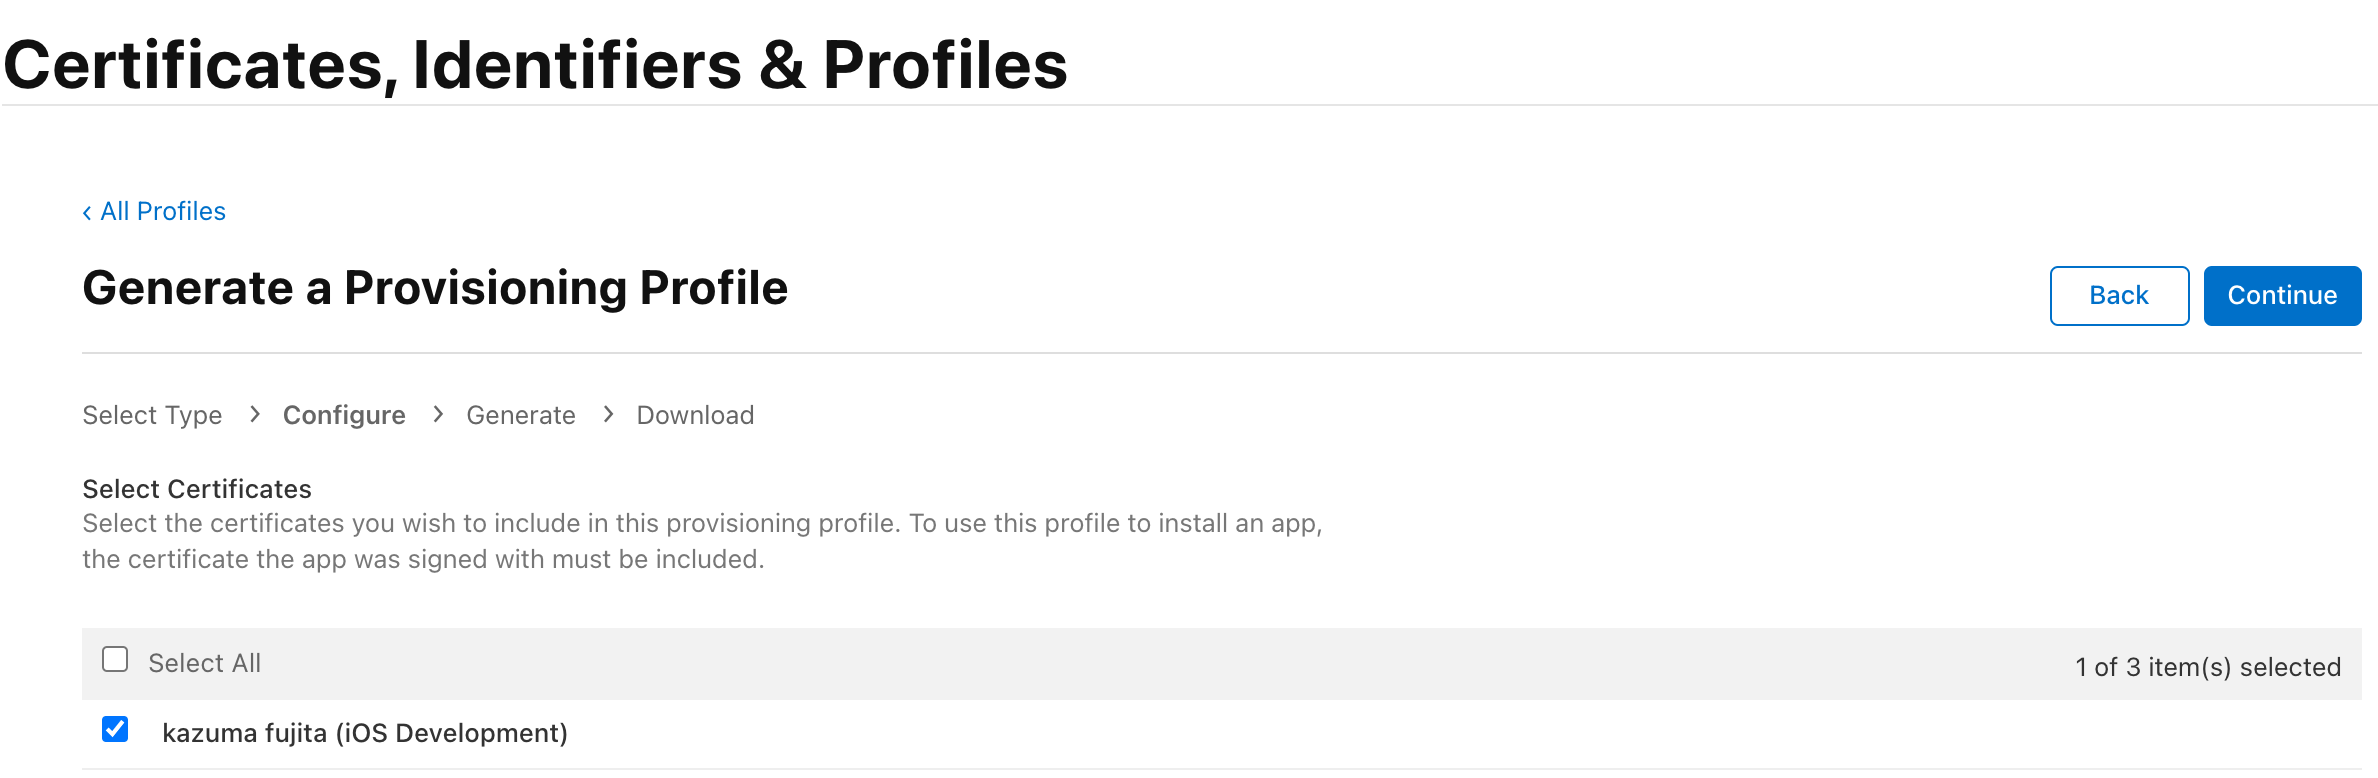
Select Certificates ではご自身で登録した PC の Certificate を選択して Continue ボタンをクリックします。
Certificate に関しては こちらの記事 で分かりやすく解説されているので参照ください。
今回 Certificate の作成に関しては本質ではないので割愛させて頂きます。
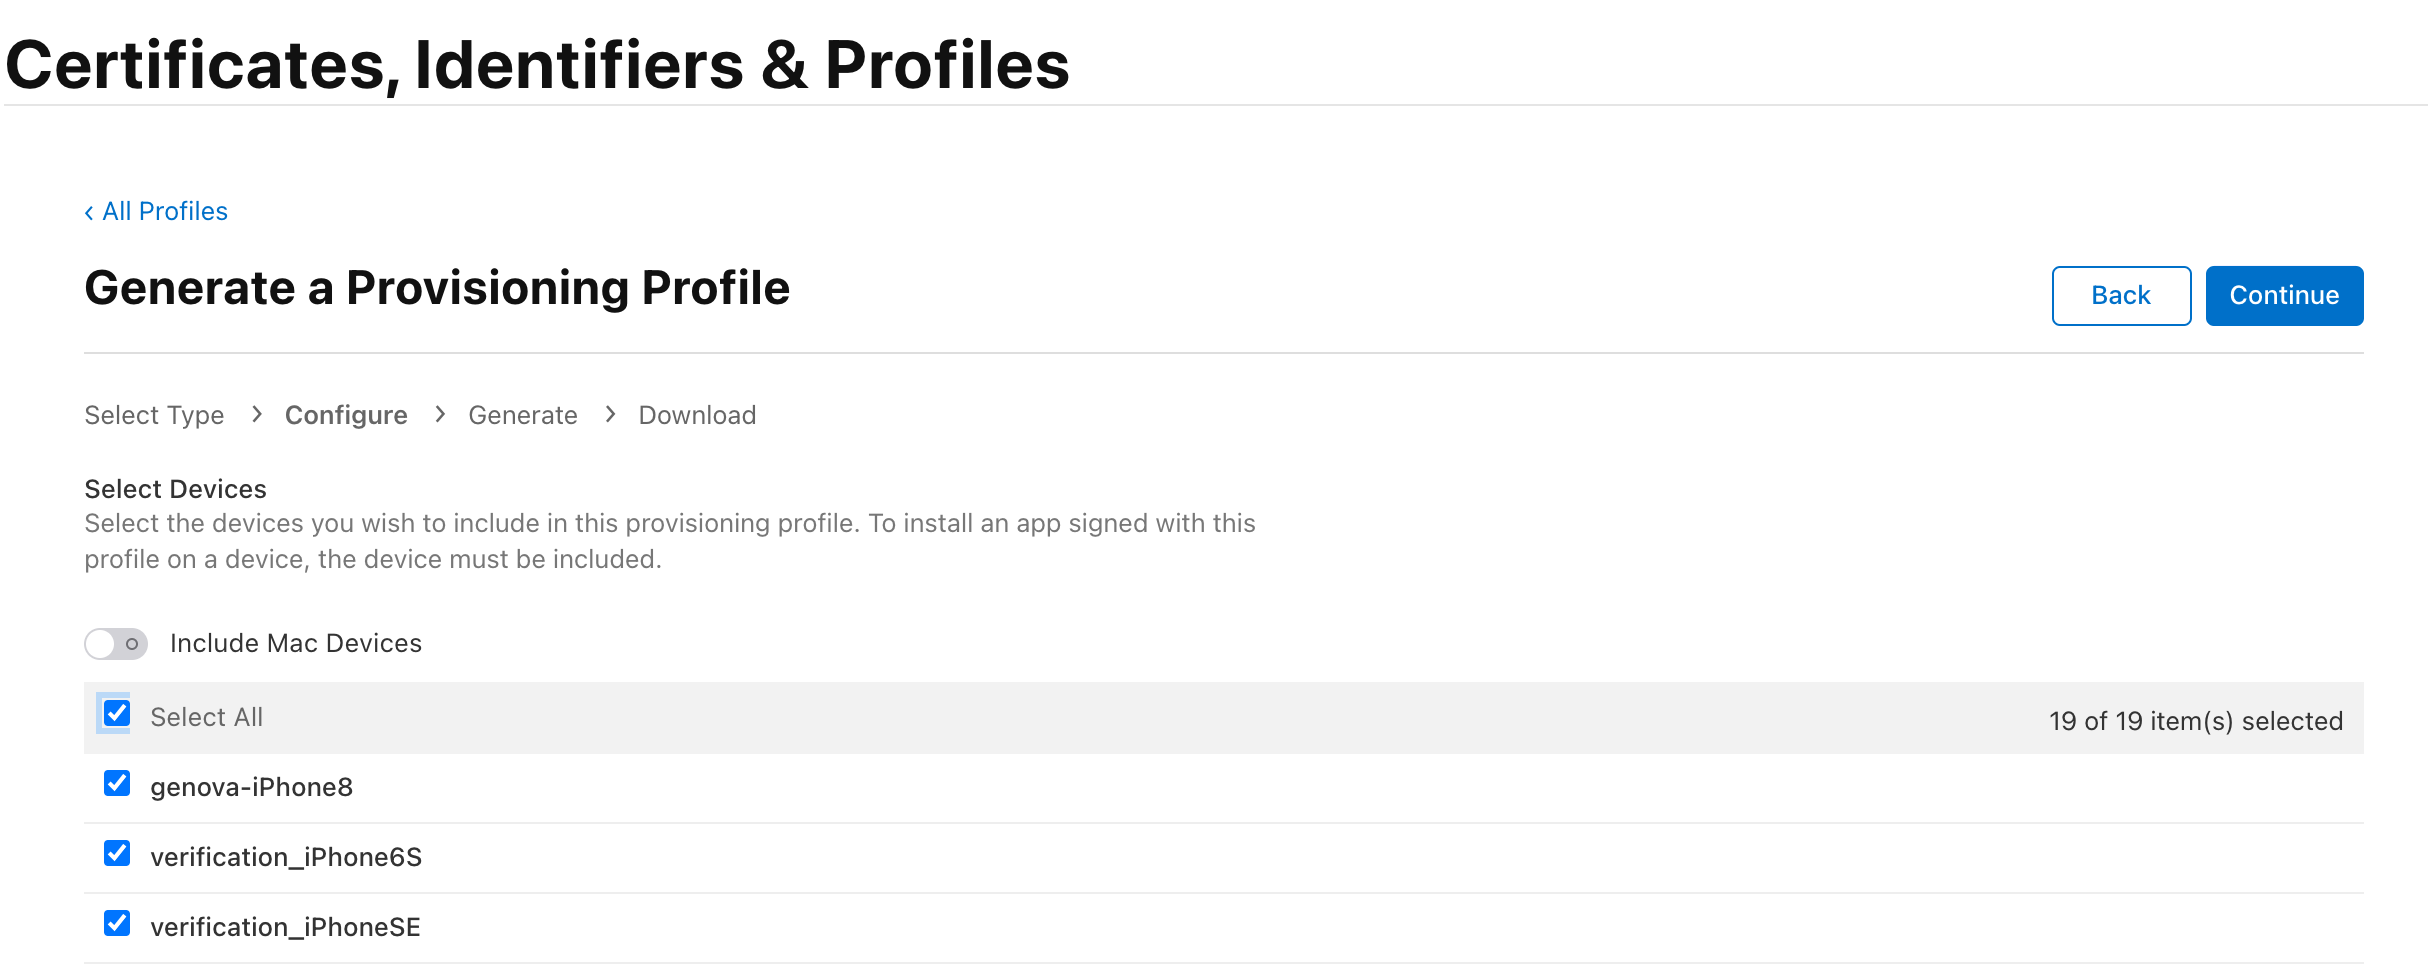
Select Device では検証に使用する実機を選択して Continue ボタンをクリックします。
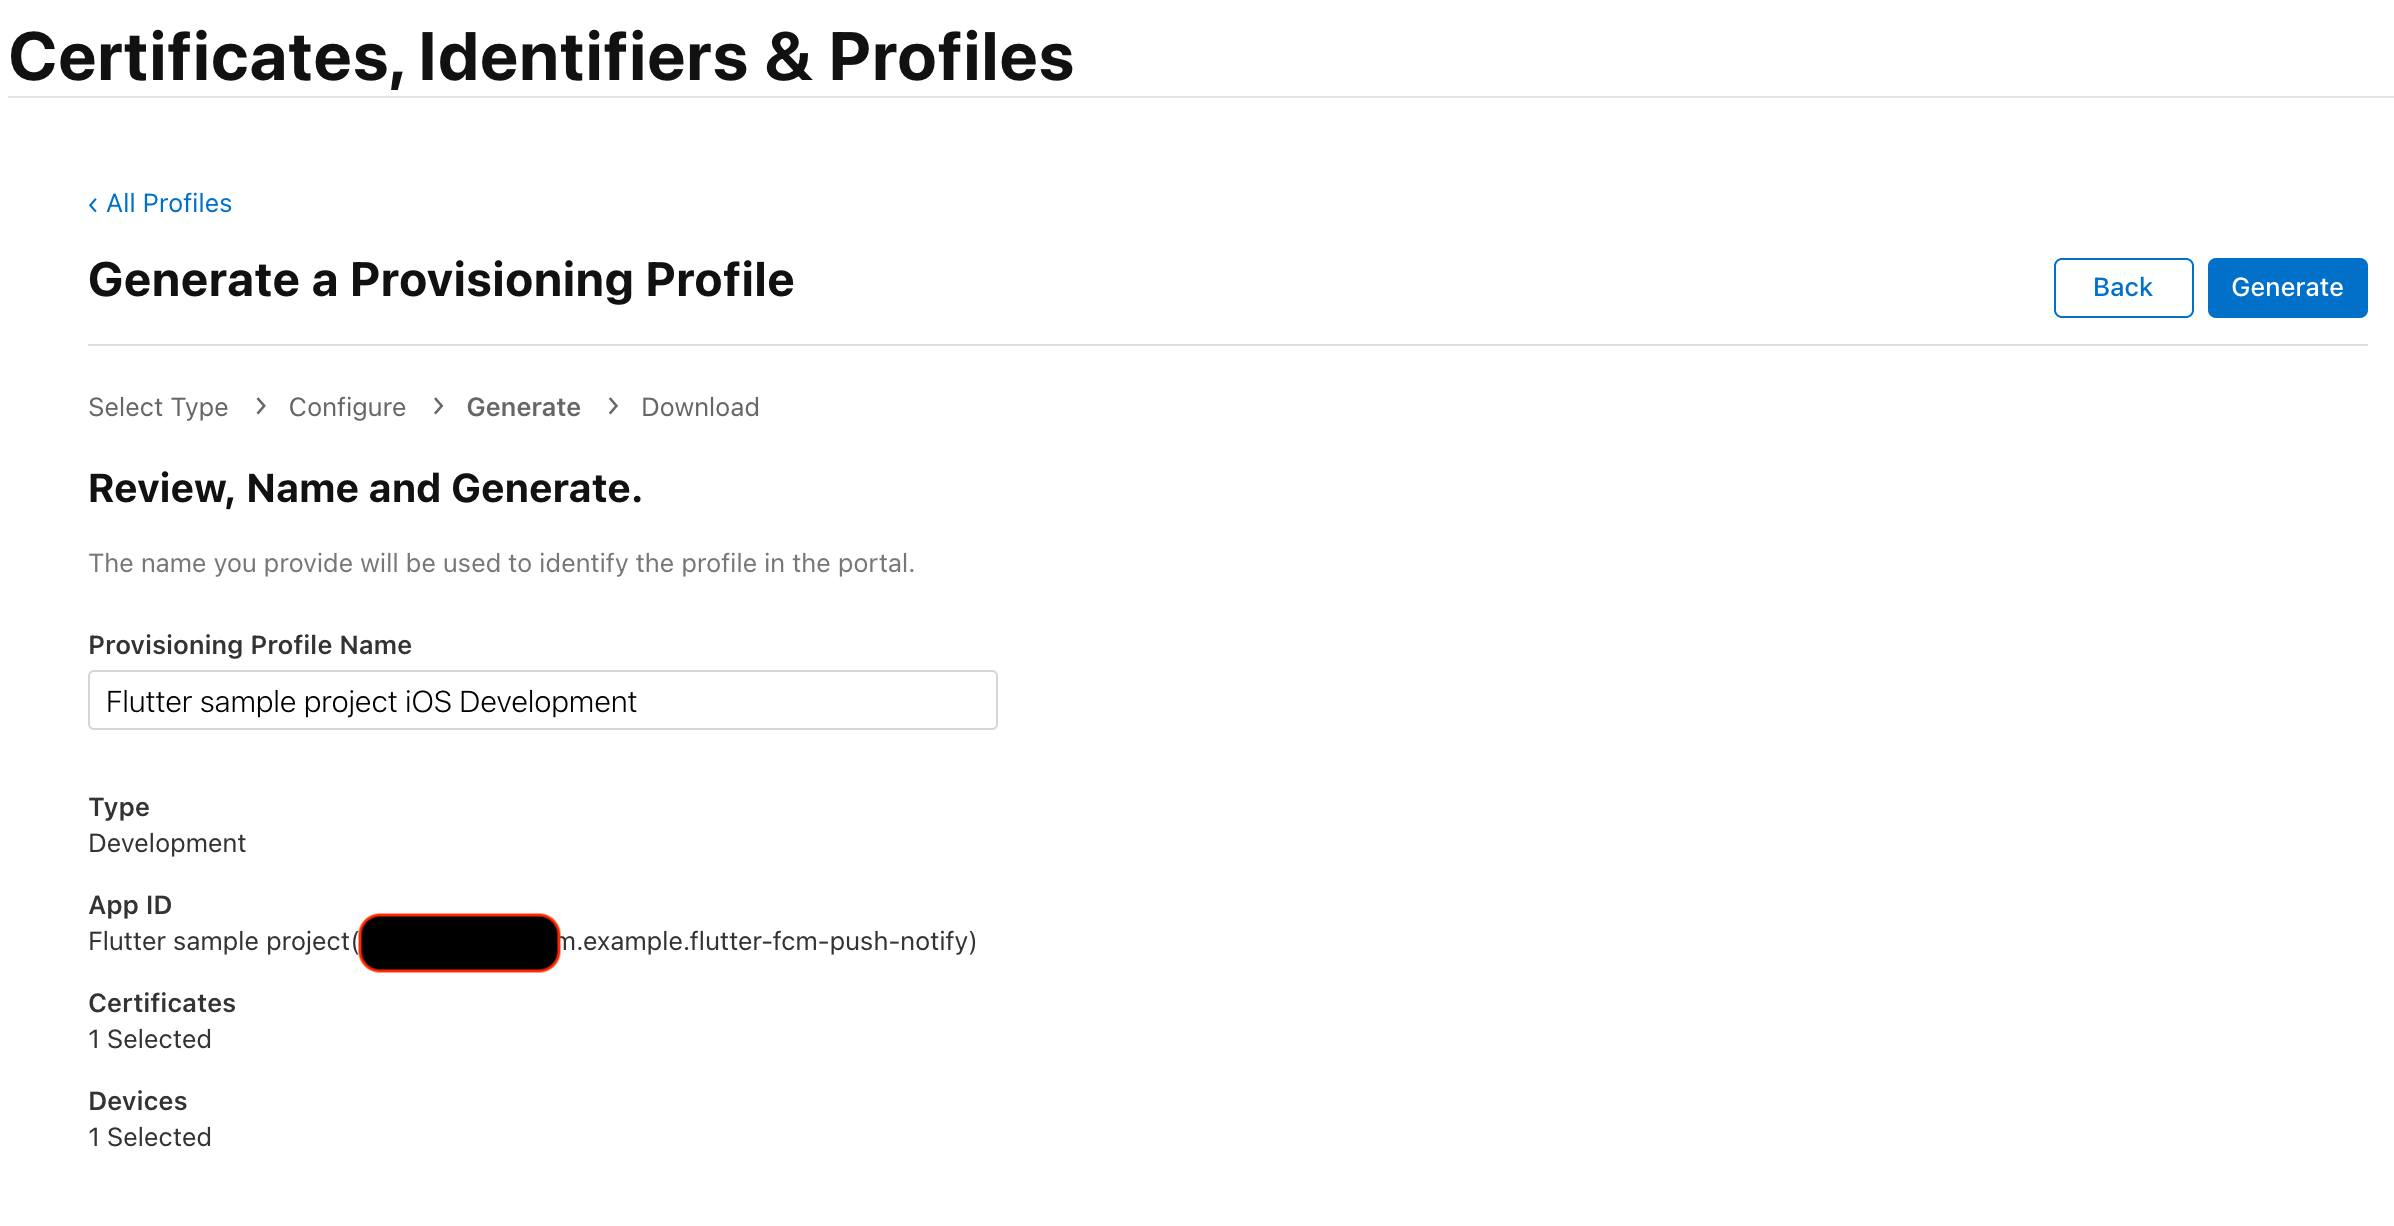
Provisioning Profile Name に profile 名を入力します。
今回は Flutter sample project iOS Development という名前を入力しました。
Generate ボタンをクリックします。
作成した profile を Download します。
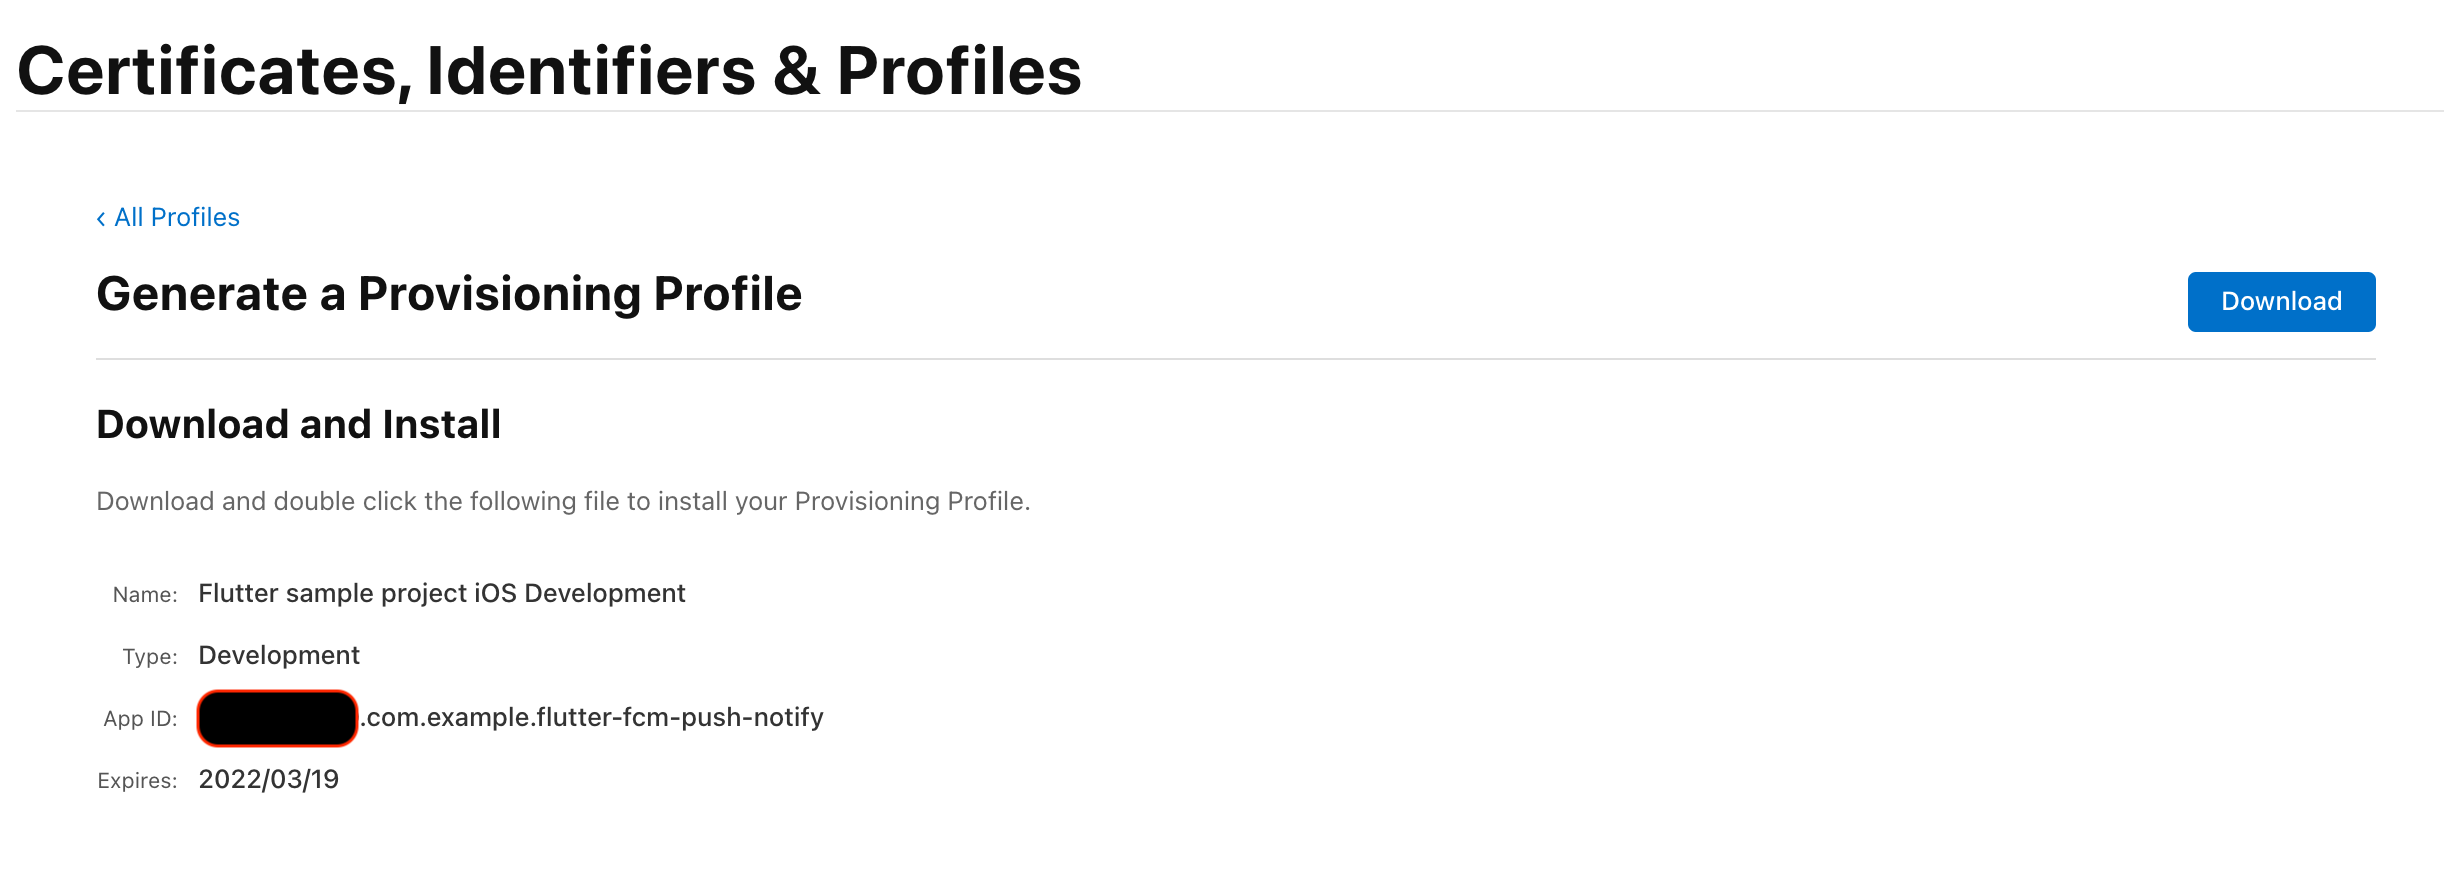
.mobileprovision という拡張子の profile が DL されたので、ファイルをダブルクリックして Mac に profile を登録します。
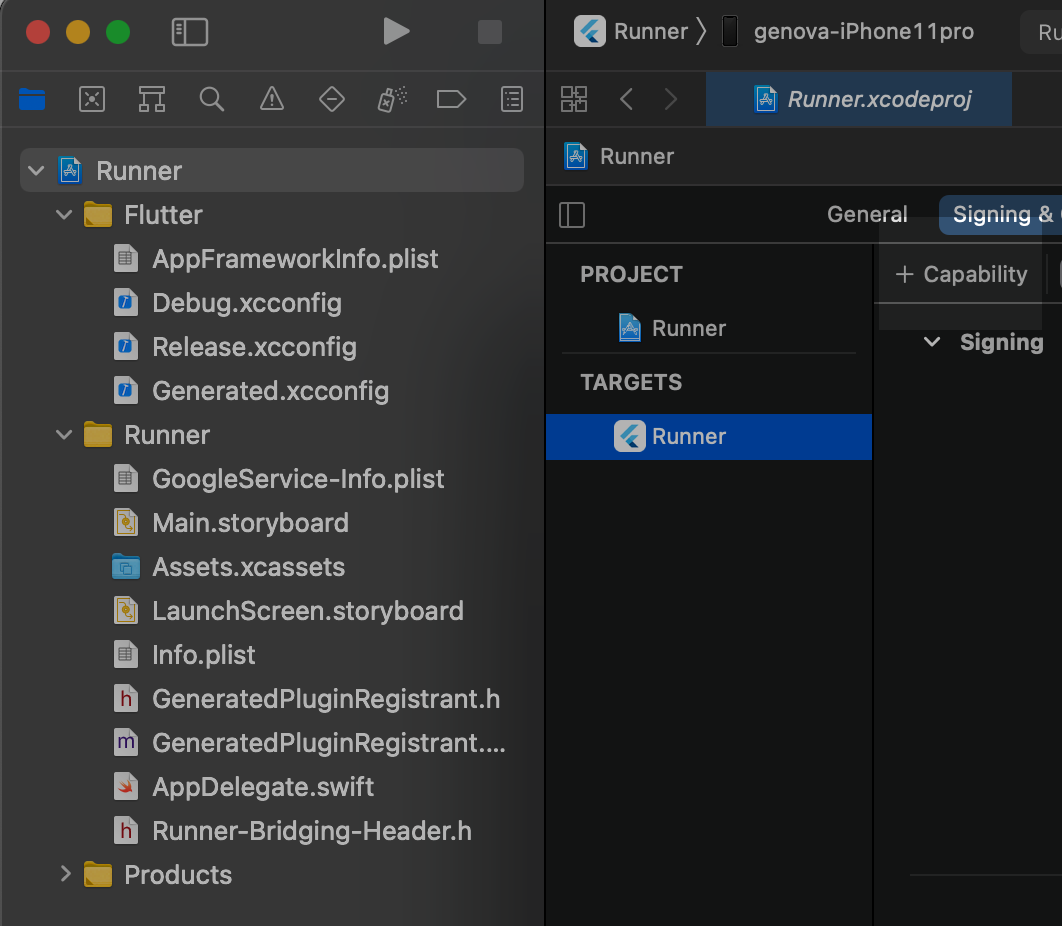
Xcode で Capabilities を設定する
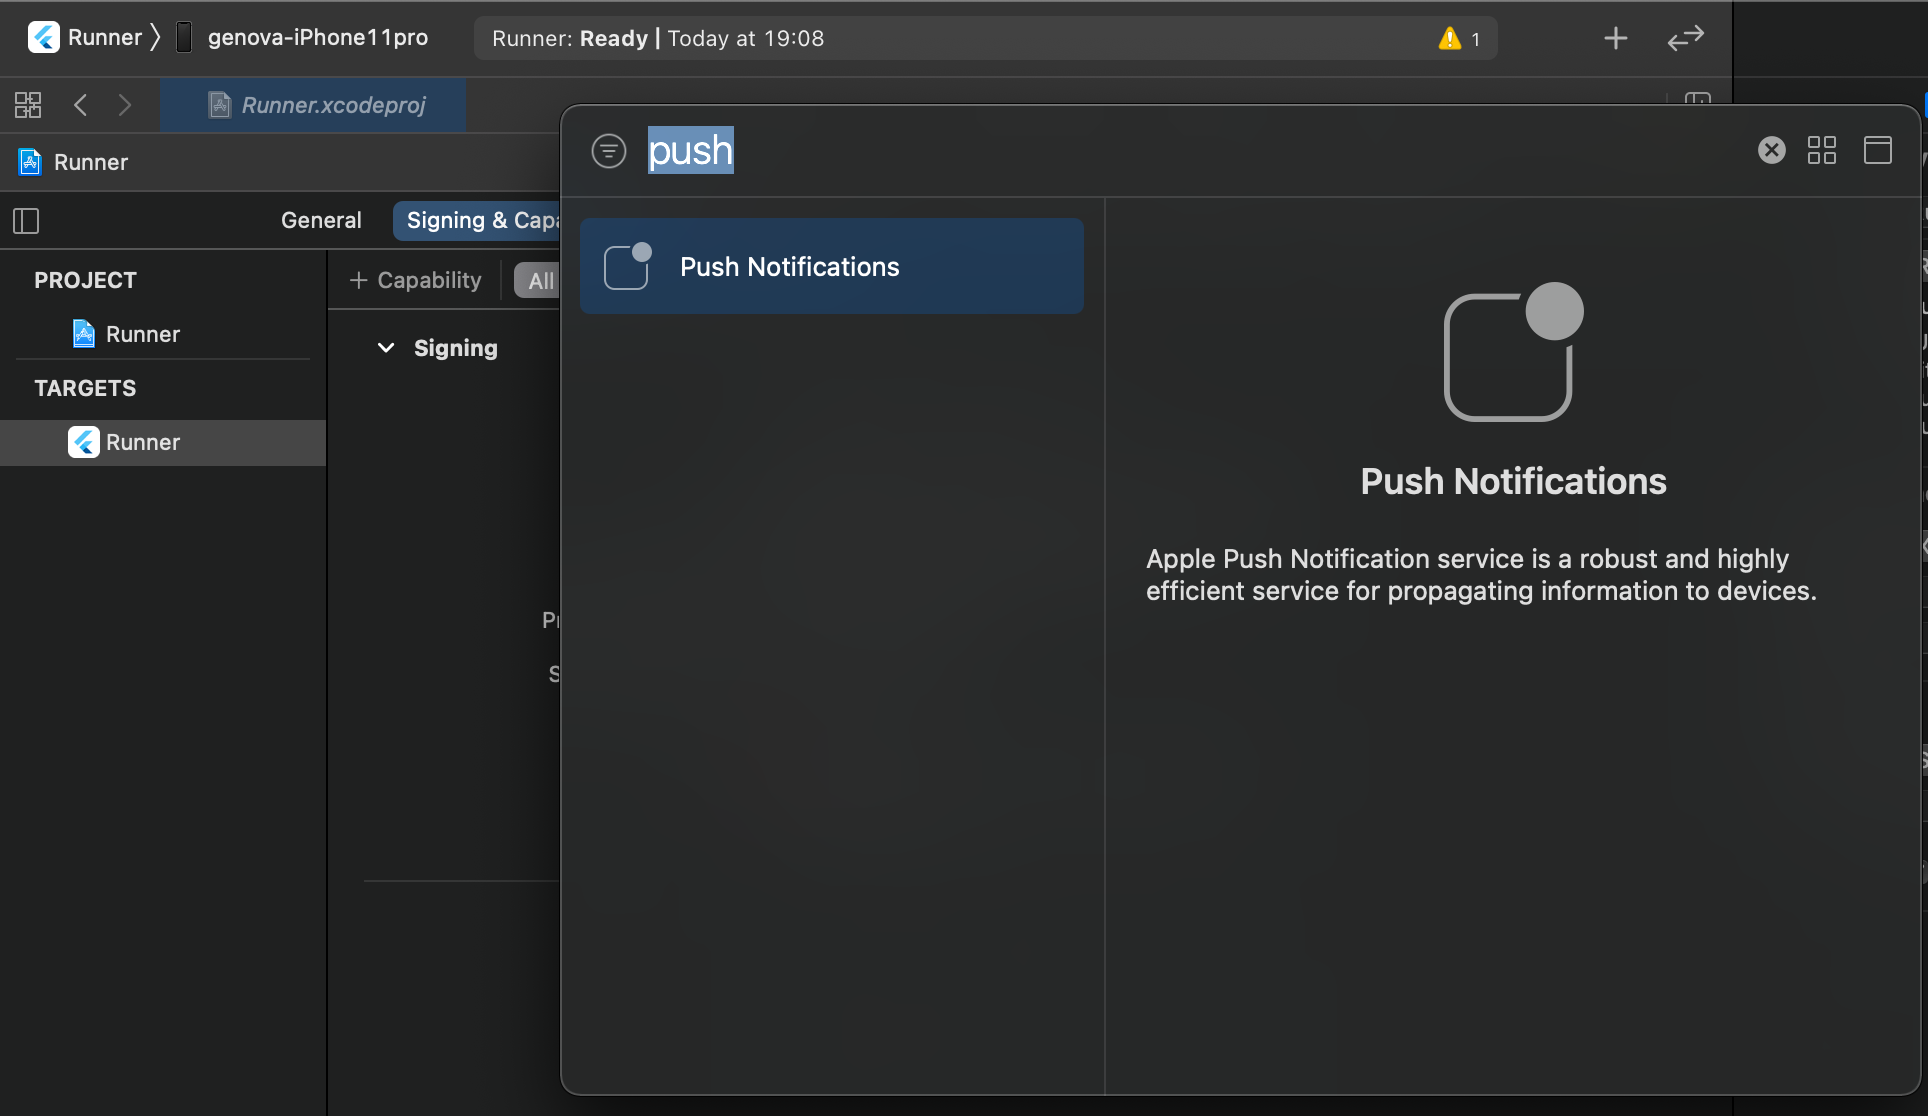
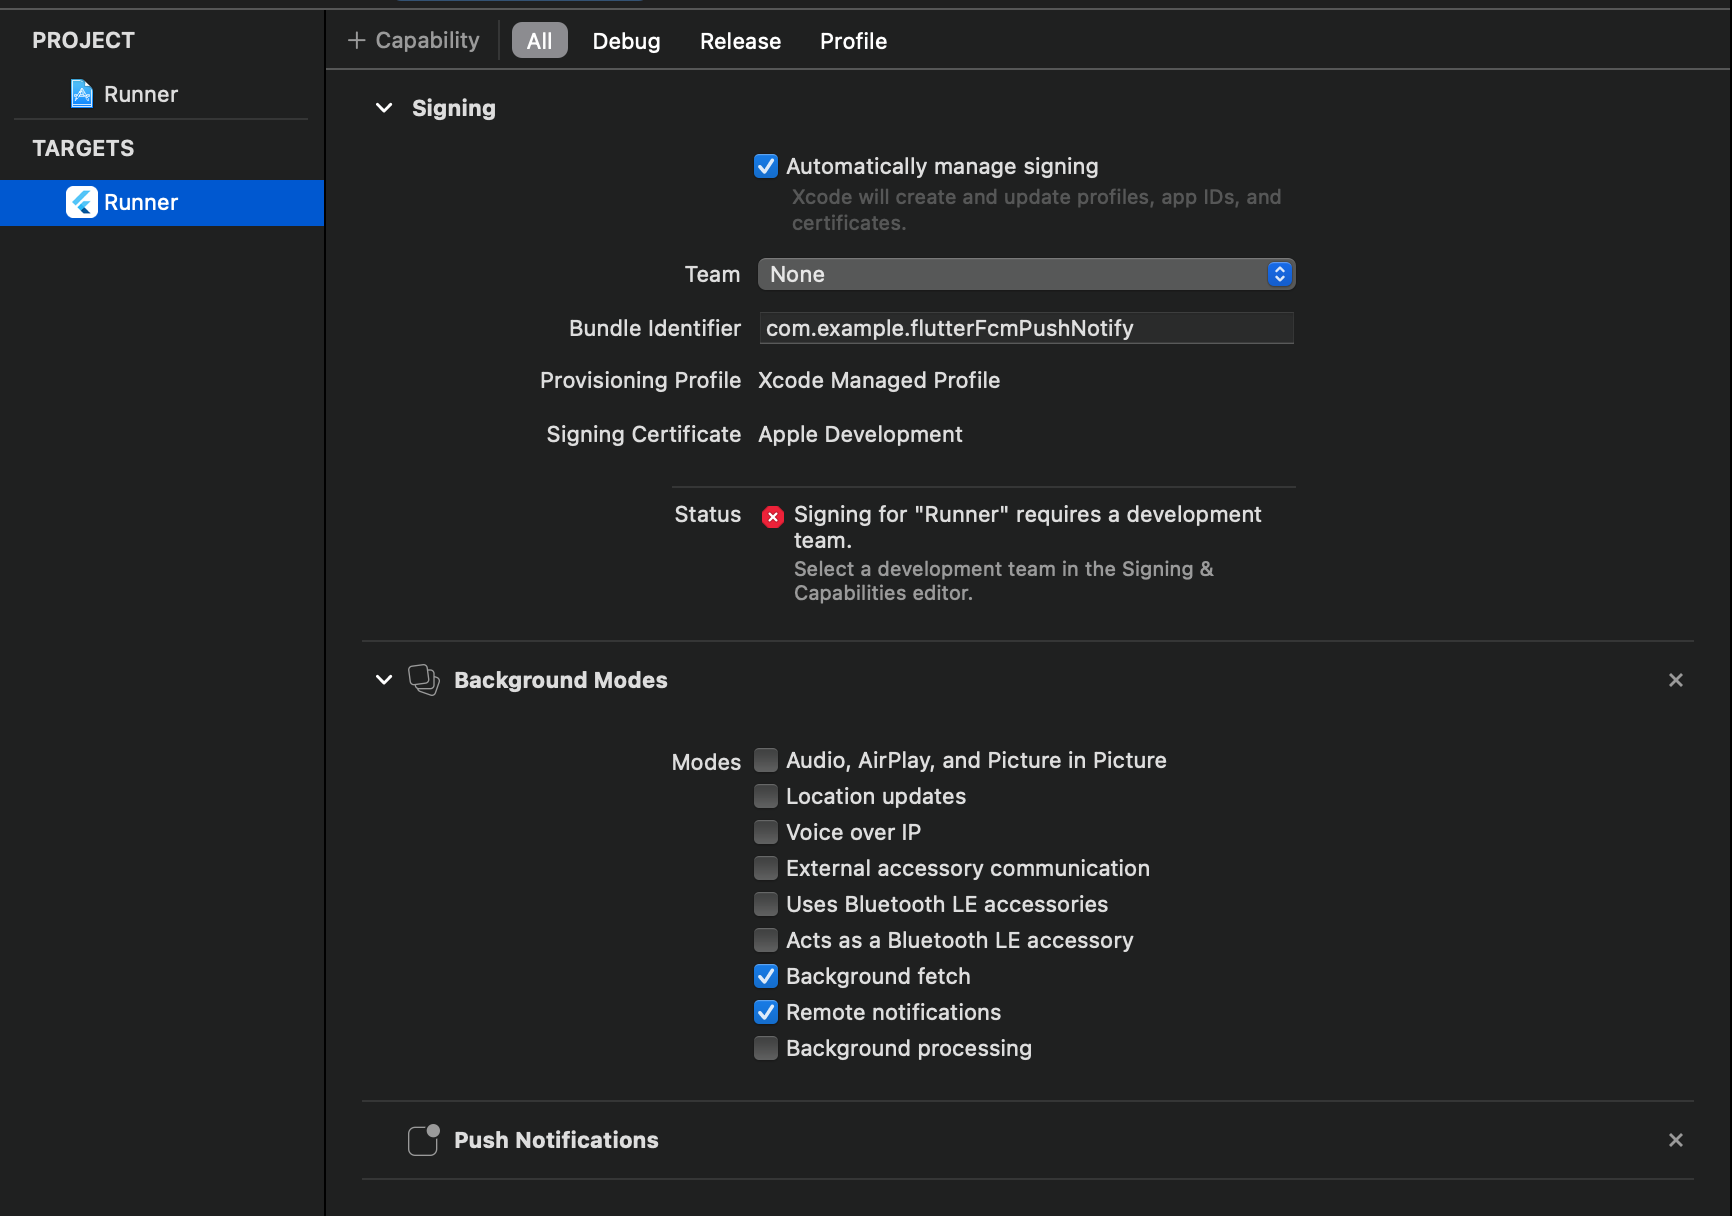
Xcode のプロジェクトナビゲータから Runner を選択し、Signin & Capabilities で、+ Capabilities をクリックします。
PushNotifications を検索して追加します。
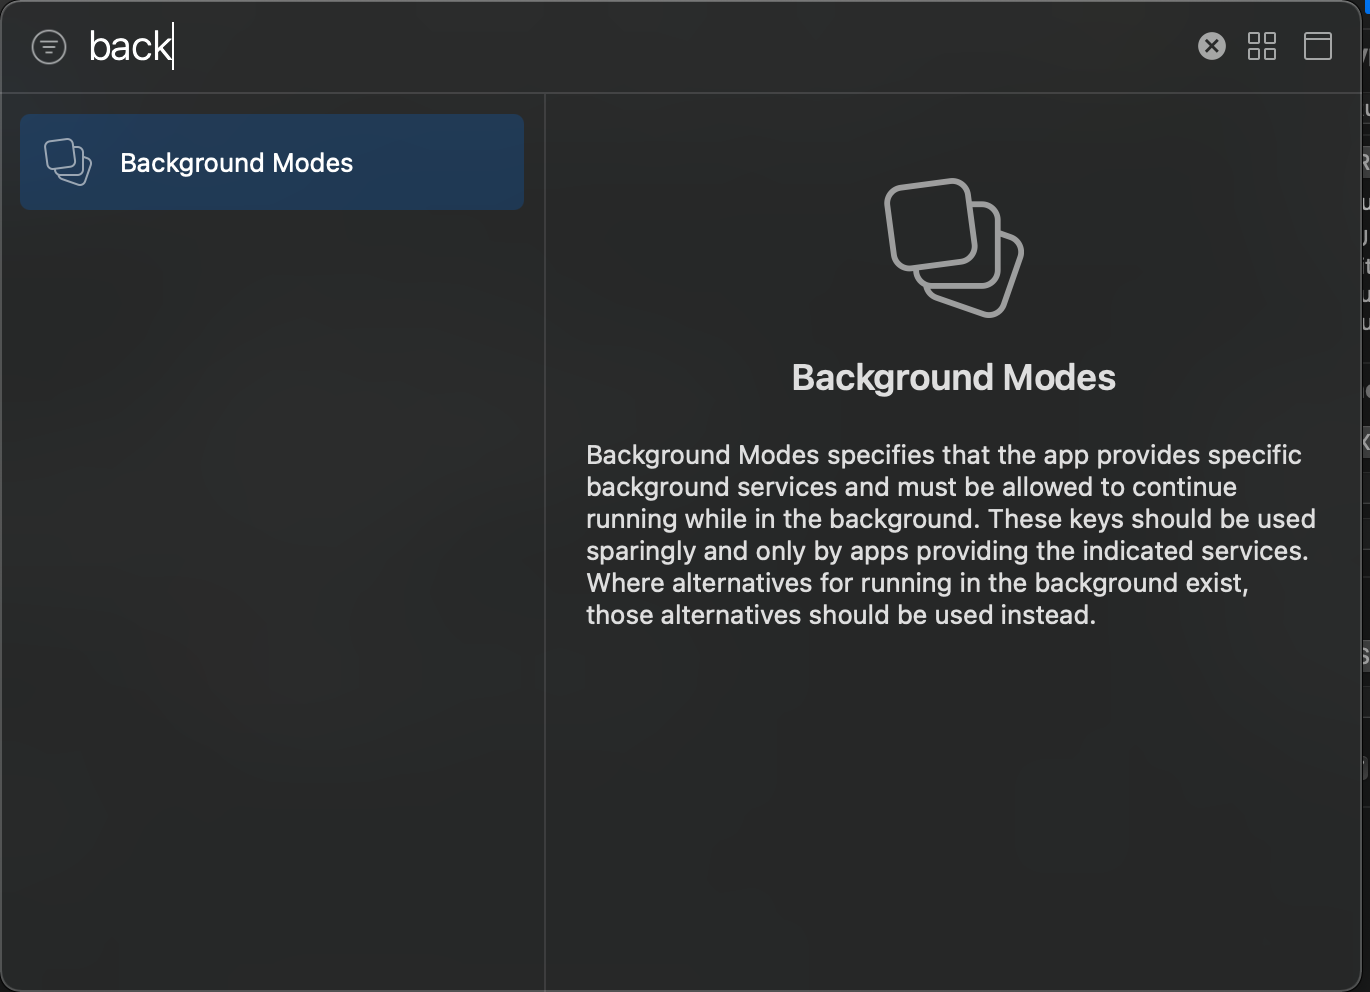
次に Background Modes を検索して追加します。
BackgroundModes の Background fetch と Remote notifications にチェックを入れます。
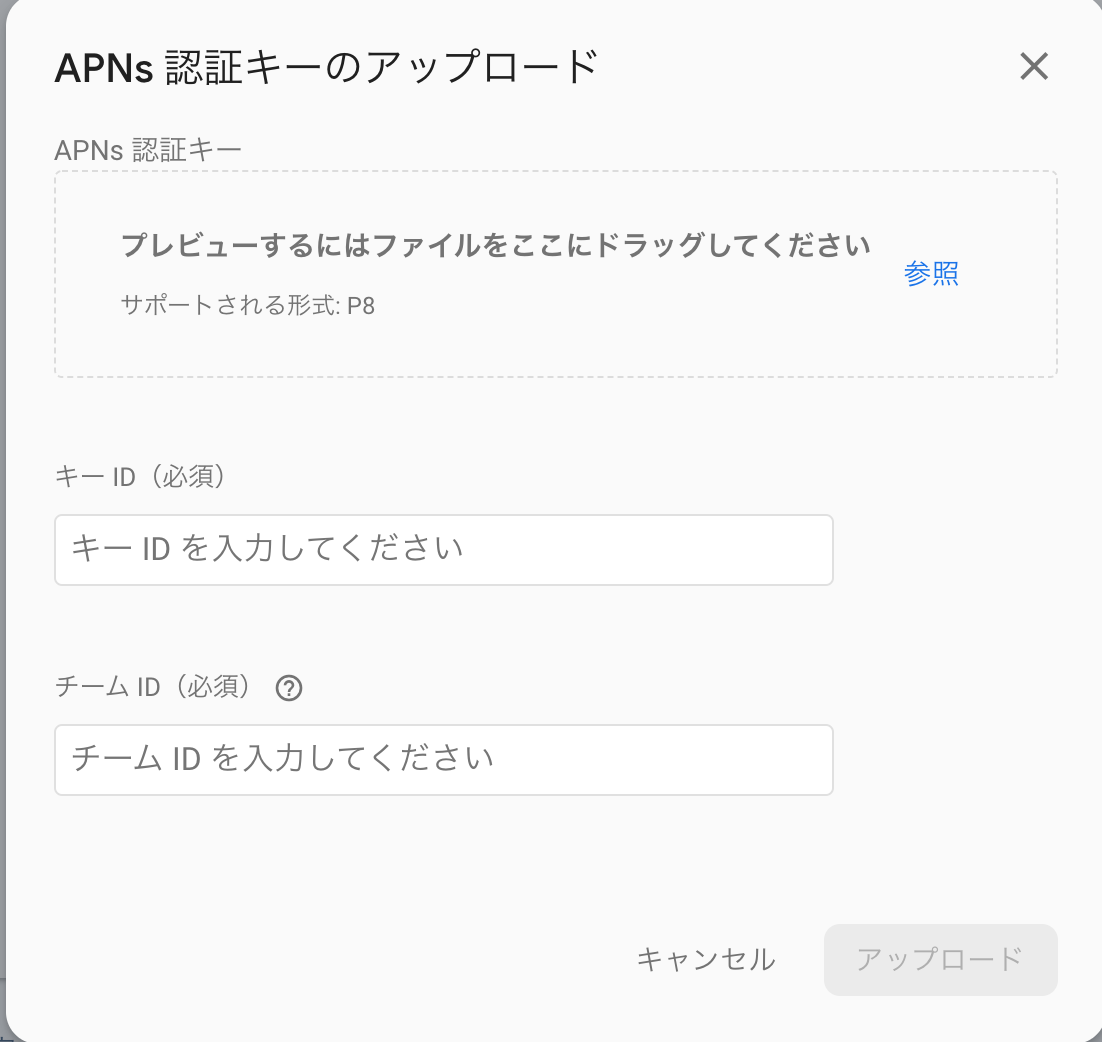
APNs 認証キーをアップロード
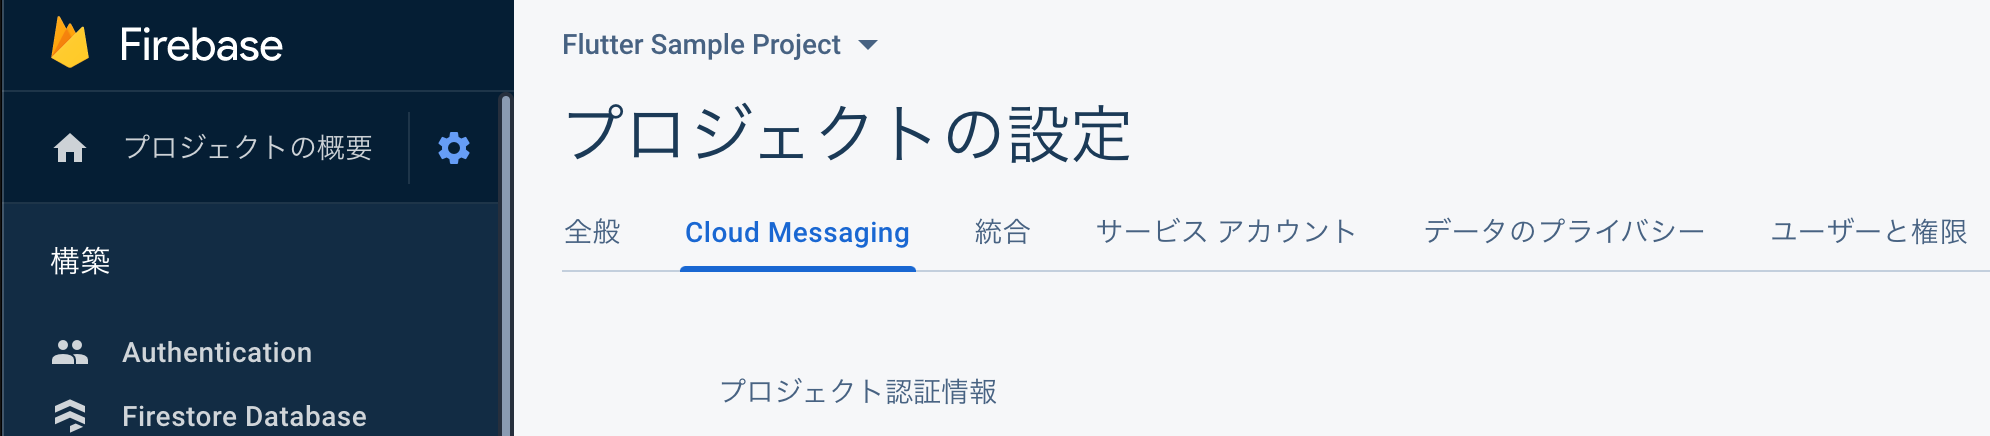
FirebaseConsole > プロジェクトの設定 > CloudMessaging タブをクリックします。
iOS アプリの設定で APNs 認証キーのアップロードをクリックします。
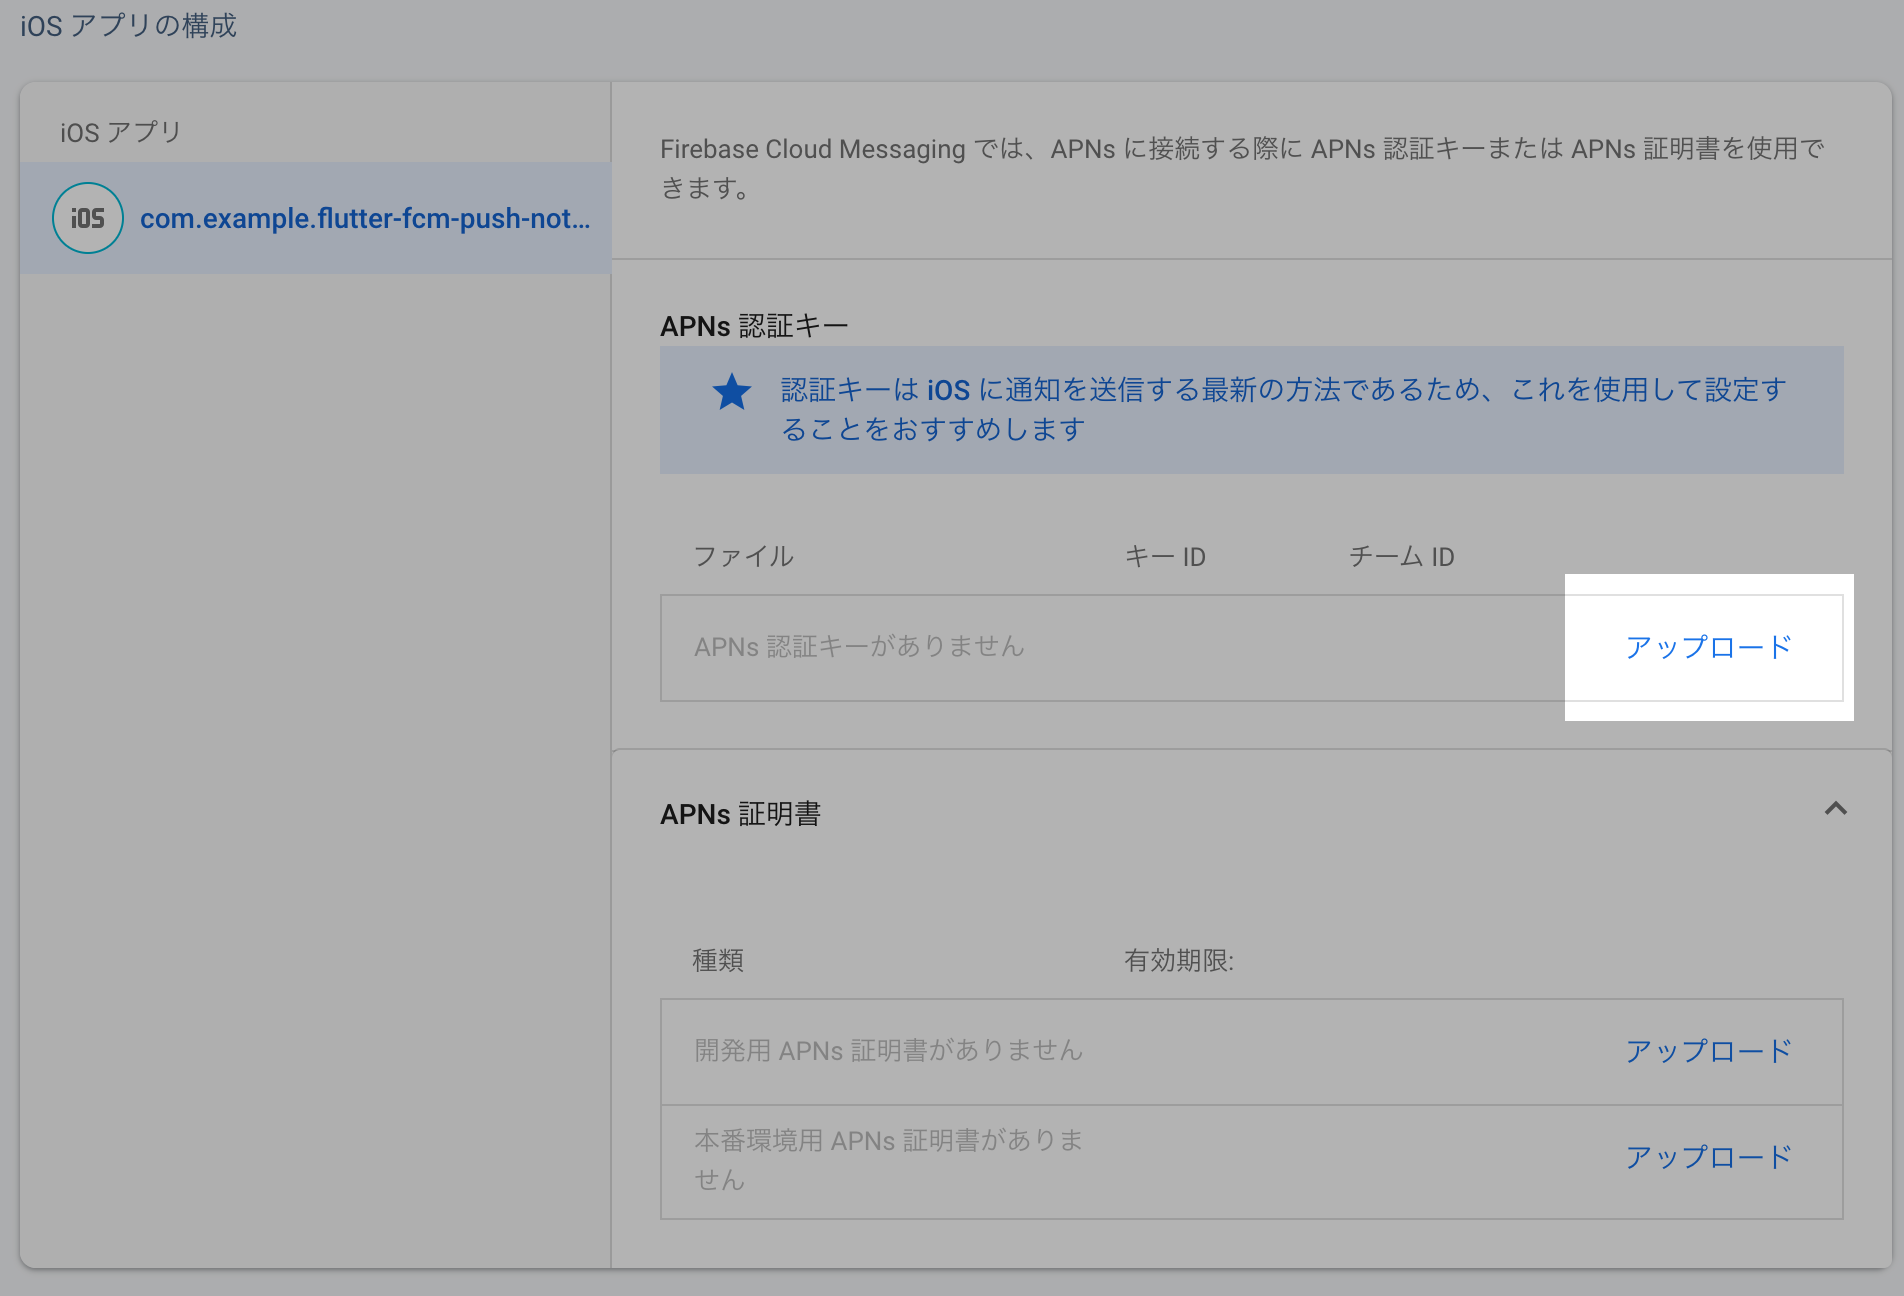
APNs 認証キーには、先程ダウンロードしておいた p8 のキーファイルをドラッグ&ドロップします。
キー ID は、Apple Developer Console の Keys より Key を選択すると確認できます。
チーム ID は Apple Developer Member Center メンバーシップより確認できます。
入力したらアップロードボタンをクリックします。
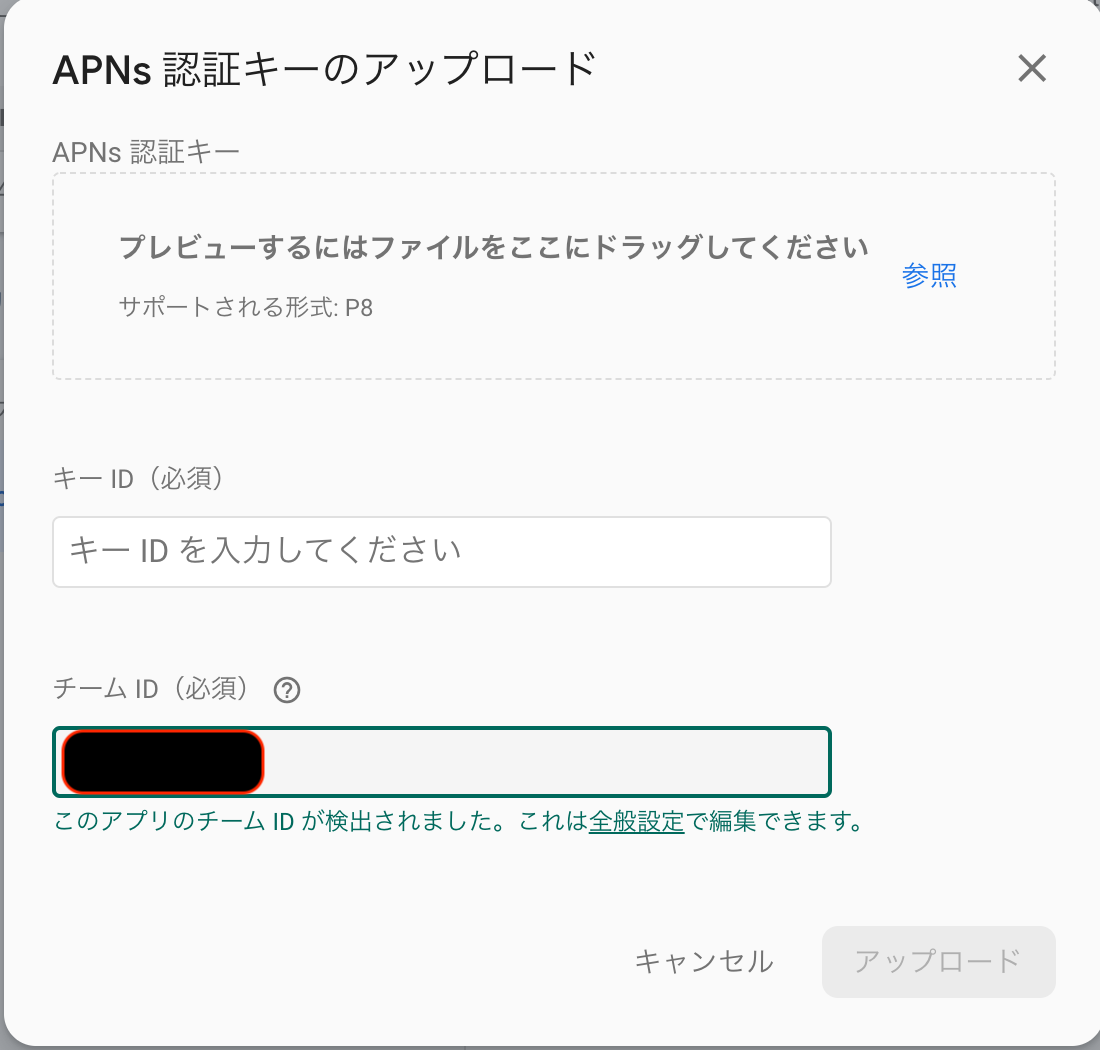
もしも、「このアプリにチーム ID が保存されていません」というエラーが表示された場合は Key を削除後もう一度設定し直します。
このエラーが表示された後、チーム ID がプロジェクト全体設定に反映される為、再度アップロードダイアログを開くとちゃんとチーム ID が設定されています。
Xcode で Bundle Identifier を設定する
Xcode のプロジェクトナビゲータから Runner を選択し、Signin & Capabilities で、Capabilities をクリックします。
この Bundle Identifier は Apple Developer Console で設定したアプリの Identifier と同じ名前を設定します。
今回は com.example.flutter-fcm-push-notify という Bundle Identifier 名にしています。
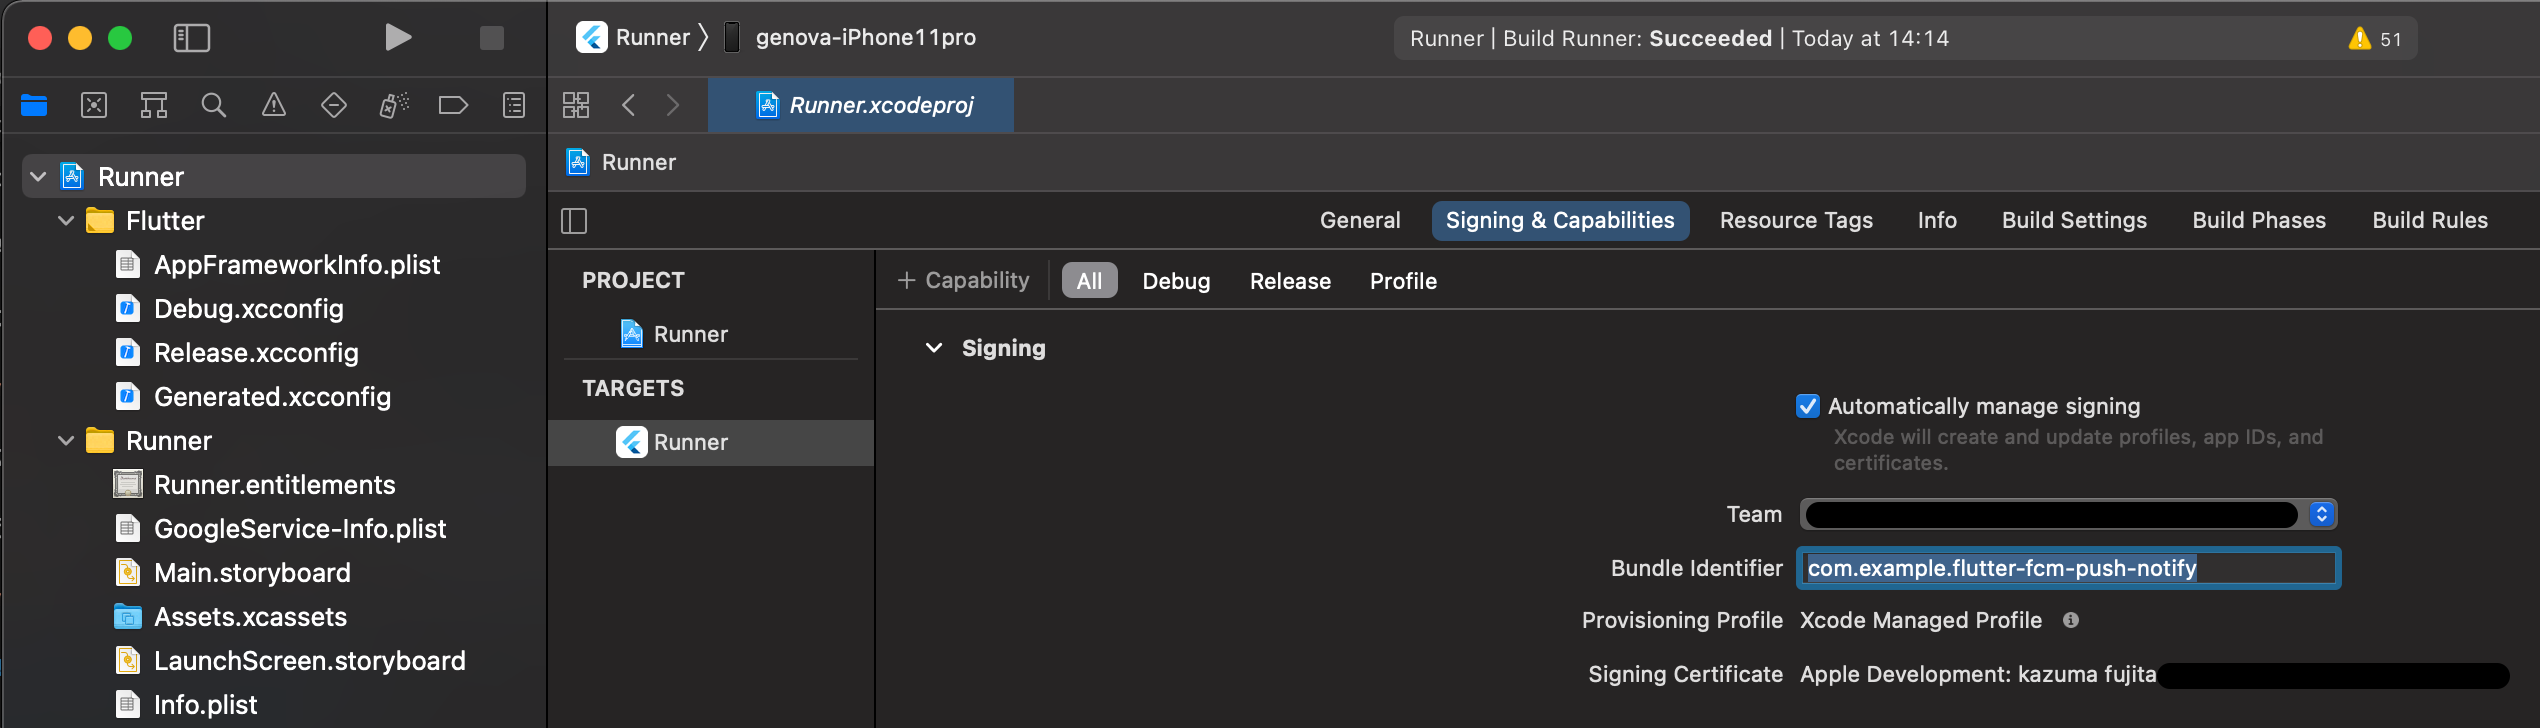
ここの Bundle Identifier を証明書と合わせておかないと Build はできますが、Profile と BundleID が違う為プッシュ通知が届きません。
筆者はこれで iOS だけプッシュ通知が配信されずハマりました。
Podfile に platform version を設定する
ios/Podfile を開いて platform :ios, '12.1' を追記します。
筆者の Flutter version 2.0.0 環境ではデフォルトで platform :ios, '9.0' がコメントアウトの状態なので以下のようになりました。
# Uncomment this line to define a global platform for your project
# platform :ios, '9.0'
platform :ios, '12.1'
Podfile で iOS の version 指定をしないと pod install 時に以下のエラーが出力されます。
Launching lib/main.dart on genova-iPhone11pro in debug mode...
Signing iOS app for device deployment using developer identity: "Apple Development: kazuma.fujita@genova.co.jp (5G3VQZ5PL5)"
Running pod install...
CocoaPods' output:
↳
      Preparing

    Analyzing dependencies

    Inspecting targets to integrate
      Using `ARCHS` setting to build architectures of target `Pods-Runner`: (``)

    Fetching external sources
    -> Fetching podspec for `Flutter` from `Flutter`
    -> Fetching podspec for `firebase_core` from `.symlinks/plugins/firebase_core/ios`
    firebase_core: Using Firebase SDK version '7.3.0' defined in 'firebase_core'
    -> Fetching podspec for `firebase_messaging` from `.symlinks/plugins/firebase_messaging/ios`
    firebase_messaging: Using Firebase SDK version '7.3.0' defined in 'firebase_core'
    -> Fetching podspec for `flutter_local_notifications` from `.symlinks/plugins/flutter_local_notifications/ios`
    -> Fetching podspec for `path_provider` from `.symlinks/plugins/path_provider/ios`
    -> Fetching podspec for `sqflite` from `.symlinks/plugins/sqflite/ios`

    Resolving dependencies of `Podfile`
      CDN: trunk Relative path: CocoaPods-version.yml exists! Returning local because checking is only perfomed in repo update
    [!] CocoaPods could not find compatible versions for pod "firebase_core":
      In Podfile:
        firebase_core (from `.symlinks/plugins/firebase_core/ios`)

    Specs satisfying the `firebase_core (from `.symlinks/plugins/firebase_core/ios`)` dependency were found, but they required a higher minimum deployment target.
                             :
                             :
                             :
Exception: Error running pod install
筆者はこのエラーでもハマりました。
iOS の Podfile 周りは落とし穴が多いです。
解決方法としてこちらの Stack overflow を参照にしました。
Go to ios/ folder, edit Podfile and choose the platorm and version you want to launch. For example for platform ios and version 12.0.
ちなみに Stack overflow では iOS platform version を 12.0 で指定していますが、Xcode12.4 の iOS Development Target は 12.0 は存在せず、12.1 からだったので今回は 12.1 で設定しています。
以上で iOS のプッシュ通知設定の完了です。
おわりに
ここまでが Firebase のプロジェクト設定から iOS/Android の FCM 設定でした。
次回はいよいよアプリの実装です。
アプリの実装編の記事こちらになります。
プッシュ通知の送信、フォアグラウンド、バッググラウンド、アプリのタスクを落としたターミネイト状態でプッシュ通知メッセージを表示する実装を行います。
また、プッシュ通知メッセージをタップしてアプリの特定の画面を開く実装も行います。
最後に開発・ステージング・本番環境別にプッシュ通知を配信する方法の記事を書いたので、より実践的にプッシュ通知を配信したい方はこちらをご覧ください。