
FlutterでAndroidの開発/ステージング/本番環境を切り替える
Flutter で開発、ステージング、本番環境を切り替える方法です。
プロダクト開発だと開発環境の他、本番環境、本番環境により近いステージング環境と 3 種類の環境を用意するケースが多いと思います。
ステージング環境は QA 環境やテスト環境とも呼んだりしますね。
Flutter で環境を切り替えるには Debug build/Release build で切り替える方法や Flavor を使う方法がありますが、今回は dart-define を利用して環境を切り替えてみます。
iOS で開発、ステージング、本番環境を切り替える方法はこちらの記事をご覧ください。
また、dart-define で環境変数を設定して Flutter や iOS のソースコード、Android の AndroidManifest.xml で環境変数の値を使用する記事を以前書きました。
dart-define の環境変数の利用方法をもっと知りたい方はこちらの記事を参考にしてください。
それでは Android で dart-define を利用して環境の切り替え方法を解説していきます。
今回は dart-define で開発/ステージング/本番環境を定義して環境ごとにアプリの表示名、 BundleID やアプリアイコン、Firebase の google-services.json の切り替えをします。
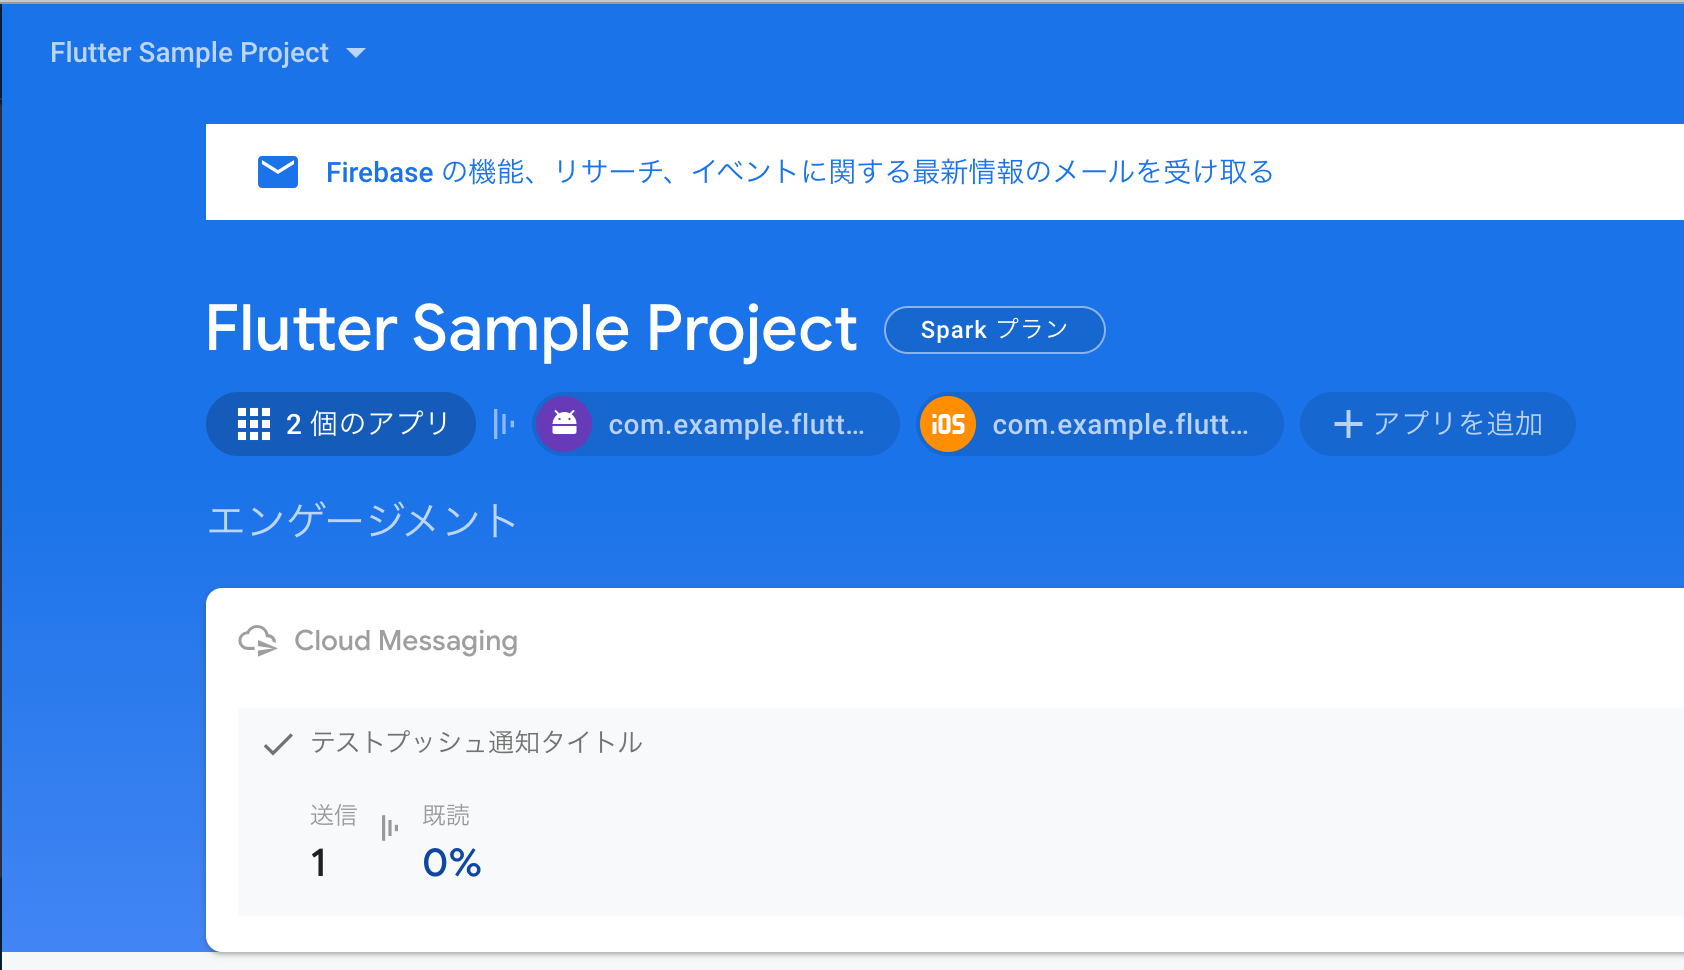
今回 FCM でプッシュ通知をする用途で google-services.json を環境別に出力して切り替えをしたいと思います。
途中で FCM の設定が出てきますが、不要な方は読み飛ばしてください。
また、環境は以下のような構成を実現できるようにします。
- Debug build
- 開発環境
- ステージング環境
- Release build
- ステージング環境
- 本番環境
Debug build は IDE から Run/Debug を実行するか、flutter run --debug を実行した時を指します。
Release build は flutter run --release を実行した時を指します。
flutter run (or build) の引数で dart-define で 開発環境、ステージング環境、本番環境を切り替えます。
前提として、利用する IDE は Android Studio になります。
途中 IDE 特有の設定が出てきますが、VSCode の方は読み替えて頂ければ幸いです。
環境
- macOS Big Sur 11.2.3
- Android Studio 4.1.3
- Flutter 2.0.3
- Dart 2.12.2
IDE に環境変数を設定する
こちらは iOS と共通の設定ですので、本記事の iOS 版であるこちらの記事を参照して設定お願いします。
内容としては --dart-define で以下の環境変数を定義します。
- 開発環境
flutter run --debug --dart-define=BUNDLE_ID_SUFFIX=.dev --dart-define=BUILD_ENV=dev- ステージング環境
flutter run --debug (or --release) --dart-define=BUNDLE_ID_SUFFIX=.stg --dart-define=BUILD_ENV=stg- 本番環境
flutter run –release --dart-define=BUILD_ENV=prodFirebase プロジェクトを作成する
ここからは FCM を利用した開発・ステージング・本番環境別のプッシュ通知を実現する為の手順です。
今回は Firebase の google-services.json を環境別に取得します。
ここでは Firebase プロジェクトが既に作成してあると仮定します。
Firebase のプロジェクトの作成方法は以前の記事を参照ください。
本番環境の google-services.json を取得する
まず Firebase Console を開き Firebase プロジェクトに移動します。
以下のアプリを追加ボタンをクリックして Android を選択します。
今回 Flutter のプロジェクト名は flutter_fcm_push_notify とします。
Android パッケージ名を入力しますが今回サンプルなので com.example.flutter_fcm_push_notify としました。
Google Play Store では com.example のパッケージ名は審査が通らないのでプロダクトで利用する場合は注意しましょう。
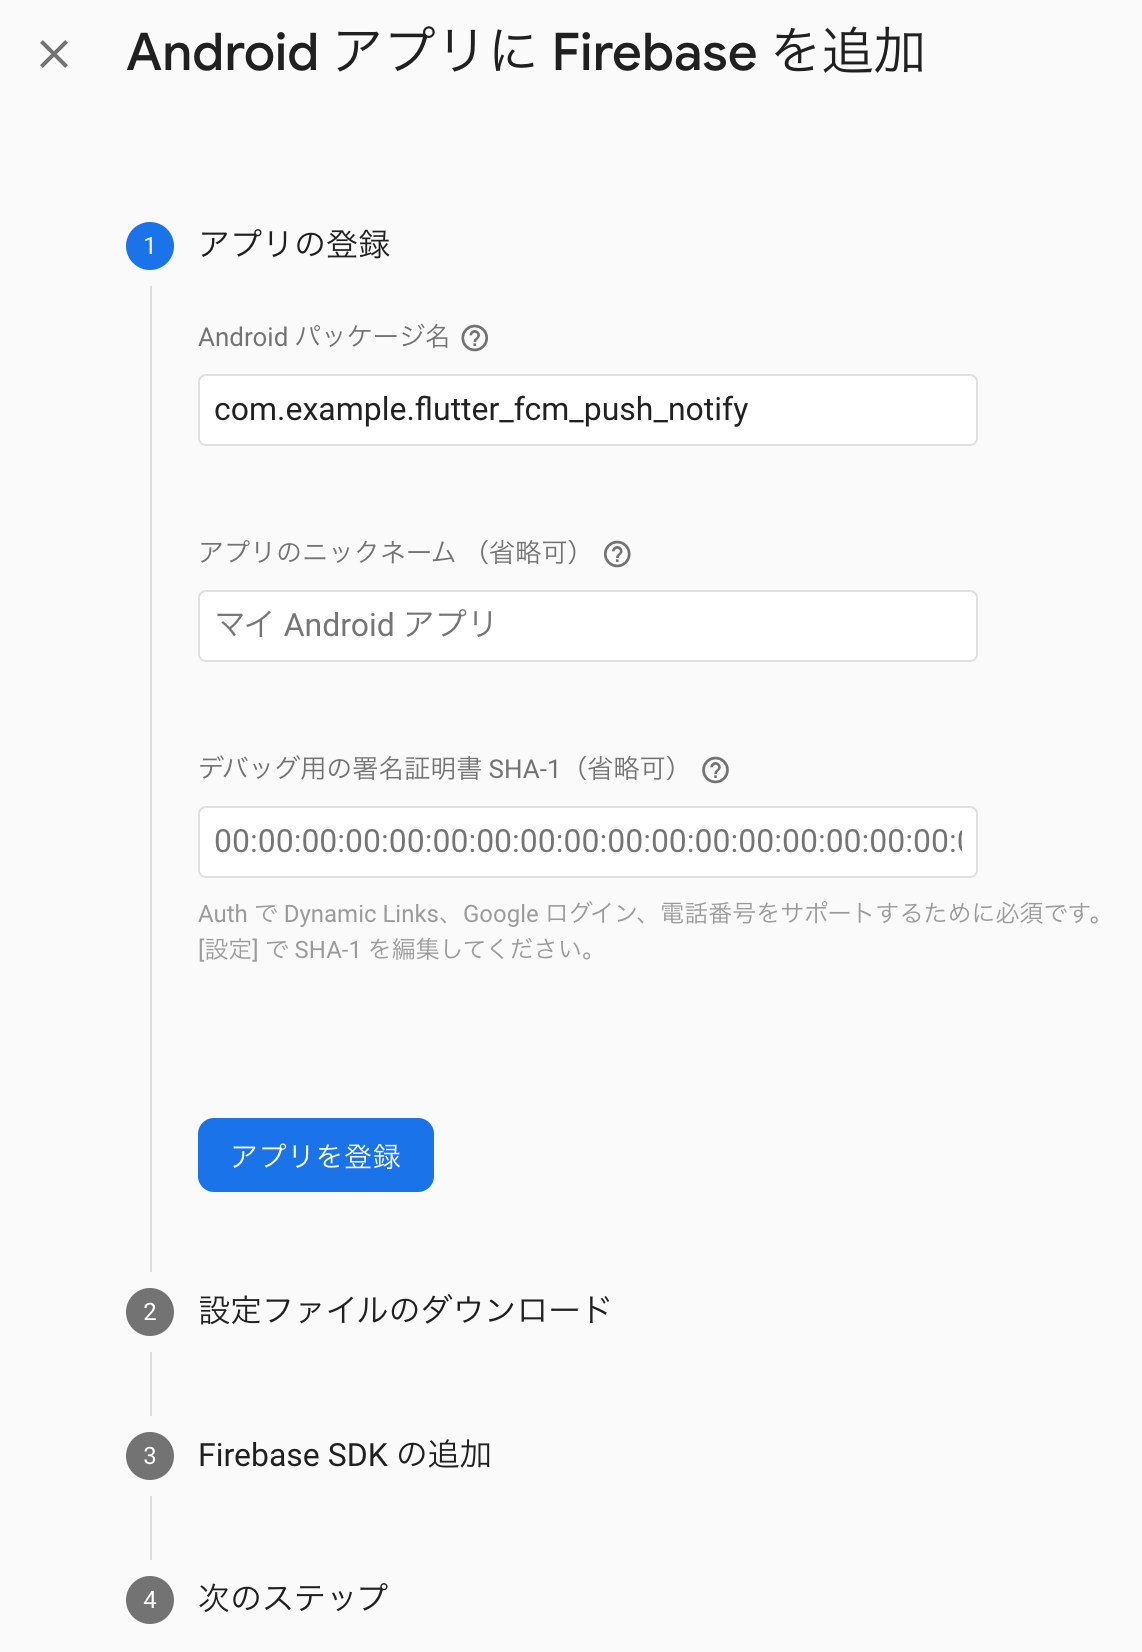
後は何もせず 次へ 押してコンソールへ戻ります。
開発・ステージング環境の google-services.json を取得する
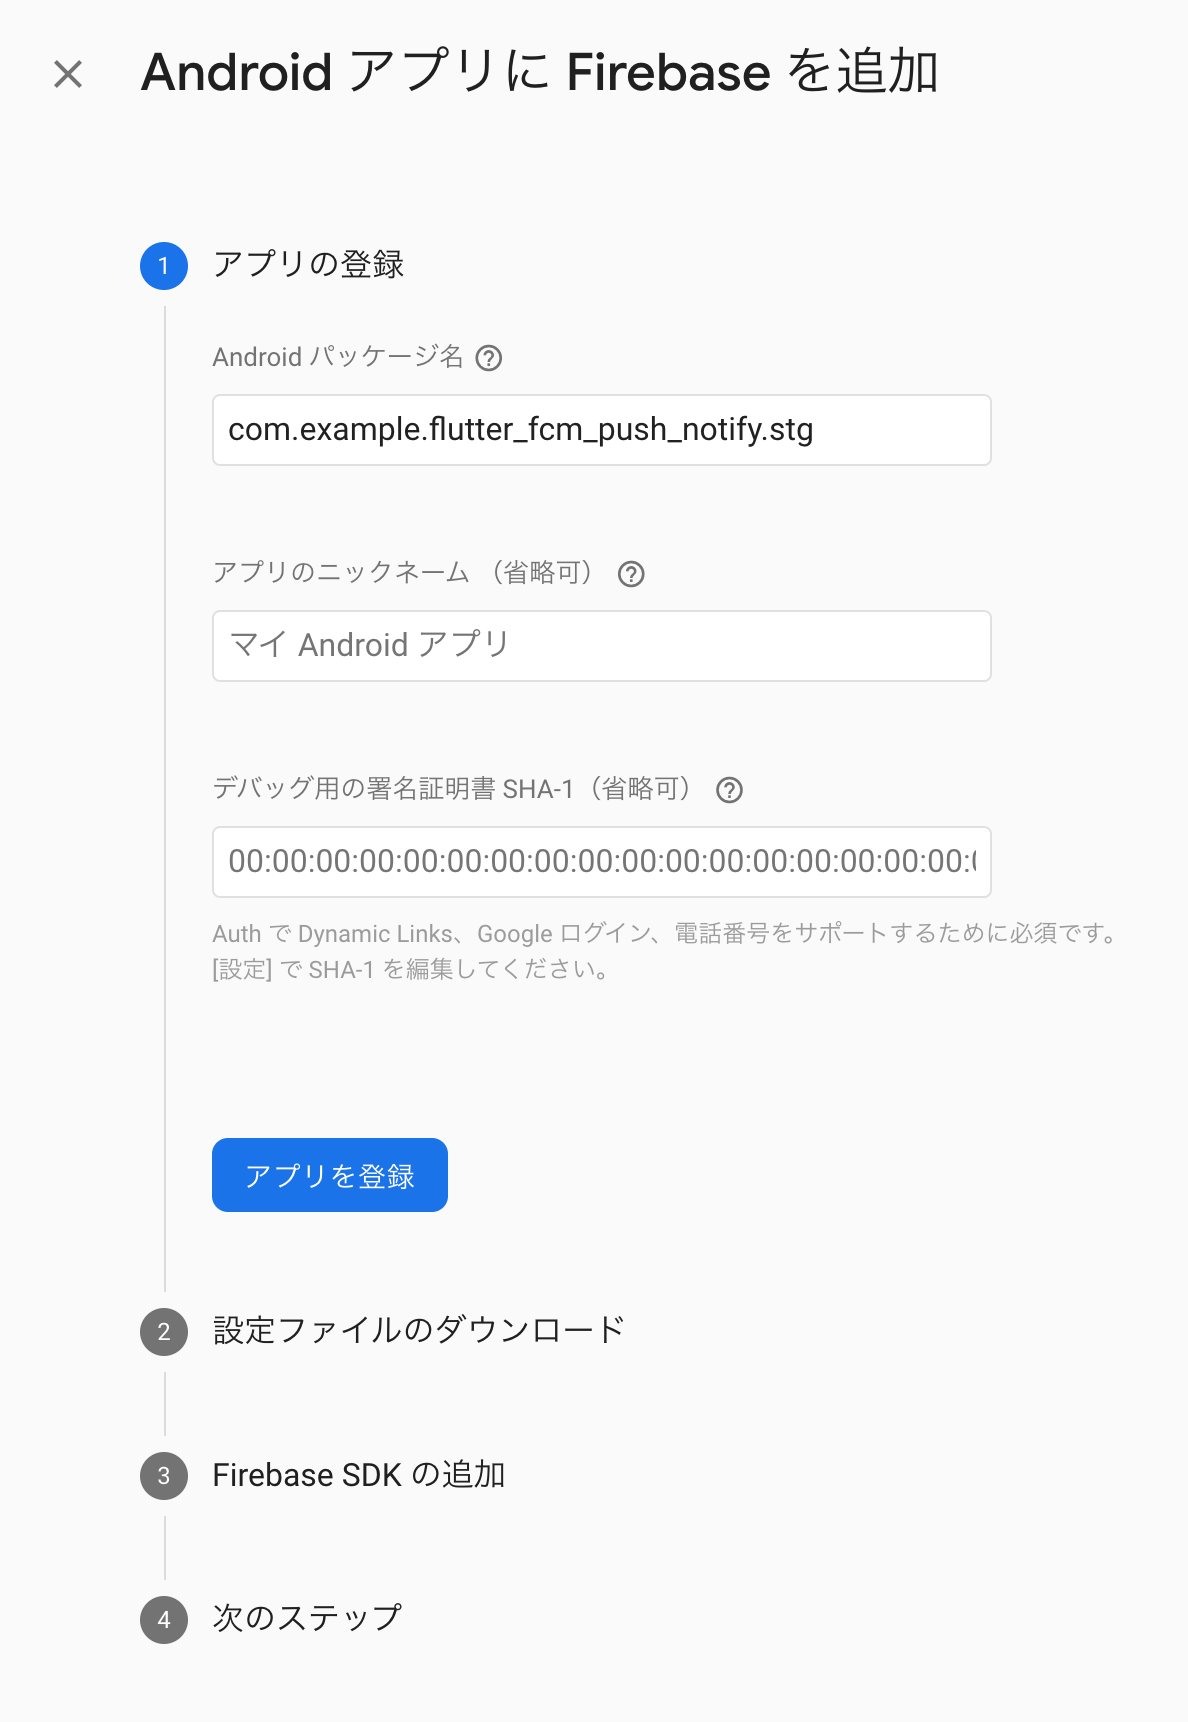
次に同じ要領で、開発環境、ステージング環境用のアプリを登録します。
Android のパッケージ名 はそれぞれ以下を入力します。
- 開発環境
com.example.flutter_fcm_push_notify.dev
- ステージング環境
com.example.flutter_fcm_push_notify.stg
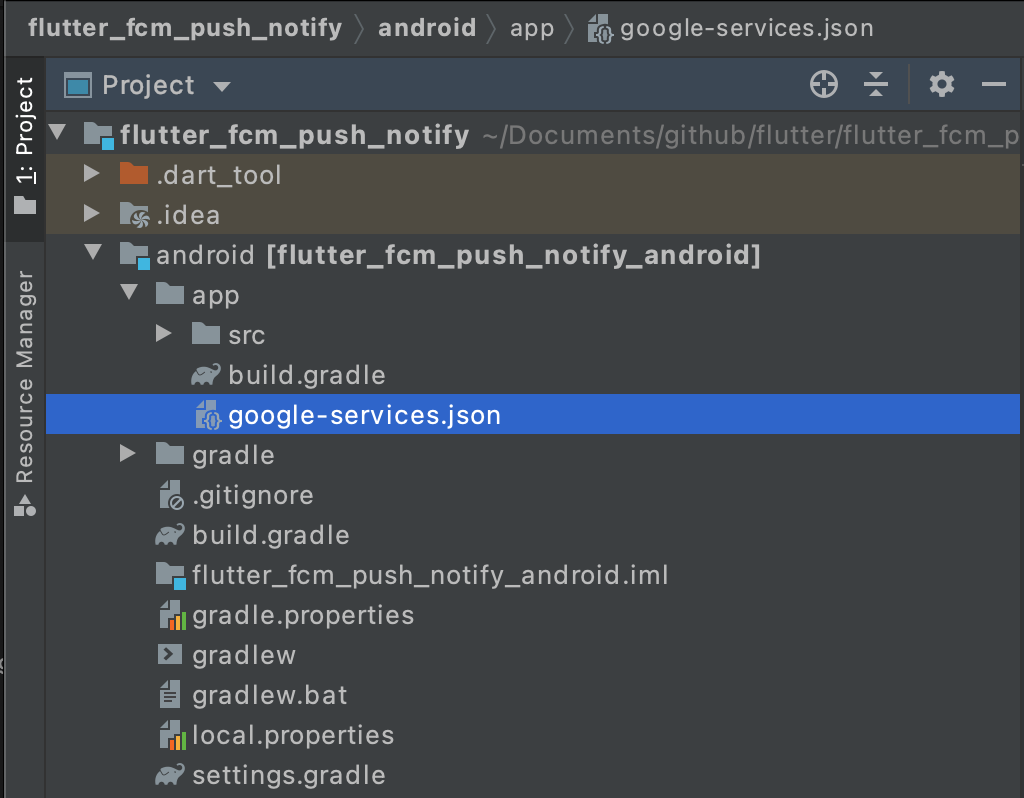
最後にプッシュ通知をする際に必須の設定である google-services.json を DL します。
iOS の GoogleService-Info.plist は各環境でそれぞれ Firebase の設定ファイルが必要でしたが、Android の google-services.json は 1 ファイルに全ての環境の設定が記述されています。
どの環境で google-services.json を DL しても同じファイルなので、どれかの環境一つの google-services.json を利用します。
DL した google-services.json は プロジェクトの android/app/ の下に置きます。
環境別のアプリアイコンを設定する
環境別にアプリアイコンを表示する為に、開発、ステージング、本番環境別のアプリアイコンをプロジェクトに設定します。
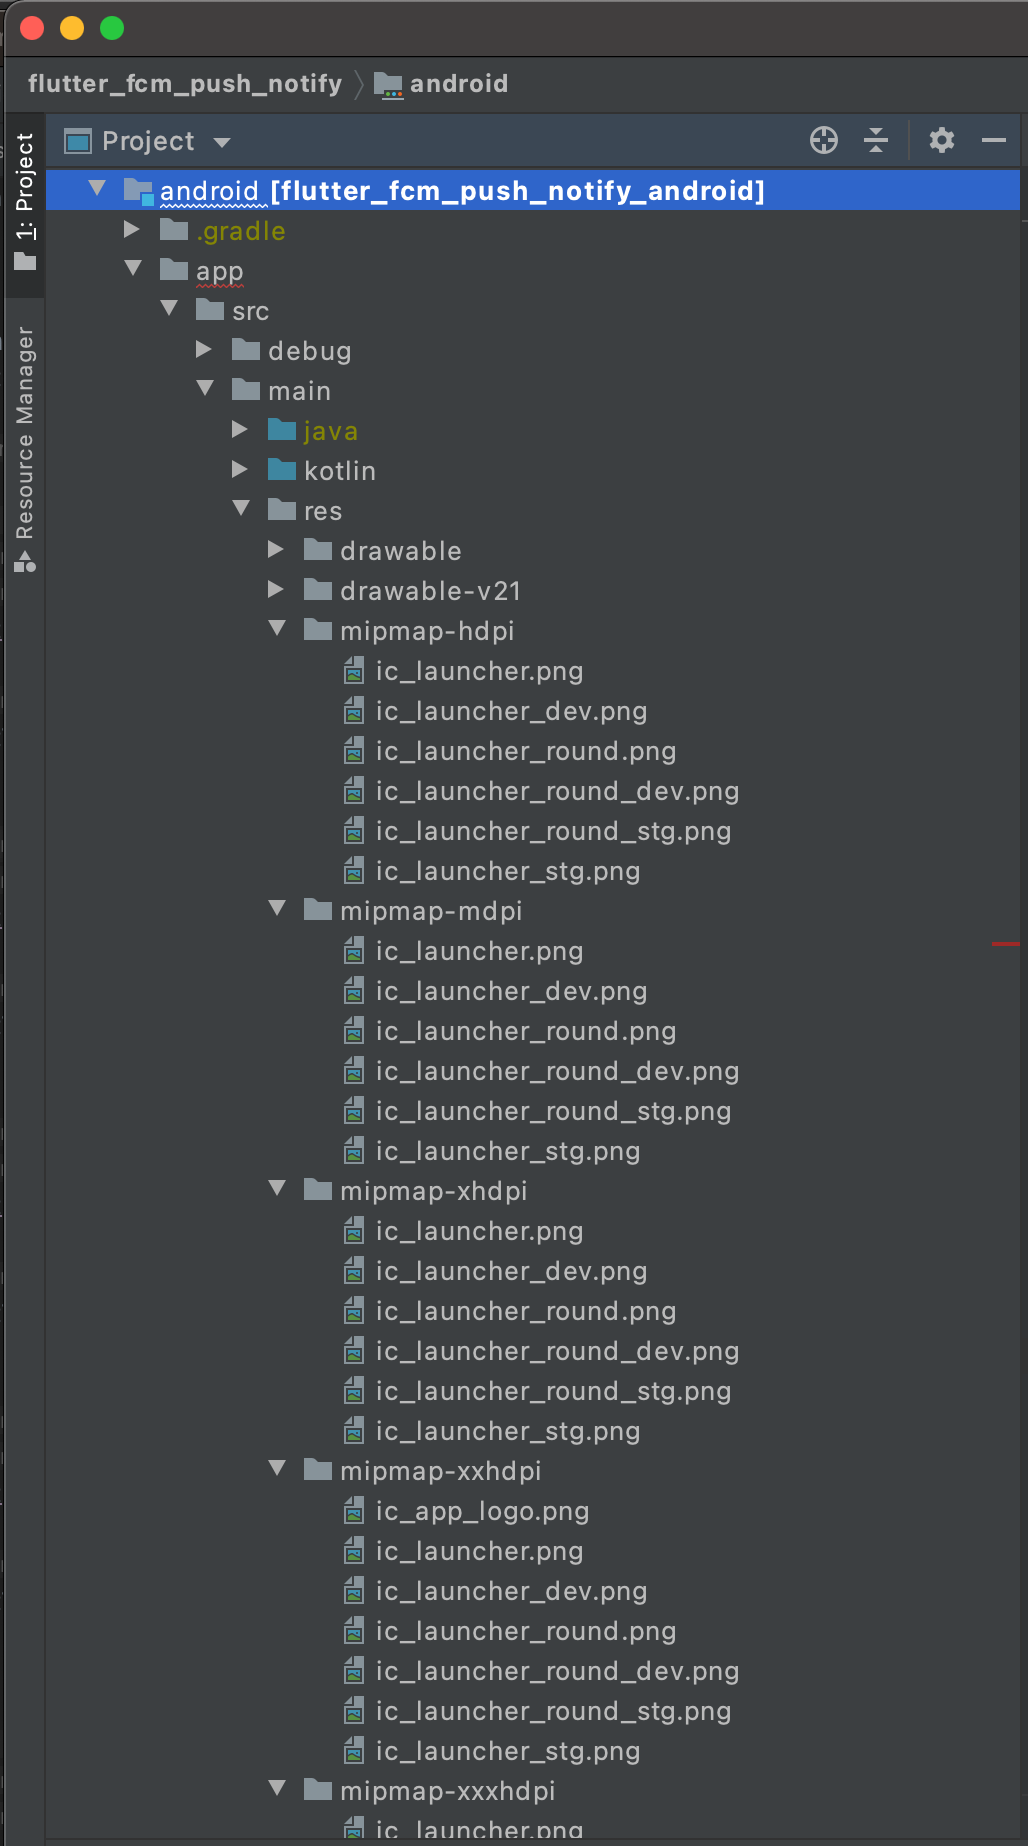
以下の階層に環境別 x サイズ別のアイコンをコピーする必要があります。
- android/app/src/main/res/mipmap-hdpi
- android/app/src/main/res/mipmap-mdpi
- android/app/src/main/res/mipmap-xhdpi
- android/app/src/main/res/mipmap-xxhdpi
- android/app/src/main/res/mipmap-xxxhdpi
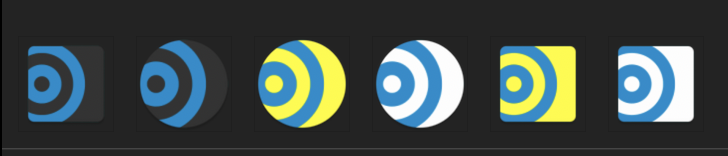
各環境別に以下命名規則のファイルを用意します。
- 開発環境
ic_launcher_dev.pngic_launcher_round_dev.png
- ステージング環境
ic_launcher_stg.pngic_launcher_round_stg.png
- 本番環境
ic_launcher.pngic_launcher_round.png
iclauncher アイコンは正方形のアイコンで、iclauncher_round は Android7.1 以降で使用する丸形アイコンです。
以下のように環境別に色分けしたアイコンを用意します。
環境別の iclauncher と iclauncher_round はそれぞれ以下サイズ別のアイコンを用意します。
- mipmap-hdpi
- 48x48px
- mipmap-mdpi
- 72x72px
- mipmap-xdpi
- 96x96px
- mipmap-xxdpi
- 144x144px
- mipmap-xxxdpi
- 192x192px
流石にこれを自前で用意するのは骨が折れるので、各アイコンを自動生成する flutter_launcher_icons というコマンドラインツールがあります。
筆者は既に手元にあるアイコンを使用したのでこちらのツールは使ったことがないのですが、iOS のアイコンも自動で作れそうなので今度試してみたいと思います。
話を戻して各階層にアイコンをコピーした後はこのような状態になります。
環境変数に応じて google-services.json を書き換えるスクリプトを記述する
android/app/build.gradle ファイルを開いて、以下の Start adding 〜 End adding のスクリプトを追記します。
def flutterRoot = localProperties.getProperty('flutter.sdk')
if (flutterRoot == null) {
    throw new GradleException("Flutter SDK not found. Define location with flutter.sdk in the local.properties file.")
}

def flutterVersionCode = localProperties.getProperty('flutter.versionCode')
if (flutterVersionCode == null) {
    flutterVersionCode = '1'
}

def flutterVersionName = localProperties.getProperty('flutter.versionName')
if (flutterVersionName == null) {
    flutterVersionName = '1.0'
}

// ========================== Start adding ============================
// 環境変数配列
def dartEnvironmentVariables = [
        BUNDLE_ID_SUFFIX: null,
        BUILD_ENV: ''
]
// --dart-define読み込み
if (project.hasProperty('dart-defines')) {
    dartEnvironmentVariables = dartEnvironmentVariables + project.property('dart-defines')
            .split(',')
            .collectEntries { entry ->
                def pair = URLDecoder.decode(entry, 'UTF-8').split('=')
                [(pair.first()): pair.last()]
            }
}
// デフォルトアプリ表示名
def appName = "App"
// デフォルトLauncherIconパス
def launcherIconPath = "@mipmap/ic_launcher"
def launcherRoundIconPath = "@mipmap/ic_launcher_round"
if (dartEnvironmentVariables.BUNDLE_ID_SUFFIX != null) {
    appName += dartEnvironmentVariables.BUNDLE_ID_SUFFIX
    launcherIconPath += "_${dartEnvironmentVariables.BUILD_ENV}"
    launcherRoundIconPath += "_${dartEnvironmentVariables.BUILD_ENV}"
}
// ========================== End adding ============================

apply plugin: 'com.android.application'
apply plugin: 'kotlin-android'
apply from: "$flutterRoot/packages/flutter_tools/gradle/flutter.gradle"
apply plugin: 'com.google.gms.google-services'

android {
    compileSdkVersion 30

    sourceSets {
        main.java.srcDirs += 'src/main/kotlin'
    }

    defaultConfig {
        // TODO: Specify your own unique Application ID (https://developer.android.com/studio/build/application-id.html).
        applicationId "com.example.flutter_fcm_push_notify"
        minSdkVersion 23 // 16 -> 23
        targetSdkVersion 30
        versionCode flutterVersionCode.toInteger()
        versionName flutterVersionName
        // ========================== Start adding ============================
        if (dartEnvironmentVariables.BUNDLE_ID_SUFFIX != null) {
            applicationIdSuffix dartEnvironmentVariables.BUNDLE_ID_SUFFIX
        }
        manifestPlaceholders = [
                appName: appName,
                launcherIcon: launcherIconPath,
                roundLauncherIcon: launcherRoundIconPath
        ]
        // ========================== End adding ============================
    }

    buildTypes {
        release {
            // TODO: Add your own signing config for the release build.
            // Signing with the debug keys for now, so `flutter run --release` works.
            signingConfig signingConfigs.debug
        }
    }
}
簡単に解説ですが、まず以下のスクリプトで --dart-define 環境変数で設定した BUNDLE_ID_SUFFIX と BUILD_ENV を dartEnvironmentVariables 配列に格納します。
// 環境変数配列
def dartEnvironmentVariables = [
        BUNDLE_ID_SUFFIX: null,
        BUILD_ENV: ''
]
// --dart-define読み込み
if (project.hasProperty('dart-defines')) {
    dartEnvironmentVariables = dartEnvironmentVariables + project.property('dart-defines')
            .split(',')
            .collectEntries { entry ->
                def pair = URLDecoder.decode(entry, 'UTF-8').split('=')
                [(pair.first()): pair.last()]
            }
}
Flutter2.2 からは --dart-define の値が Base64 で encode されるようになりました。
Flutter2.2 以降の方は以下を利用してください。
// 環境変数配列
def dartEnvironmentVariables = [
        BUNDLE_ID_SUFFIX: null,
        BUILD_ENV: ''
]
// --dart-define読み込み
if (project.hasProperty('dart-defines')) {
    dartEnvironmentVariables = dartEnvironmentVariables + project.property('dart-defines')
            .split(',')
            .collectEntries { entry ->
                def pair = new String(entry.decodeBase64(), 'UTF-8').split('=')
                [(pair.first()): pair.last()]
            }
}
次に以下のスクリプトで BUNDLE_ID_SUFFIX の環境変数が取得できた場合、デフォルトのアプリ表示名、アプリアイコン名に環境変数を付与しています。
例えば開発環境の場合、アプリ表示名は App.dev、アプリアイコン名は @mipmap/ic_launcher_dev @mipmap/ic_launcher_round_dev となります。
appName はプロジェクトにより適宜書き換えてください。
// デフォルトアプリ表示名
def appName = "App"
// デフォルトLauncherIconパス
def launcherIconPath = "@mipmap/ic_launcher"
def launcherRoundIconPath = "@mipmap/ic_launcher_round"
if (dartEnvironmentVariables.BUNDLE_ID_SUFFIX != null) {
    appName = dartEnvironmentVariables.BUNDLE_ID_SUFFIX
    launcherIconPath += "_${dartEnvironmentVariables.BUILD_ENV}"
    launcherRoundIconPath += "_${dartEnvironmentVariables.BUILD_ENV}"
}
最後に defaultConfig 内に以下スクリプトを追記します。
        if (dartEnvironmentVariables.BUNDLE_ID_SUFFIX != null) {
            applicationIdSuffix dartEnvironmentVariables.BUNDLE_ID_SUFFIX
        }
        manifestPlaceholders = [
                appName: appName,
                launcherIcon: launcherIconPath,
                roundLauncherIcon: launcherRoundIconPath
        ]
BUNDLE_ID_SUFFIX の環境変数が取得できた場合、applicationIdSuffix に環境変数を設定して Firebase の google-services.json 内に記述された Android パッケージ名に対応させます。
applicationIdSuffix を追加すると、パッケージ名の末尾に任意の識別子を追加できます。
Firebase でアプリを追加した時に Android パッケージ名を環境別に設定しましたね。
- 開発環境
com.example.flutter_fcm_push_notify.dev
- ステージング環境
com.example.flutter_fcm_push_notify.stg
- 本番環境
com.example.flutter_fcm_push_notify
applicationIdSuffix でこのパッケージ名に対応させる訳です。
最後に manifestPlaceholders を利用して、環境変数から取得した値を任意のビルド変数で定義して AndroidManifest.xml から取得できるようにします。
アプリ表示名とアプリアイコンはこの後 AndroidManifest.xml で設定するのでその前処理です。
AndroidManifest.xml にアプリ表示名/アプリアイコンを設定する
android/app/src/main/AndroidManifest.xml を開いて、application タグ内に android:label android:icon android:roundIcon を追記します。
android:label や android:icon がデフォルトで値が入っている場合以下のように書き換えます。
<manifest xmlns:android="http://schemas.android.com/apk/res/android"
    package="com.example.flutter_fcm_push_notify">
   <application
       android:label="${appName}"
       android:icon="${launcherIcon}"
       android:roundIcon="${roundLauncherIcon}">
先程 build.gradle で manifestPlaceholders に設定した appName launcherIcon roundLauncherIcon 変数を設定して環境により動的に値を変更します。
環境変数に応じて API の向き先を変更する
プロダクトの開発・ステージング・本番環境別に API のエンドポイントが別れてるユースケースです。
環境変数に応じて API の向き先を変更するには Dart ソースコード内で String.fromEnvironment メソッドを利用して環境変数を取得して出し分けを行います。
ちなみに bool の値は bool.fromEnvironment で取得します。
bool 値は以下のように設定できます。
--dart-define=BOOL_VALUE=true取得フォーマットはこちらです。
String.fromEnvironment('STRING_VALUE');
bool.fromEnvironment('BOOL_VALUE');
環境変数を複数の箇所から利用する場合を想定して以下のように纏めて宣言しておくと使いやすいです。
class EnvironmentVariables {
  static const environment = String.fromEnvironment('BUILD_ENV');
  static const isDebugging = bool.fromEnvironment('IS_DEBUGGING');
}
環境変数は以下の BUILD_ENV の値を利用します。
--dart-define=BUILD_ENV=XXXプログラムからはこんな感じで呼び出せます。
class EnvironmentVariables {
  static const environment = String.fromEnvironment('BUILD_ENV');
}

class Environment {
  static const development = 'dev';
  static const staging = 'stg';
  static const production = 'prod';
}

class ApiEndPoint {
  static const development = 'http://localhost:8080/endpoint';
  static const staging = 'https://api-stg.sample.com/endpoint';
  static const production = 'https://api.sample.com/endpoint';
}

void main() {
  const apiEndpoint =
      (EnvironmentVariables.environment == Environment.development)
          ? ApiEndPoint.development
          : ((EnvironmentVariables.environment == Environment.staging)
              ? ApiEndPoint.staging
              : ApiEndPoint.production);

  print('ApiEndPoint: $apiEndpoint');
                 :
                 :
                 :
}
もしくはエンドポイント自体を隠蔽する為に dart-define で定義する方法もあります。
--dart-define=API_URL=http://localhost:8080/endpointclass EnvironmentVariables {
static const apiUrl = String.fromEnvironment('API_URL');
}Http パッケージで通信する例です。
http.get(EnvironmentVariables.apiUrl);動作確認
それでは動作確認を行います。
Debug Build で開発環境を実行するには IDE から develop を選択して Run or Debug するか以下のコマンドを実行します。
flutter run --debug --dart-define=BUNDLE_ID_SUFFIX=.dev --dart-define=BUILD_ENV=dev次に Debug Build でステージング環境を実行するには IDE から staging を選択して Run or Debug するか以下コマンドを実行します。
flutter run --debug --dart-define=BUNDLE_ID_SUFFIX=.stg --dart-define=BUILD_ENV=stgRelease Build でステージング環境を実行するには以下コマンドを実行します。
flutter run --release --dart-define=BUNDLE_ID_SUFFIX=.stg --dart-define=BUILD_ENV=stgRelease Build で本番環境を実行するには以下コマンドを実行します。
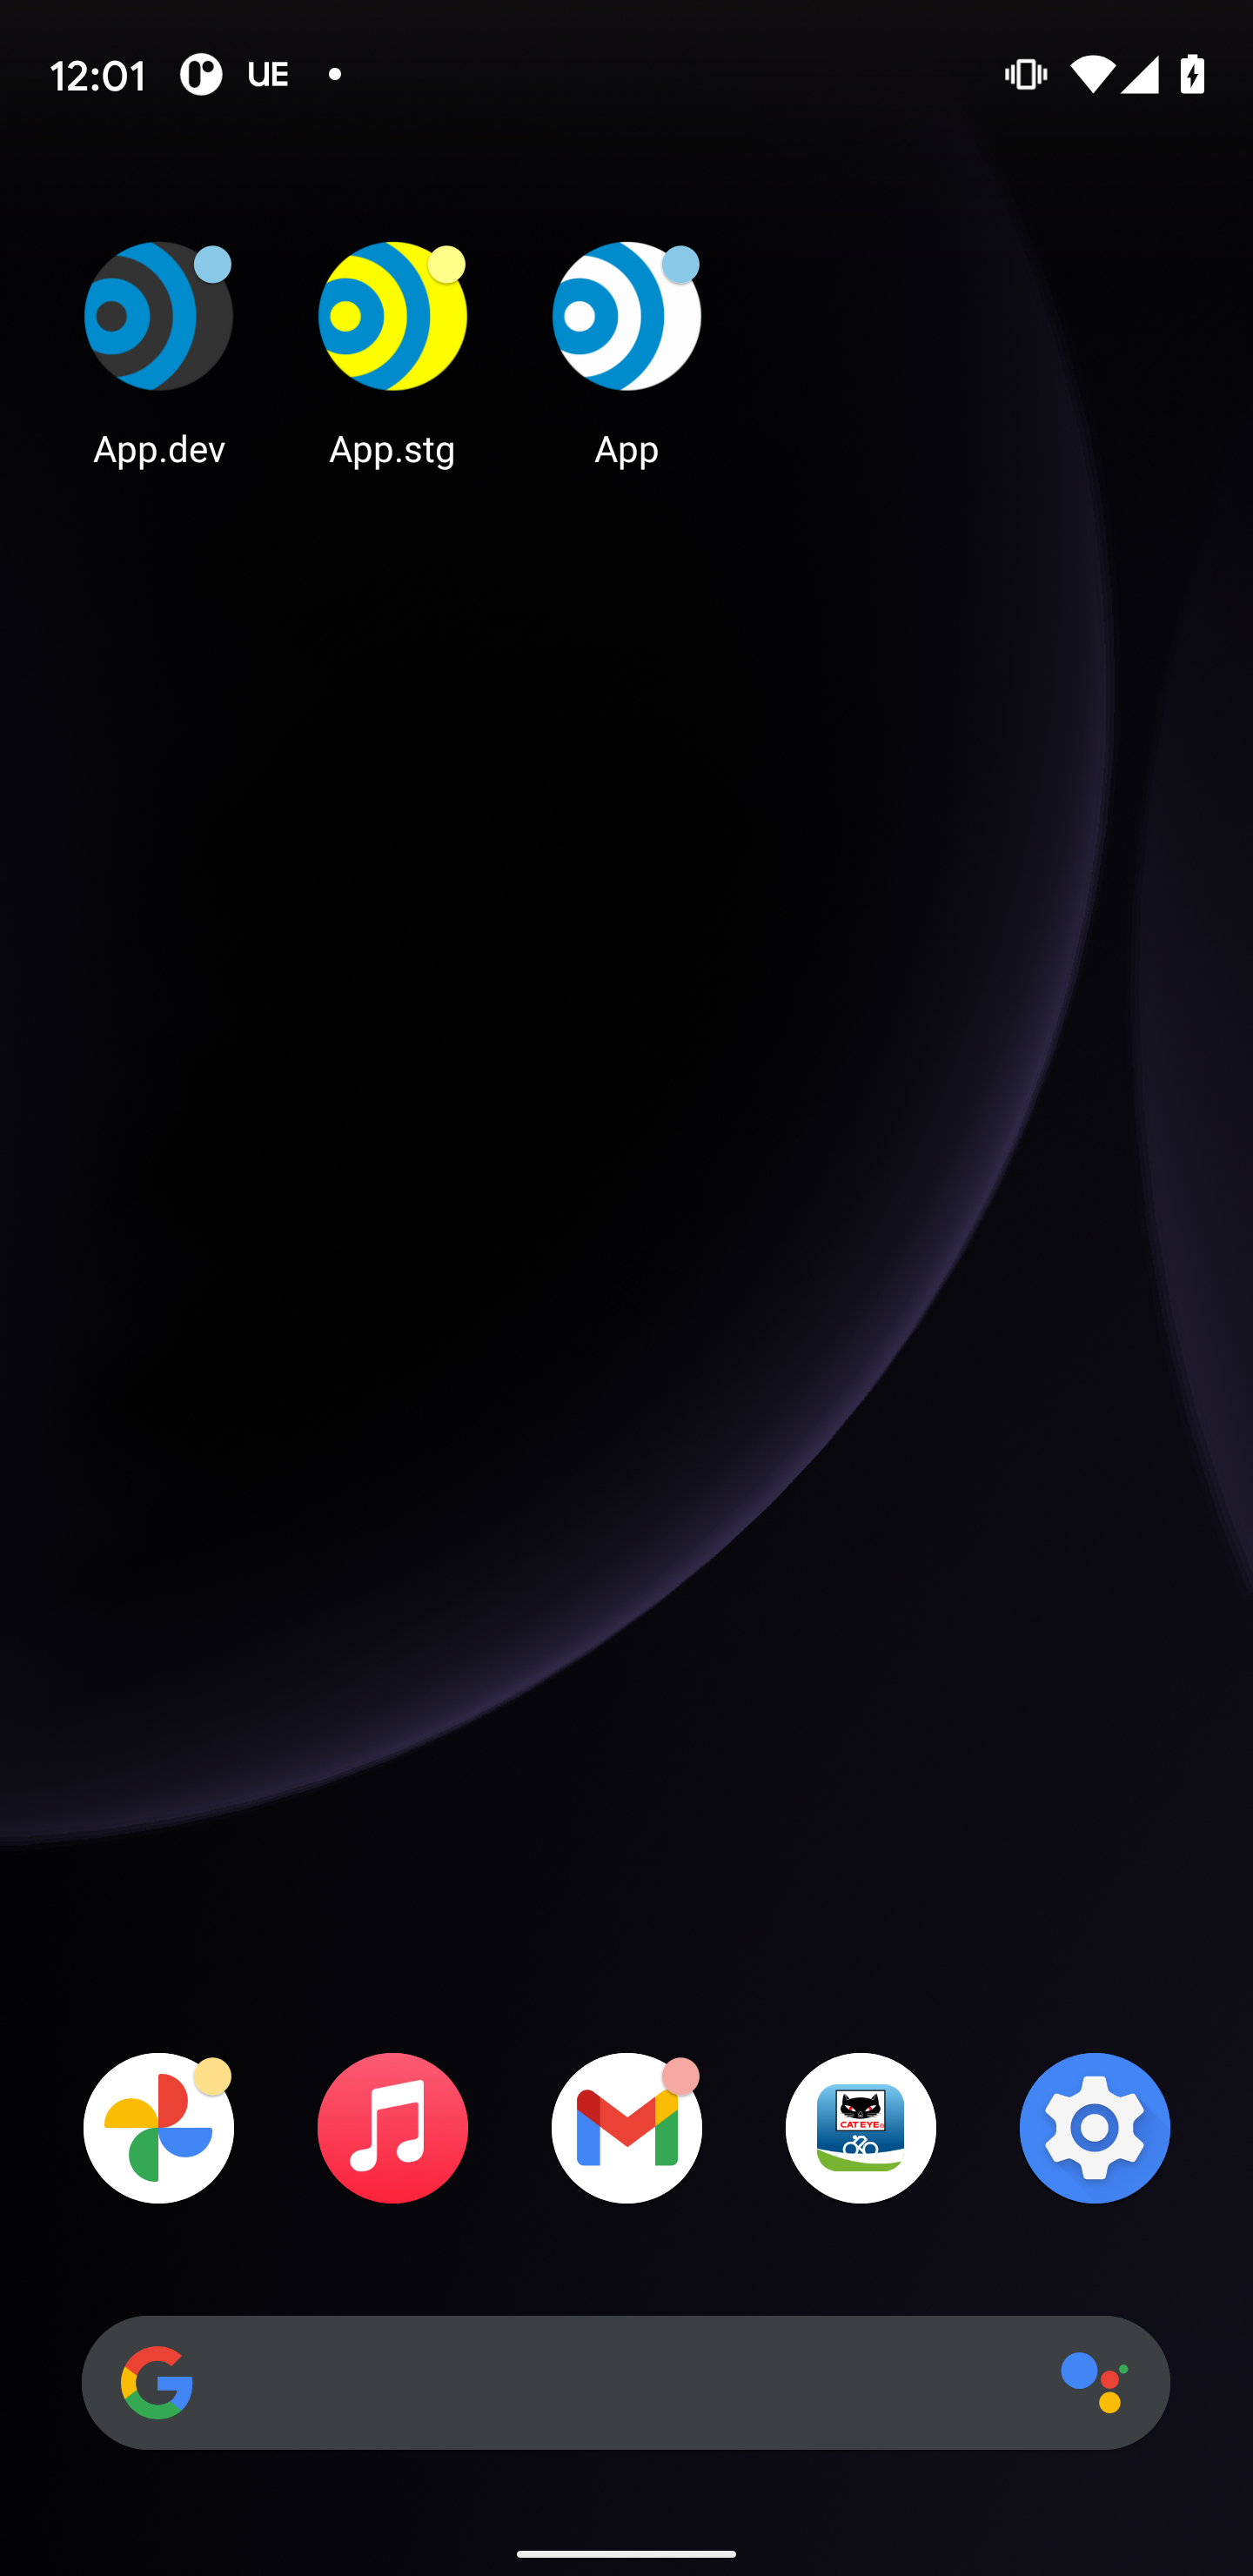
flutter run --release --dart-define=BUILD_ENV=prodそれぞれ実行すると以下のように環境別でアプリ名が設定され、アプリアイコンが色分けして表示されます。
おわりに
筆者は Flutter 初心者ですがなんとか開発、ステージング、本番環境の切り替えを行うことができました。
もっといい方法があるよ、という方はぜひ Twitter で DM していただくか Contact で連絡頂けると嬉しいです。
最後に 再掲ですが iOS で開発、ステージング、本番環境を切り替える方法がまだの方はこちらの記事をご覧ください。